How to use AC Dimmer for Home Assistant
1. Product Features
- Main Controller: ESP32
- Dimmer Controller: STM32G030F6
- Power Supply: On-board AC-DC module, no external DC power supply needed.
- Safety Design: On-board relay to completely cut off current, preventing the "ghosting" or faint glow of some LEDs when off.
- Voltage Compatibility: AC 110V ~ 230V, with automatic frequency adaptation.
- Maximum Load: 2KW
2. Prerequisites
Hardware:
- Raspberry Pi 4 or Raspberry Pi 3 Model B(Model A does not have enough RAM)with power supply.
- The Makerfabs AC Dimmer module.
- A dimmable AC lamp or bulb to act as the load.
- A USB Type-C data cable.
- A screwdriver for wiring.
Software:
- An SSH client (e.g., PuTTY, Termius, or your system's built-in terminal).
- A modern web browser (Chrome or Edge recommended).
- ESPHome Version: This tutorial is based on
2025.7.xor newer.
3. Preparation of Raspberry Pi
At first, we need a device equipped with Home Assistant system, and which we choose is DIY with Raspberry Pi.
Please follow the steps below to complete the Raspberry Pi configuration
- Step1: Install Raspberry Pi OS
- Step2: Install Docker on Raspberry Pi
- Step3: Install Home Assistant and ESPHome with Docker
4. ESPHome Device Configuration
1.Open a web browser and navigate to your ESPHome web UI at http://<YOUR_RASPBERRY_PI_IP>:6052.
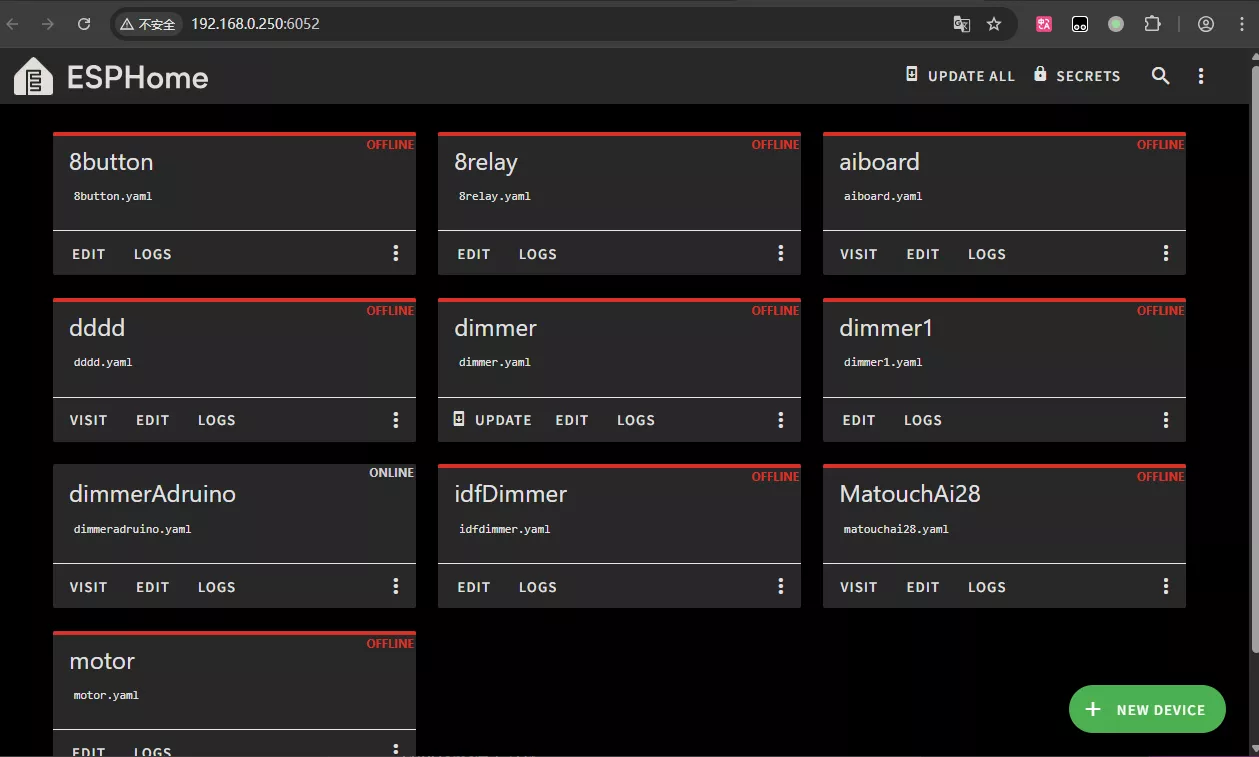
2.Click the “NEW DEVICE” button in the bottom-right corner, then click “Continue”.
3.Give your device a name (e.g., ac_dimmer) and enter your Wi-Fi credentials.

4.On the device type selection screen, choose “ESP32”.

5.Click “SKIP” to bypass the initial installation and return to the ESPHome dashboard.
6.Upload Custom Components: Use an SCP client (like WinSCP) or the scp command-line tool to upload the entire common_components folder to your ESPHome config directory on the Raspberry Pi (e.g., /home/pi/docker/esphome/config/).
7.Edit the YAML Configuration File:
-
Back in the ESPHome UI, click the “EDIT” button on the
ac_dimmercard. -
At the top of the file, under
esphome:, add theexternal_componentsdeclaration. Pay attention to indentation.external_components: - source: type: local path: common_components -
Next, copy the entire contents of the
dimmer.yamlfile provided by Makerfabs and paste it at the very end of the file.
8.Click “SAVE” to save your changes, then click “CLOSE” to exit the editor.
5. Compiling and Flashing the Firmware
1.On the ESPHome dashboard, click the three dots on the ac_dimmer card and select “Install”.
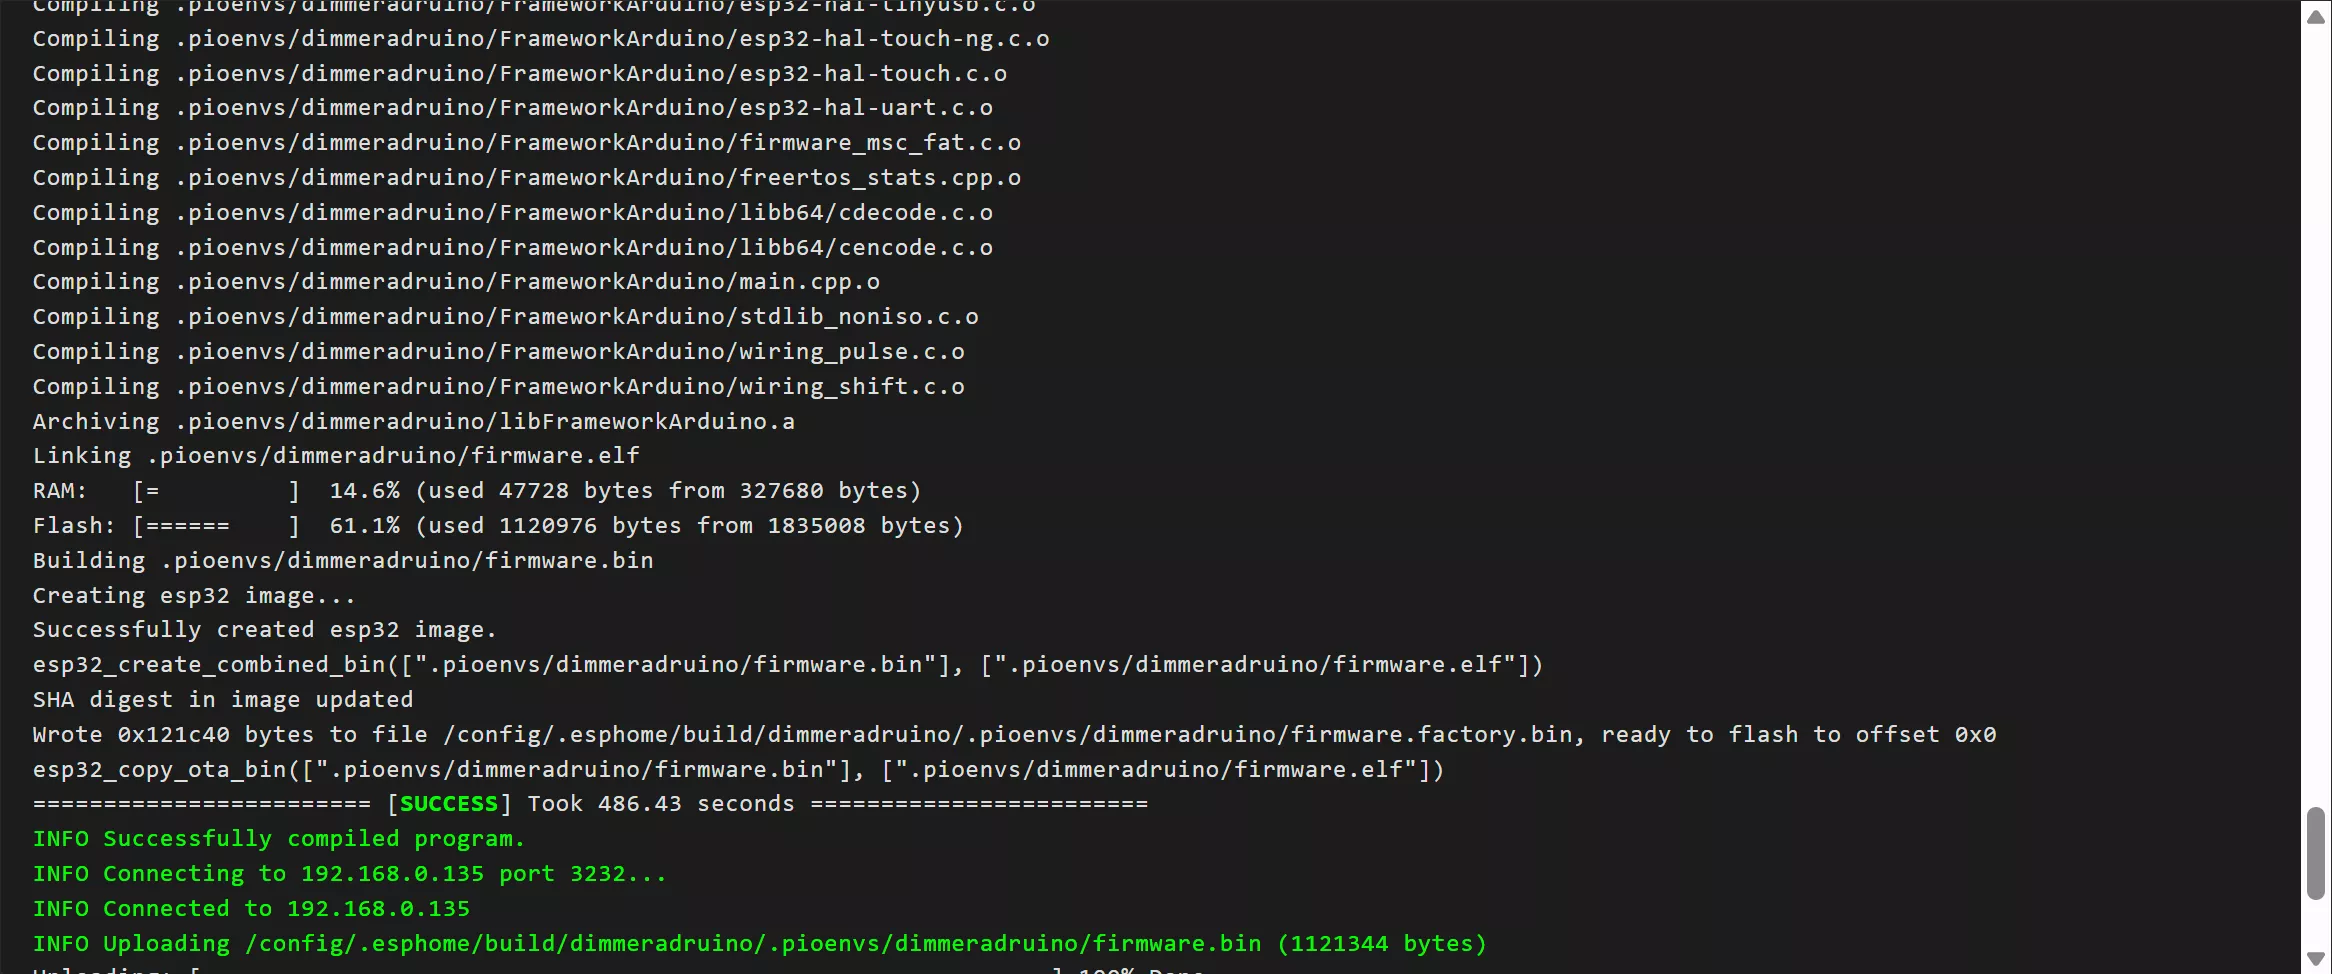
2.In the pop-up window, choose “Manual Download”, then select “Modern format”. ESPHome will begin compiling the firmware online. Please be patient.
3.Once compilation is successful, your browser will automatically download a .bin firmware file.
4.Flashing the Firmware for the First Time:
-
Connect the AC Dimmer module to your computer using the USB-C cable.
-
In your browser, navigate to the ESPHome Web Flasher: https://web.esphome.io/

-
Click “CONNECT” and select the appropriate COM port for your device from the pop-up list.

-
After connecting, click “INSTALL”, choose the
.binfile you just downloaded, and click “INSTALL” again to begin flashing.
-
Flashing failed? Press and hold the “Flash” button, then press and release the “Reset” button, and finally release the “Flash” button. Then try again.
5.After a successful flash, click “LOGS” to view the device's output. Wait for it to connect to your Wi-Fi, and you will see its assigned IP address in the logs. Make a note of this IP address.
6. Home Assistant Integration
1.Open your Home Assistant UI at http://<YOUR_RASPBERRY_PI_IP>:8123.
2.Home Assistant will often auto-discover new devices. If you see a notification, simply click “CONFIGURE”.
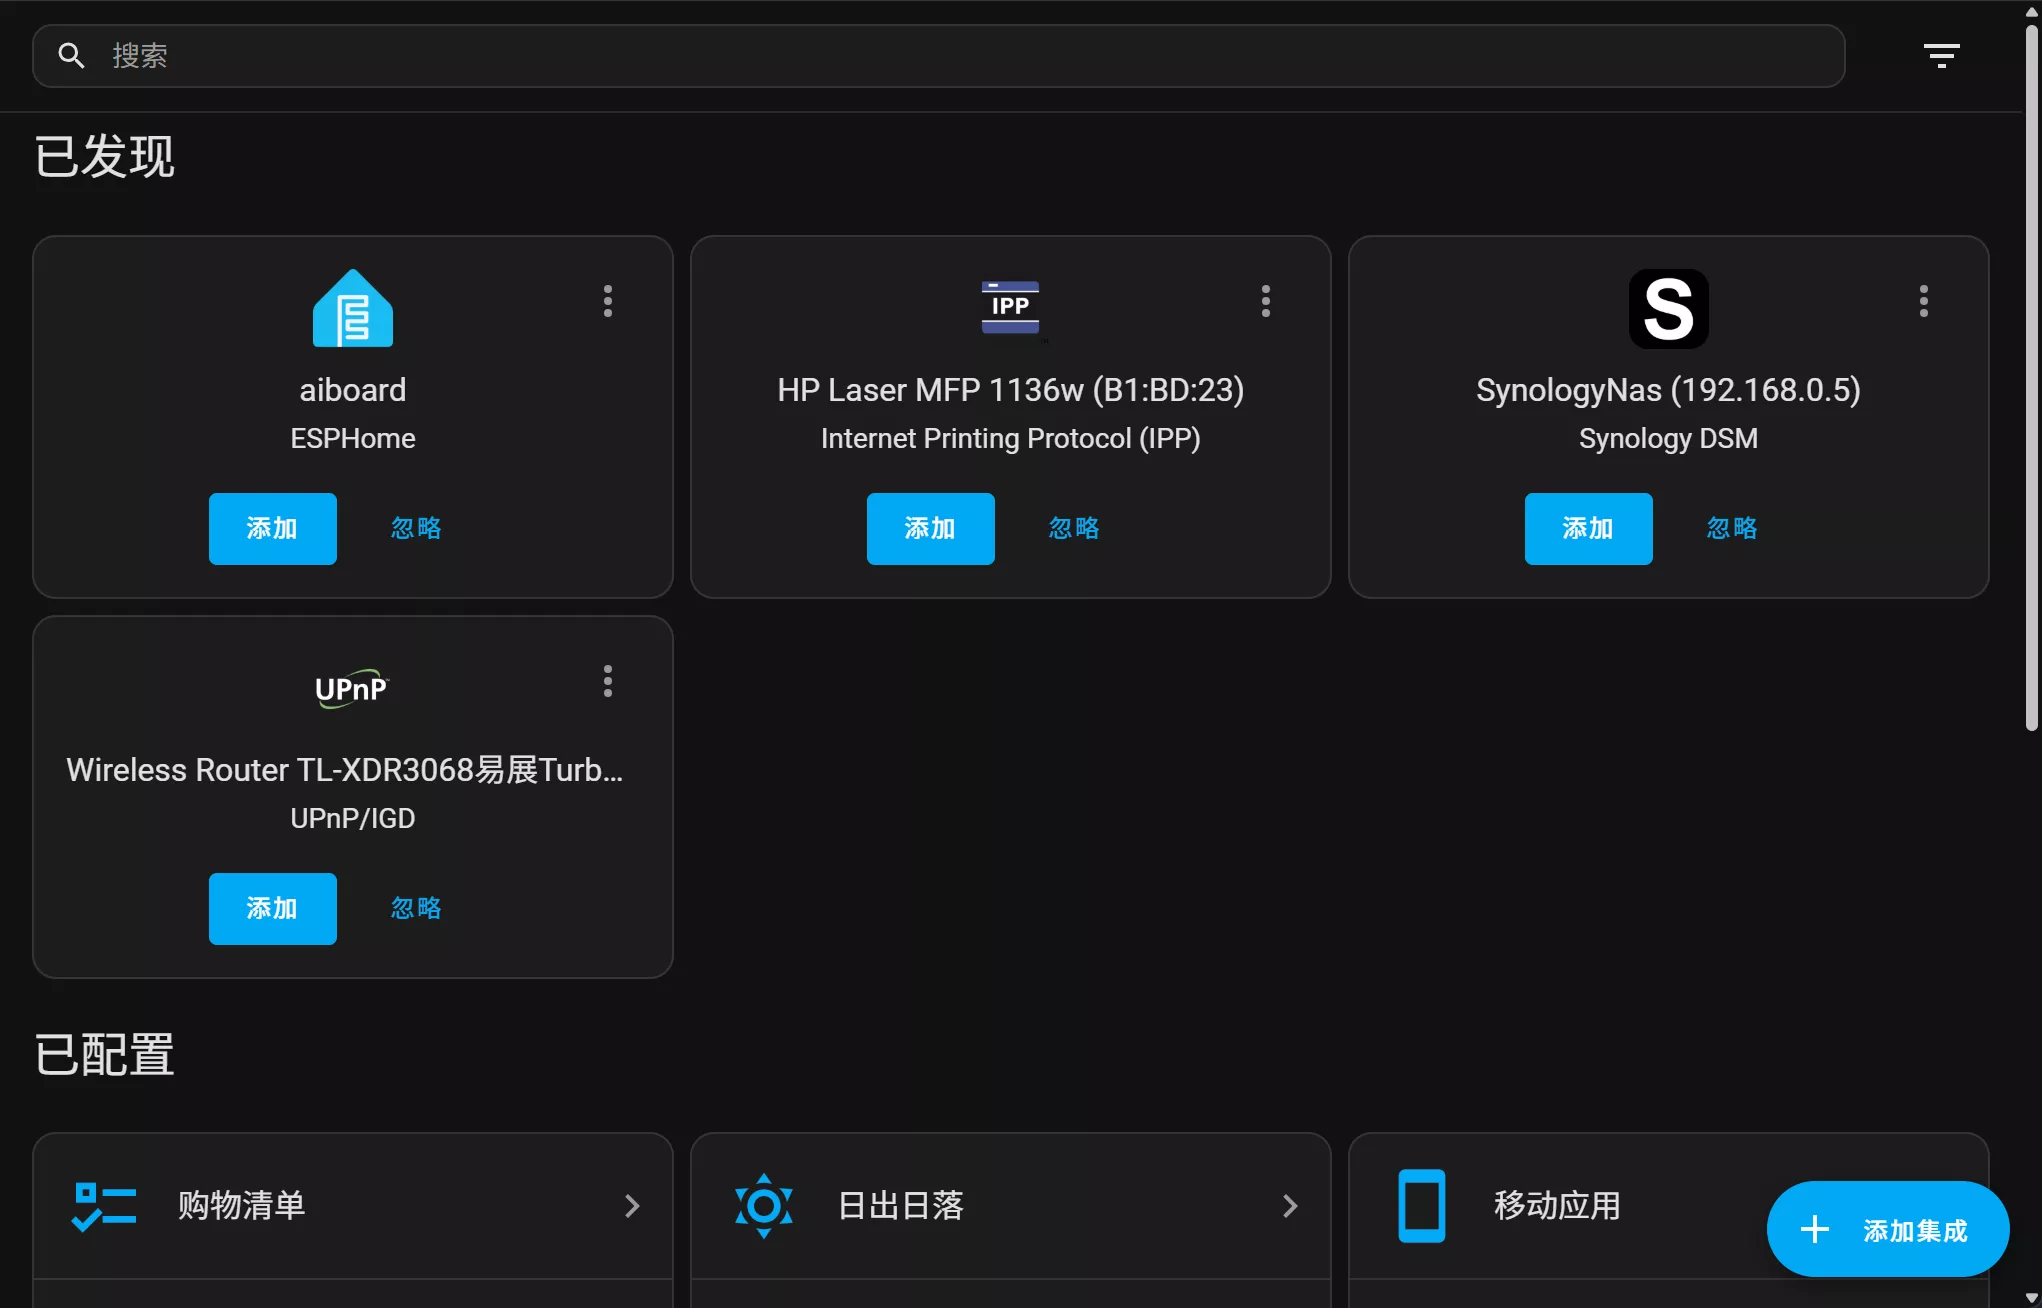
3.If the device is not discovered automatically, add it manually:
- Go to “Settings” > “Devices & Services”.
- Click “ADD INTEGRATION”, search for, and select “ESPHome”.
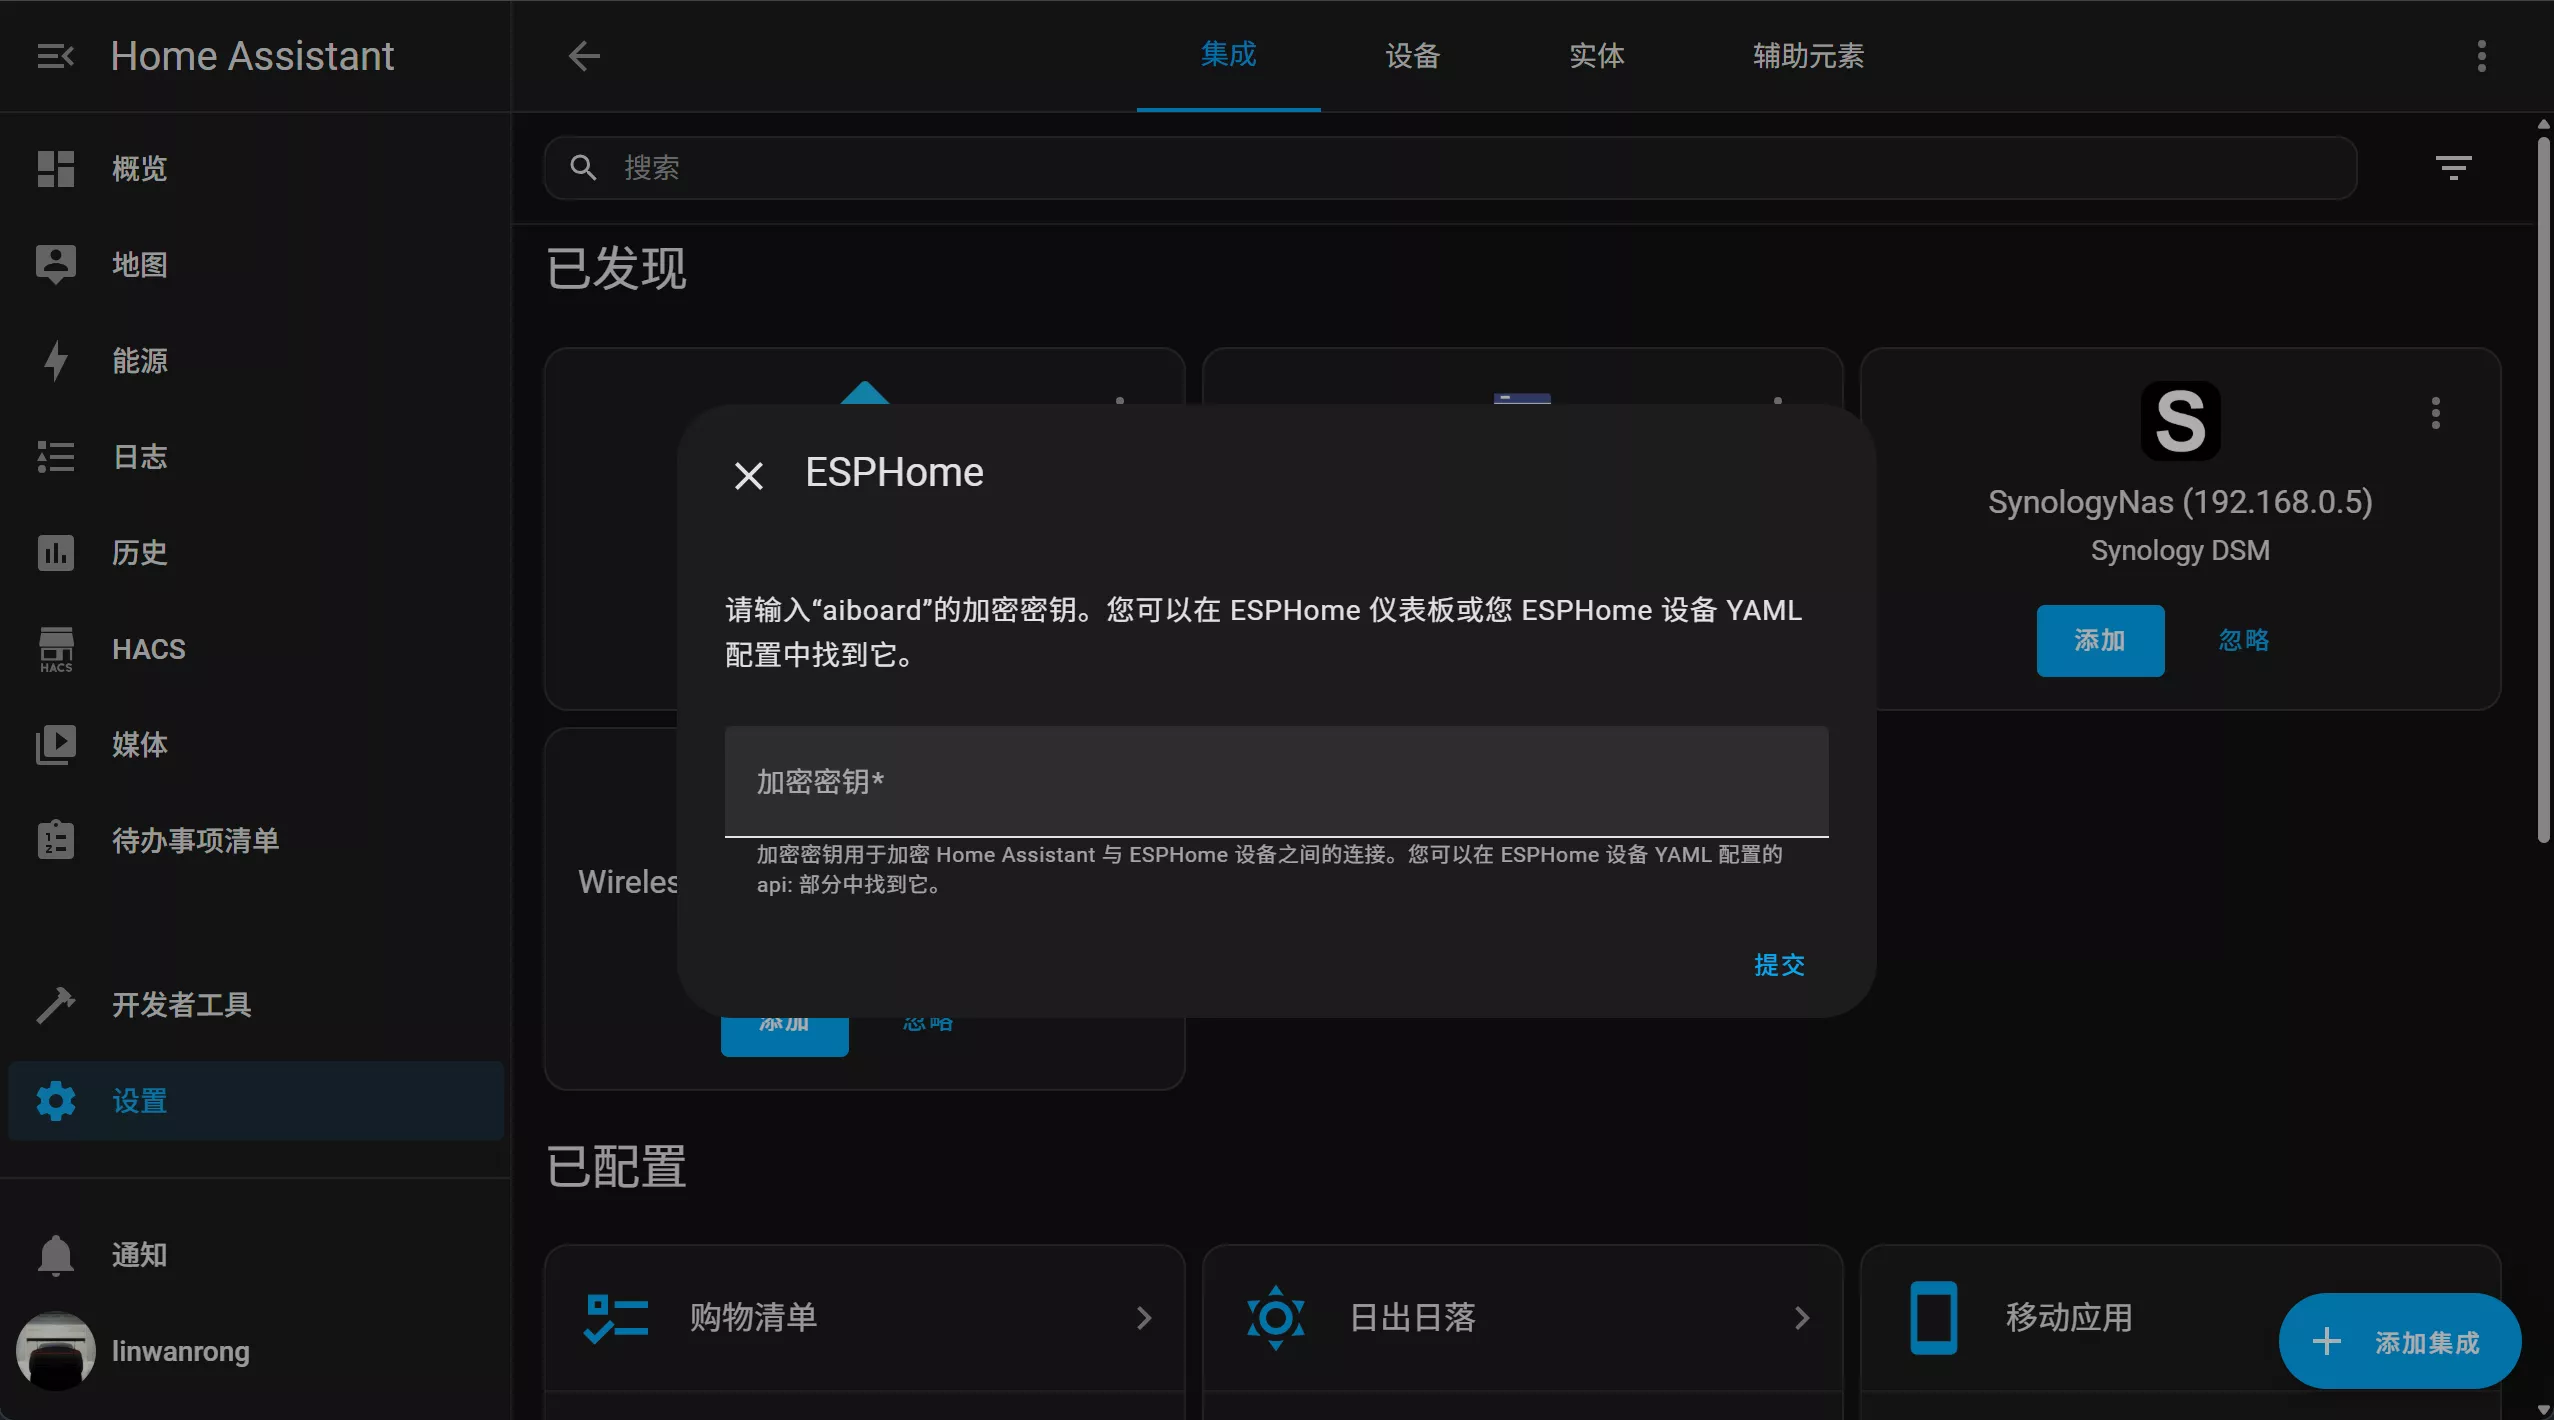
4.In the pop-up, enter the IP address of your device that you noted earlier, then click “SUBMIT”.
5.Next, Home Assistant will ask for the device's Encryption Key.
-
Go back to the ESPHome UI and click “EDIT” on your
ac_dimmercard. -
In the YAML file, find the
api:section and copy the long string of characters afterkey:. -
Paste this key into the Home Assistant input box and click “SUBMIT”.
6.Once added, assign the device to an area and click “FINISH”.
7. Home Assistant Dashboard Setup
You can use the Home Assistant Dashboard to modify or add visual controls.
1.Navigate to your main "Overview" dashboard in Home Assistant.
2.Click the three dots in the top-right corner and select “Edit Dashboard”.
3.Click the “ADD CARD” button in the bottom-right corner.
4.From the card selection list, choose a card type. For example, select the “Gauge” card.
5.In the card configuration screen, click the “Entity” dropdown and select the brightness entity for your AC Dimmer.
6.Click “SAVE”. You can repeat this process to add a "Light" card for an on/off toggle and brightness slider.
7.Finally, click “DONE” in the top-right corner to exit edit mode.
8. Hardware
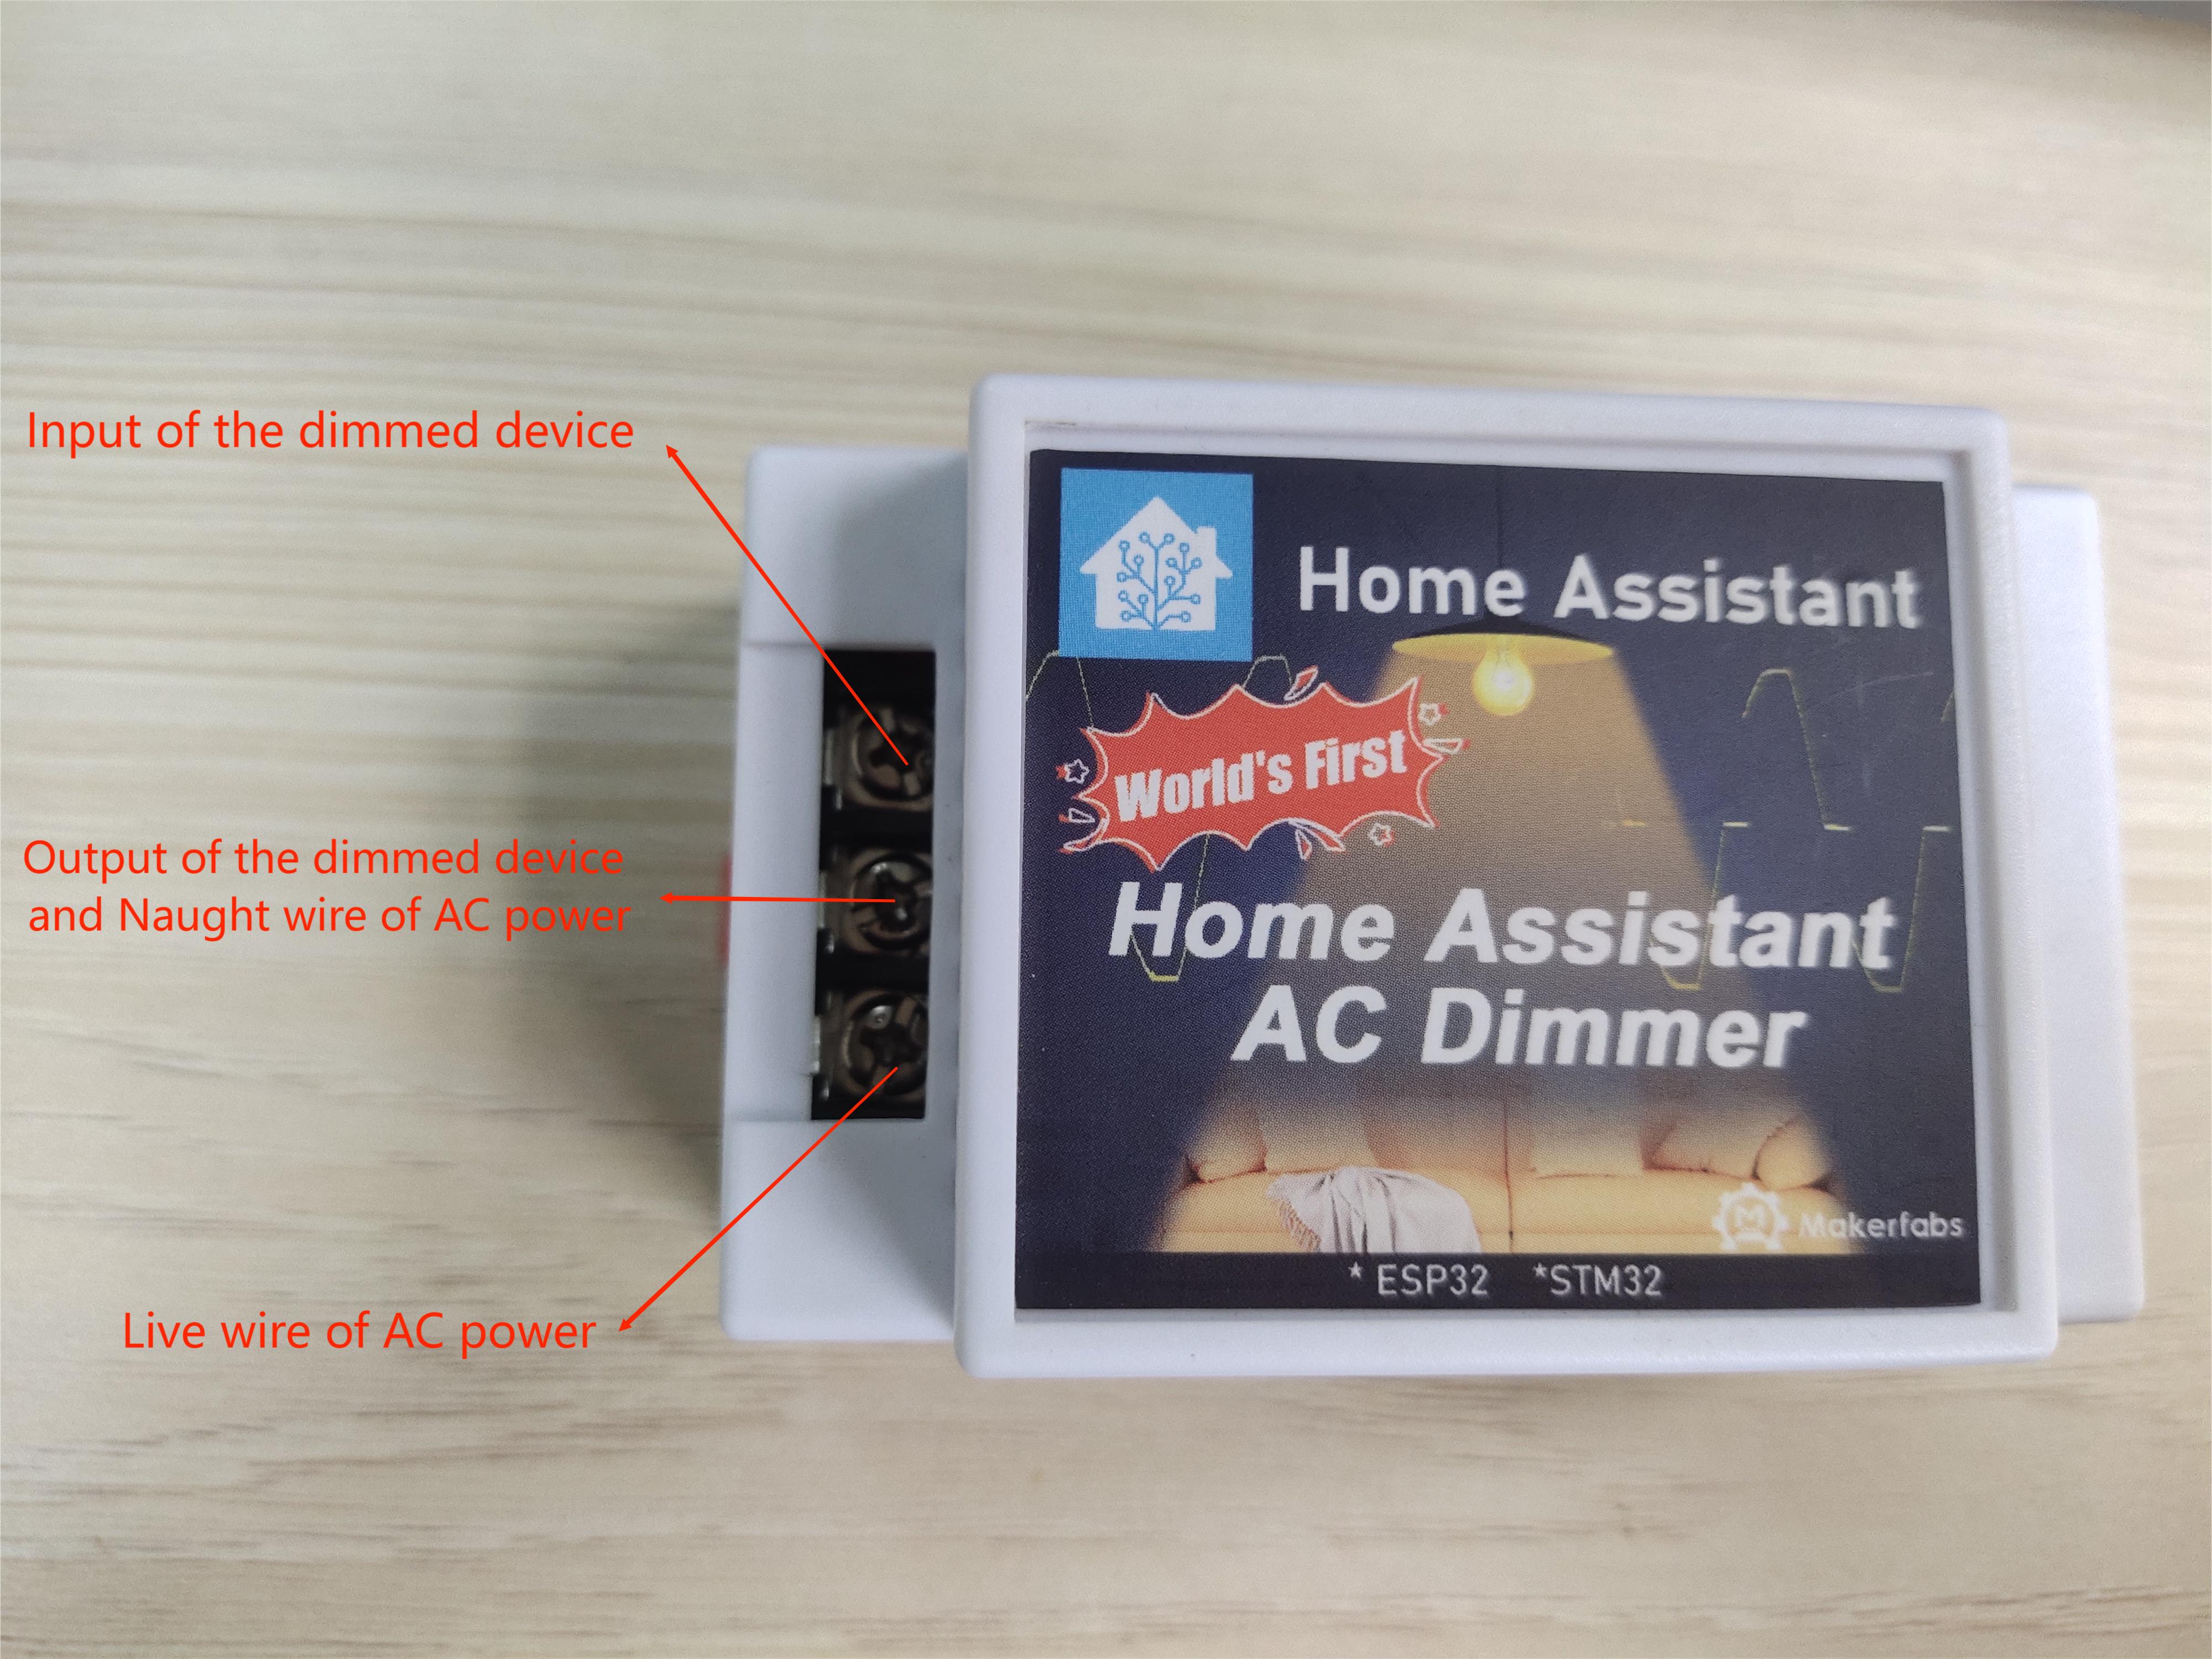 Note, the HA AC Dimmer does not work with LEDs, we recommend using incandescent lamps or devices that use AC power and do not have an internal voltage regulator.
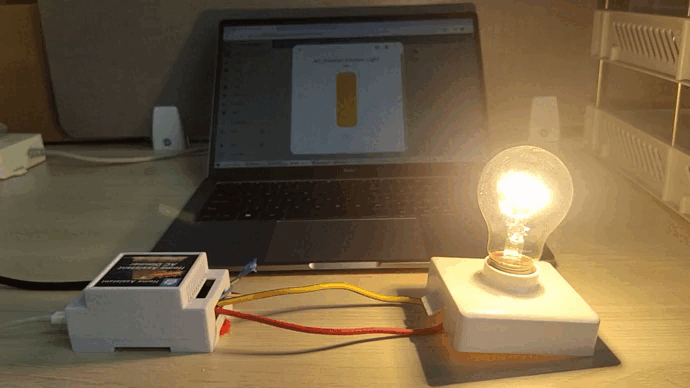
9. Result
10. FAQ
You can list your question here or contact techsupport@makerfabs.com for technology support. Detailed descriptions of your question will be helped to solve your question.