AgroSense LoRaWAN® Sensor Instruction Manual
Product link: AgroSense LoRaWAN® Sensor
1. Feature
-
Compatible with Worldwide LoRaWAN® Networks: Support the universal frequency plan from 863MHz ~928MHz;
-
Long Range: At least 2km in urban scenes and 5 km in line of sight scenes.
-
Battery& Working time: Sensor hardware& firmware detailed designed for power control, with 2 pcs common AAA battery, working time at least 2 years.
-
Simple to Use: Provides LoRaWAN® DEV EUI/ APP EUI/ APP Key, enabling users to finish configuration in a few steps.
-
Cost-effective: With Makerfabs’ strong ability on production, we make this product cost-effective to users, for mass implement in field applications such as farm/greenhouse, etc.
-
Downlink: Support downlink to modify the time interval (5min-1440min).
-
LoRaWAN version: LoRaWAN Specification 1.0.3.
2. Product model:
-
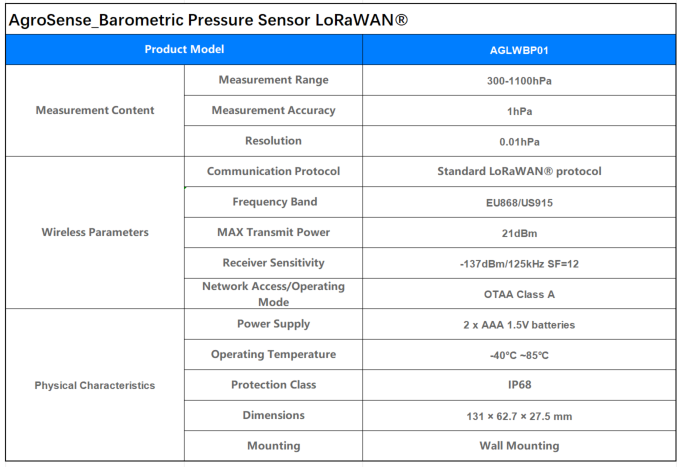
AgroSense_Barometric Pressure Sensor LoRaWAN®
-
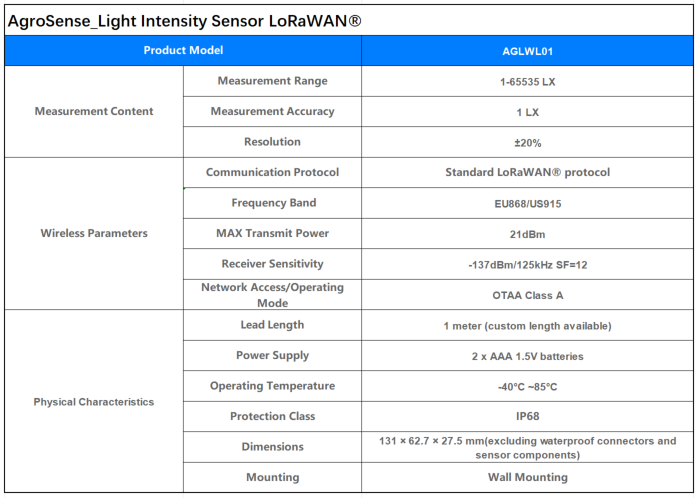
AgroSense_Light Intensity Sensor LoRaWAN®
-
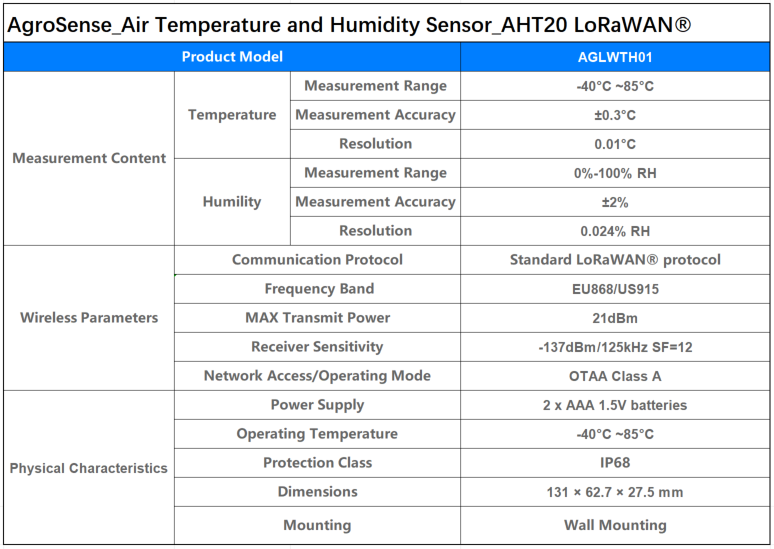
AgroSense_Air Temperature and Humidity Sensor_AHT20 LoRaWAN®
-
AgroSense_Temperature and Humidity Sensor_SHT31 LoRaWAN®

-
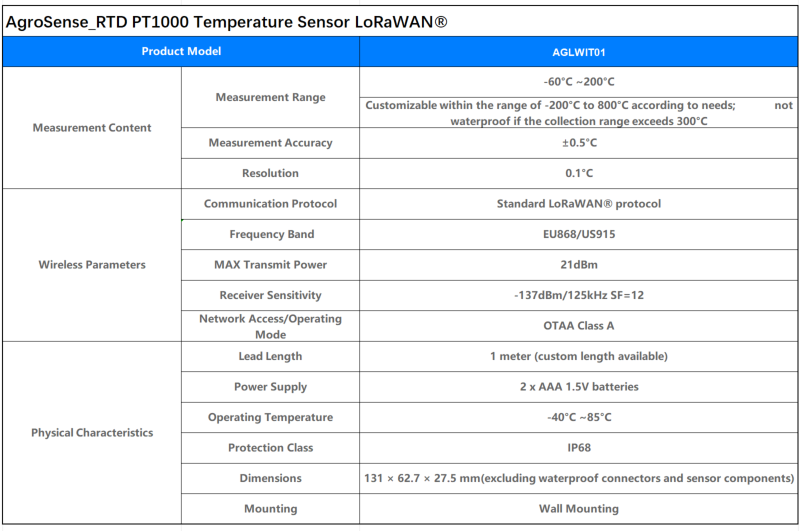
AgroSense_RTD PT1000 Temperature Sensor LoRaWAN®
-
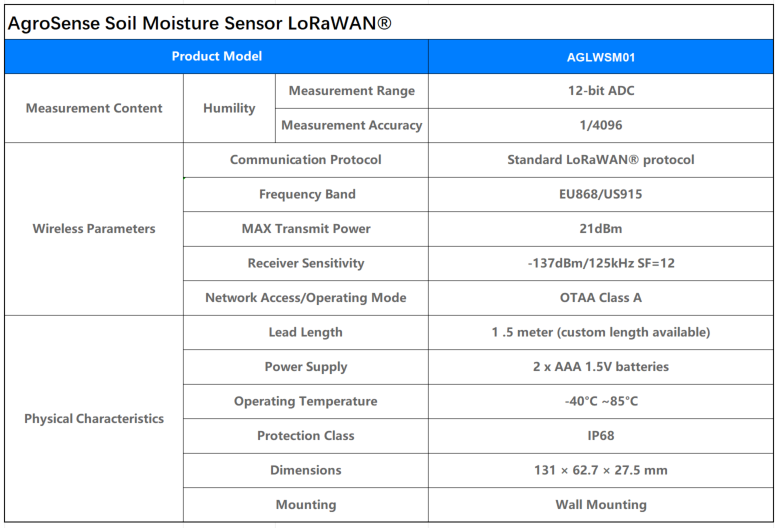
AgroSense Soil Moisture Sensor LoRaWAN®
-
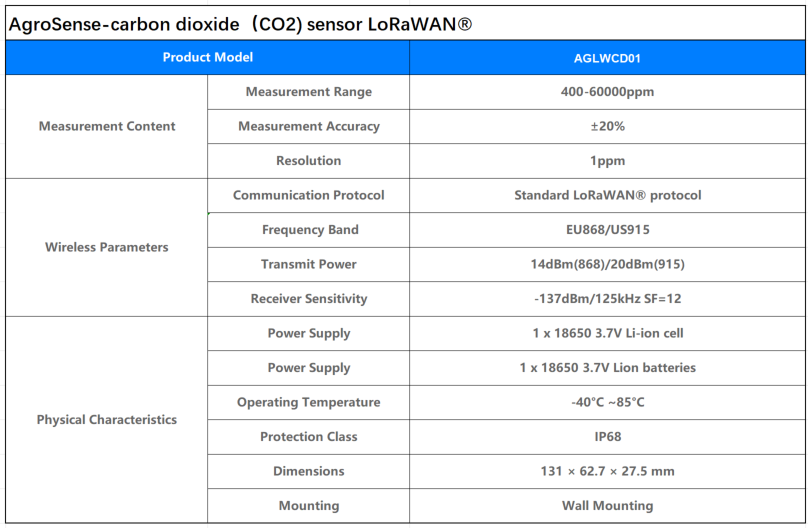
AgroSense-carbon dioxide(CO2) sensor LoRaWAN®
-
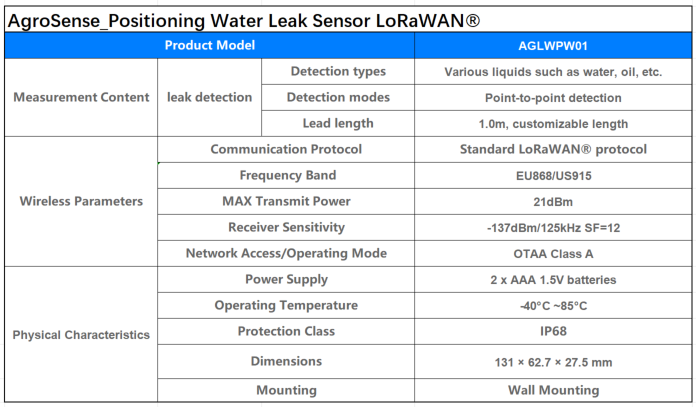
AgroSense_Positioning Water Leak Sensor LoRaWAN®
-
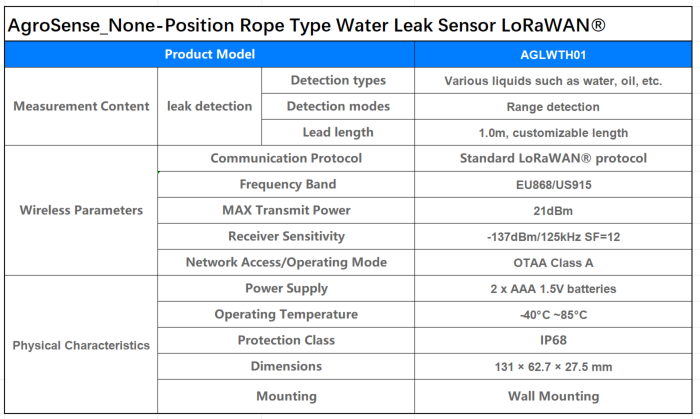
AgroSense_None-Position Rope Type Water Leak Sensor LoRaWAN®
-
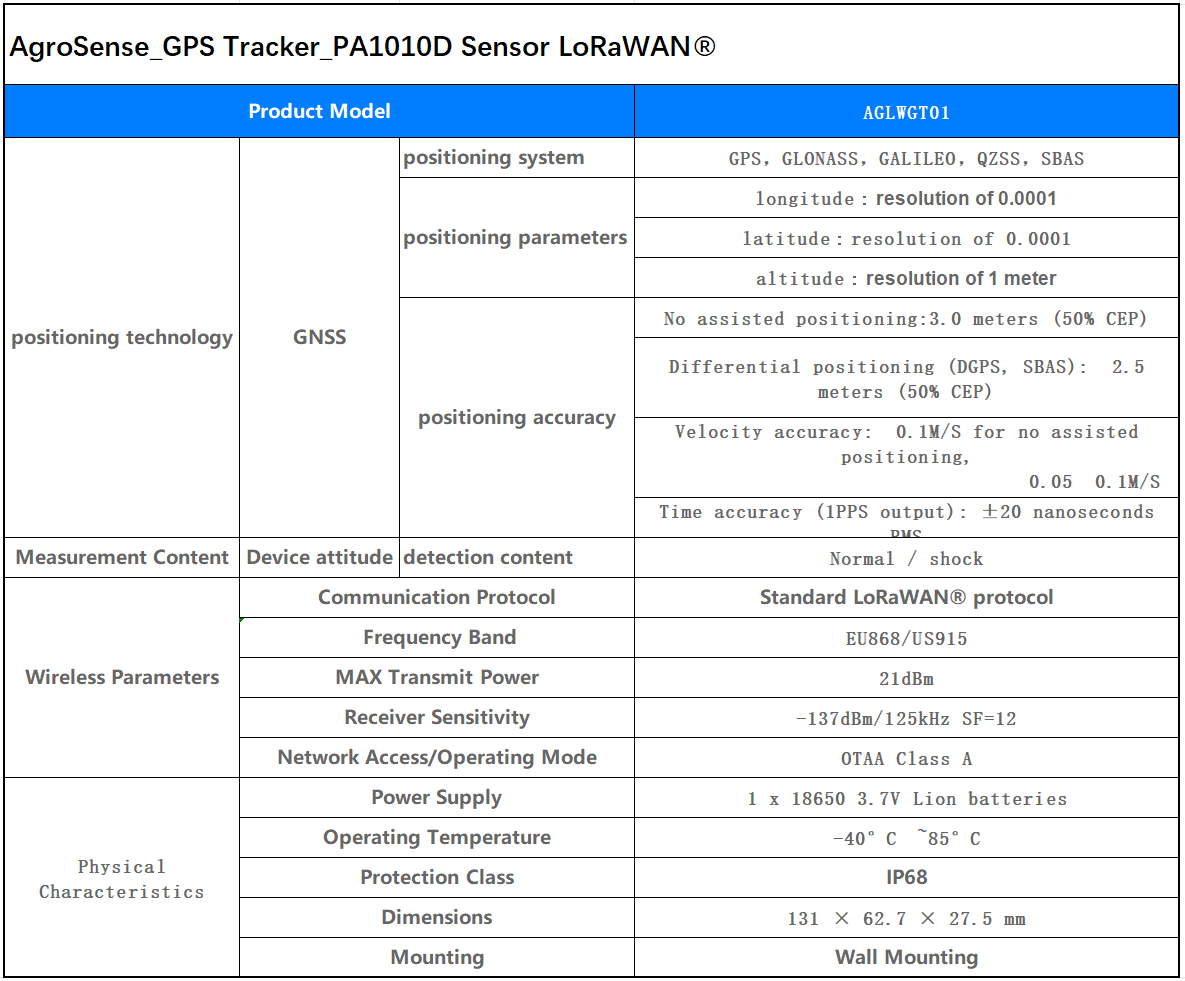
AgroSense_GPS Tracker_PA1010D Sensor LoRaWAN®
-
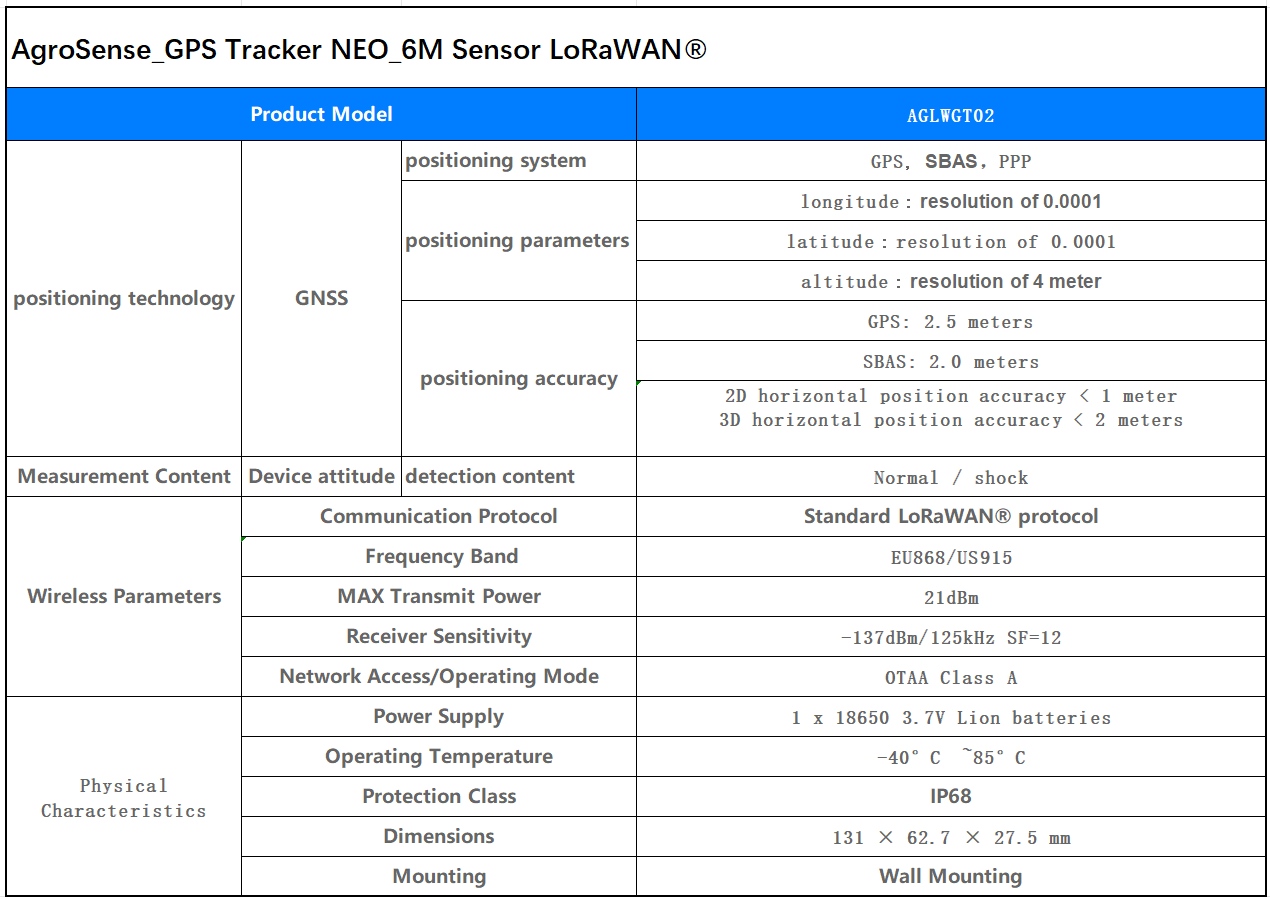
AgroSense_GPS Tracker NEO_6M Sensor LoRaWAN®
-
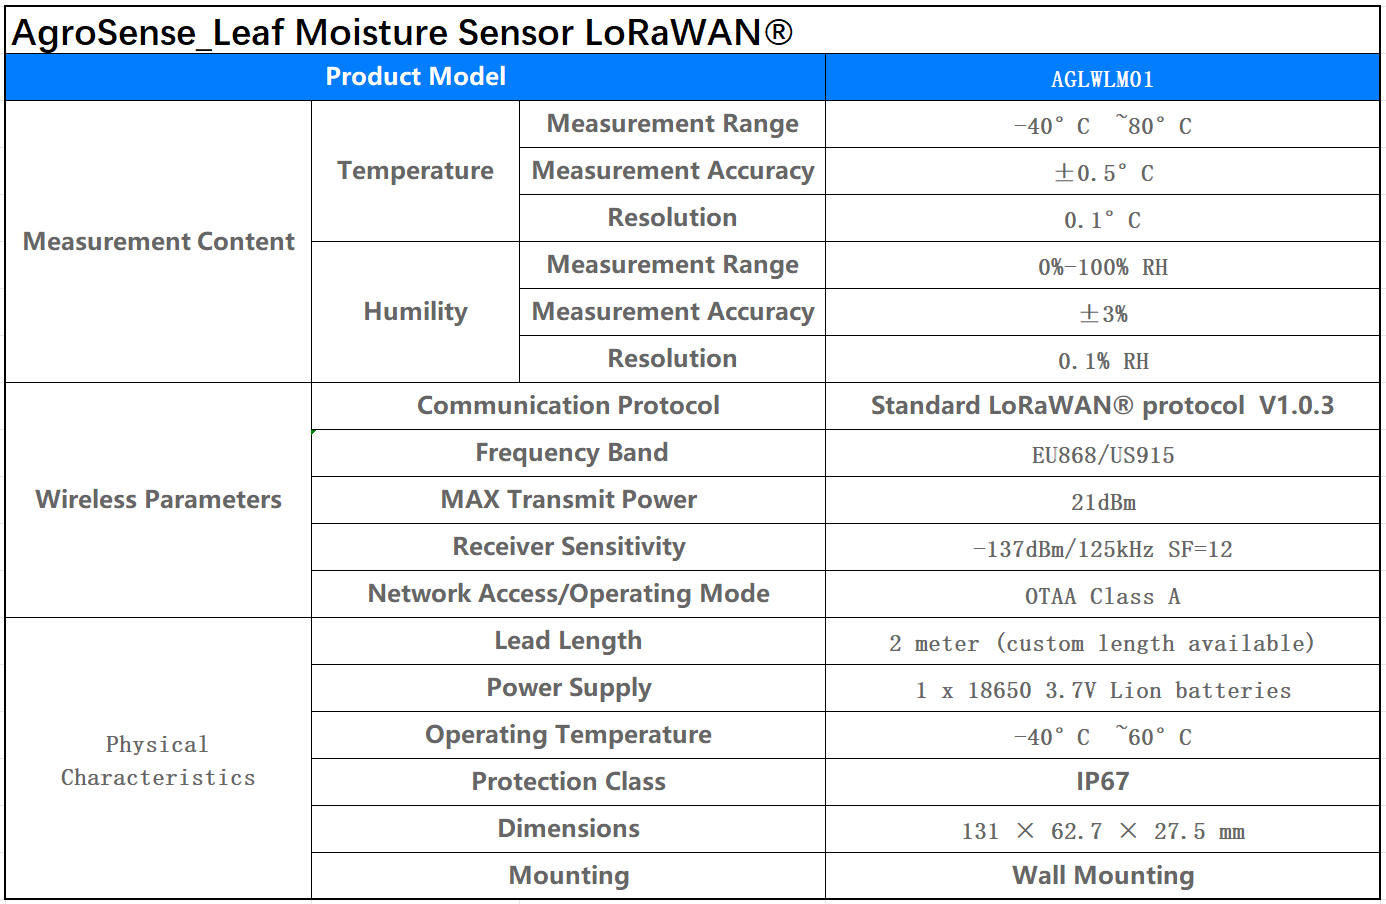
AgroSense_Leaf Moisture Sensor LoRaWAN®
-
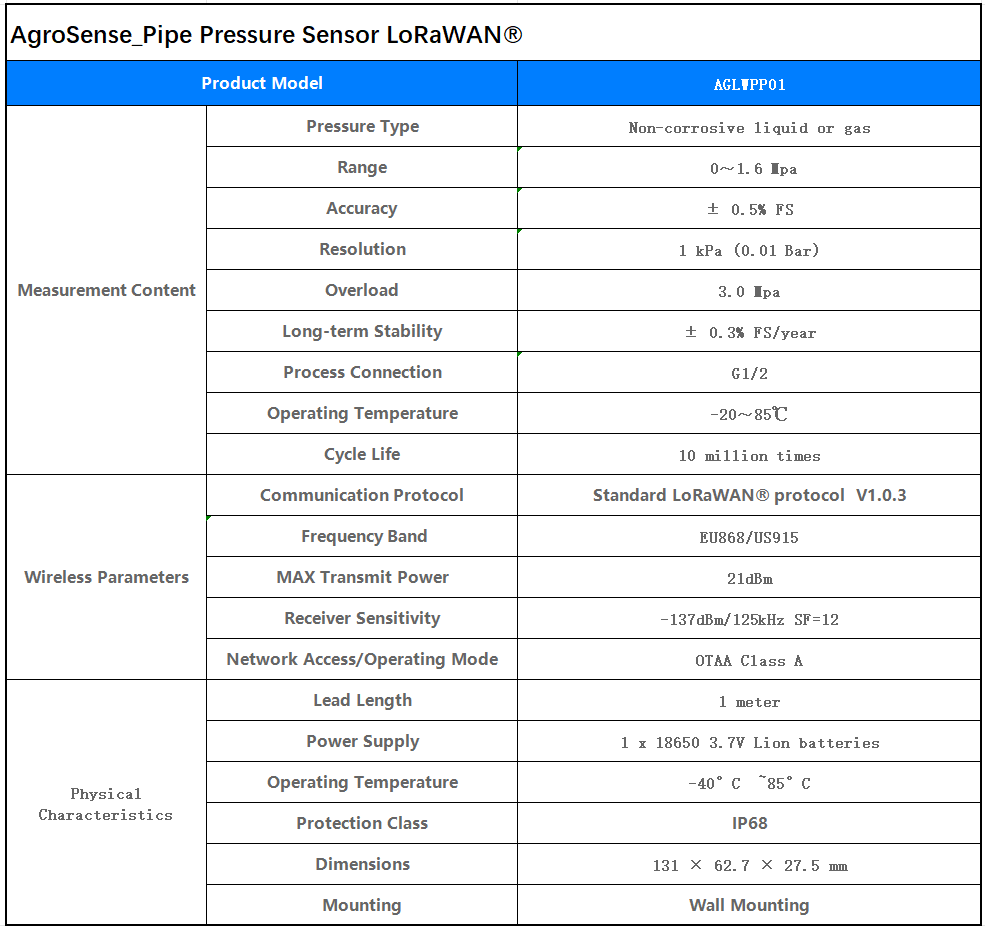
AgroSense_Pipe Pressure Sensor LoRaWAN®
-
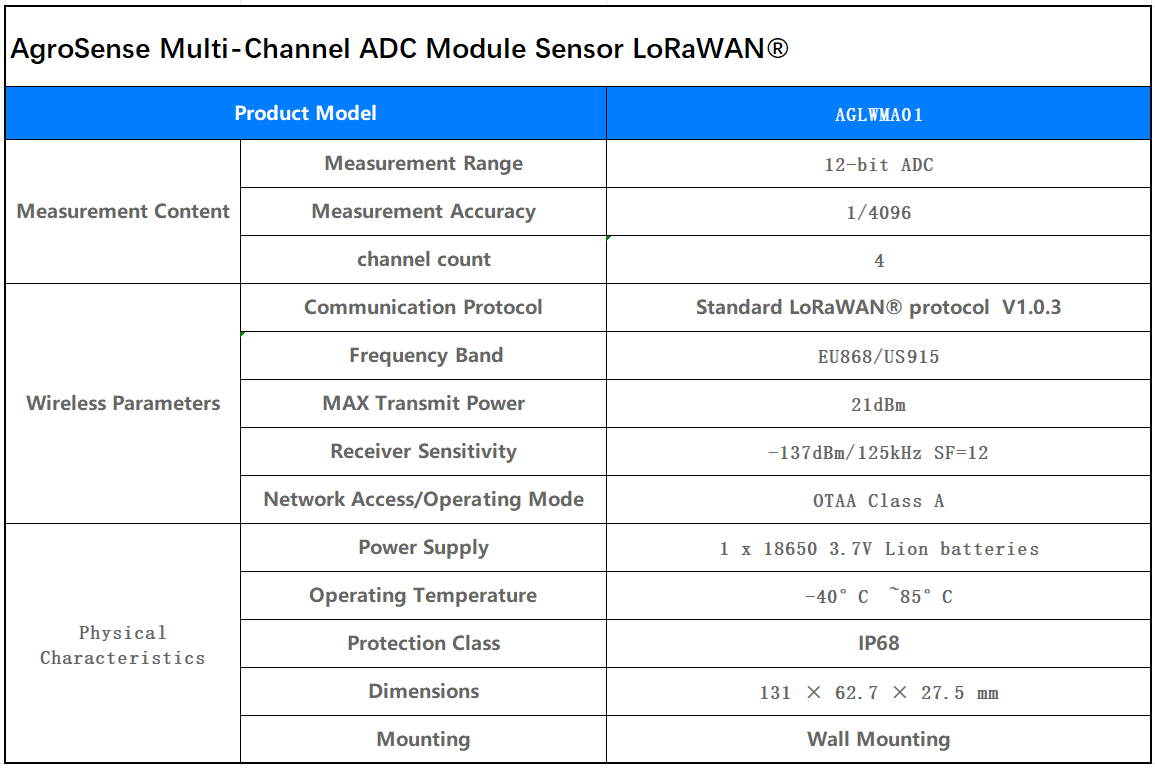
AgroSense Multi-Channel ADC Module Sensor LoRaWAN®
-
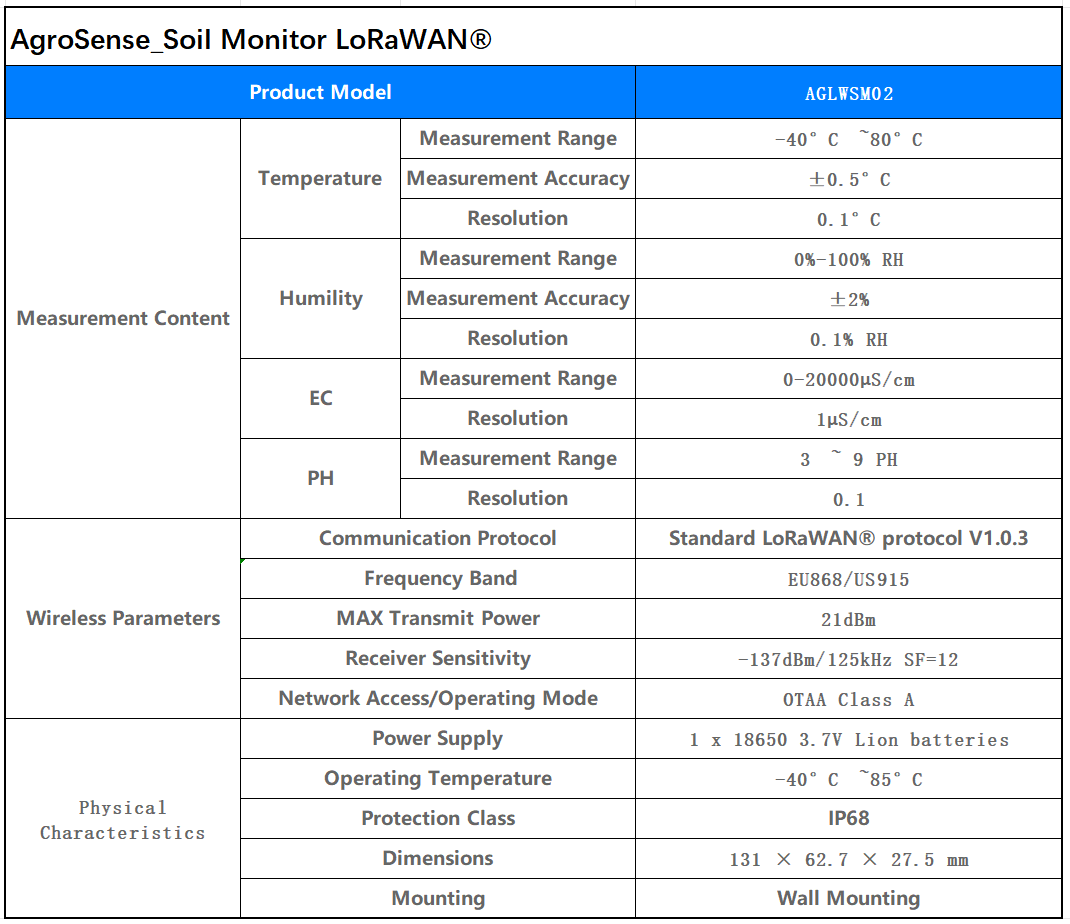
AgroSense_Soil Monitor LoRaWAN®
-
Agrosense_4 Channel Relay LoRaWAN®
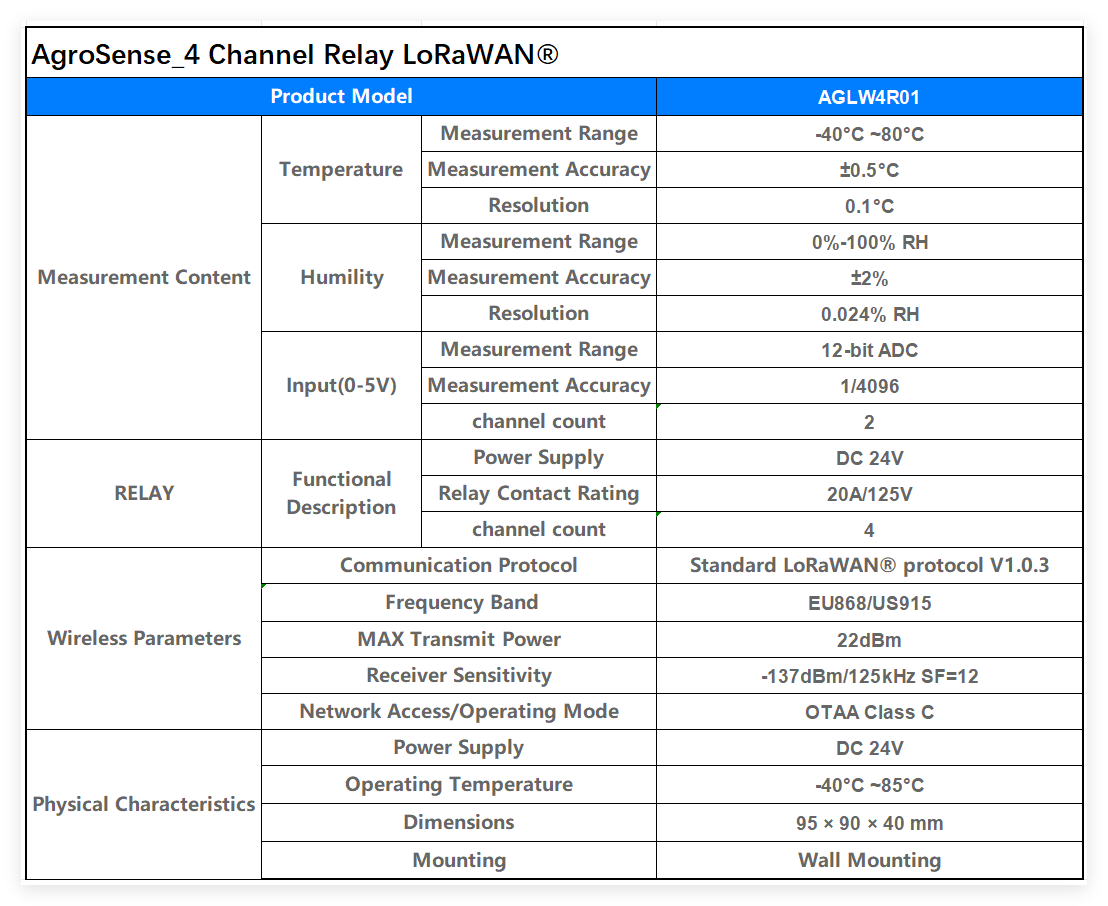
For more detailed usage of Agrosense_4 Channel Relay you can refer to manual. https://github.com/Makerfabs/Agrosense-Decoder/tree/main/Agrosense_4%20Channel%20Relay
-
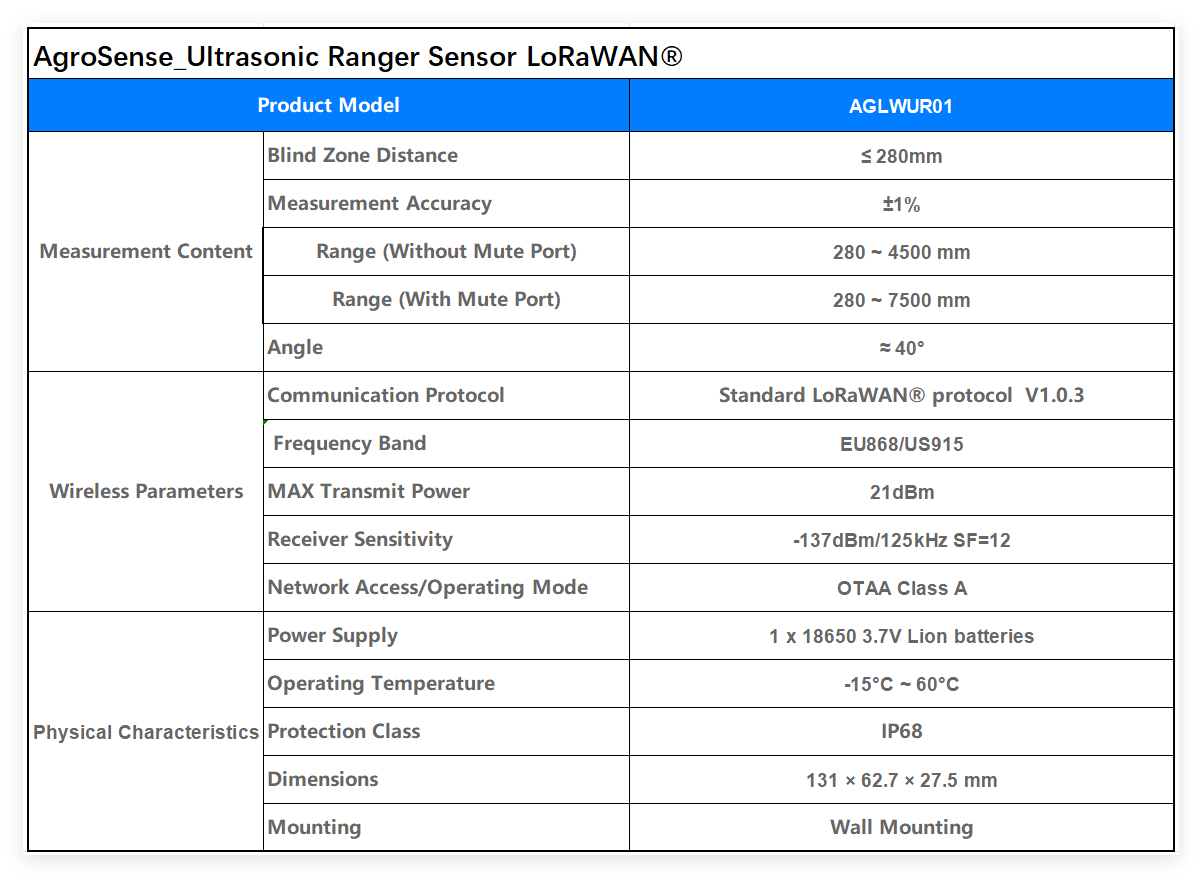
AgroSense_Ultrasonic Ranger Sensor LoRaWAN®
-
AgroSense_2 Channel Non-invasive AC Current Monitor LoRaWAN®

-
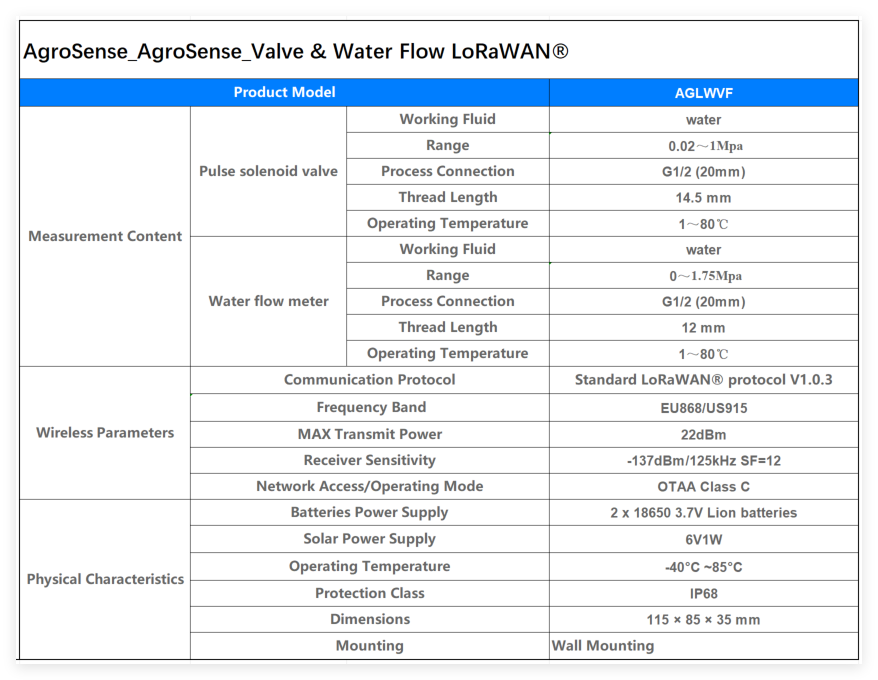
AgroSense Valve & Water Flow LoRaWAN®
-
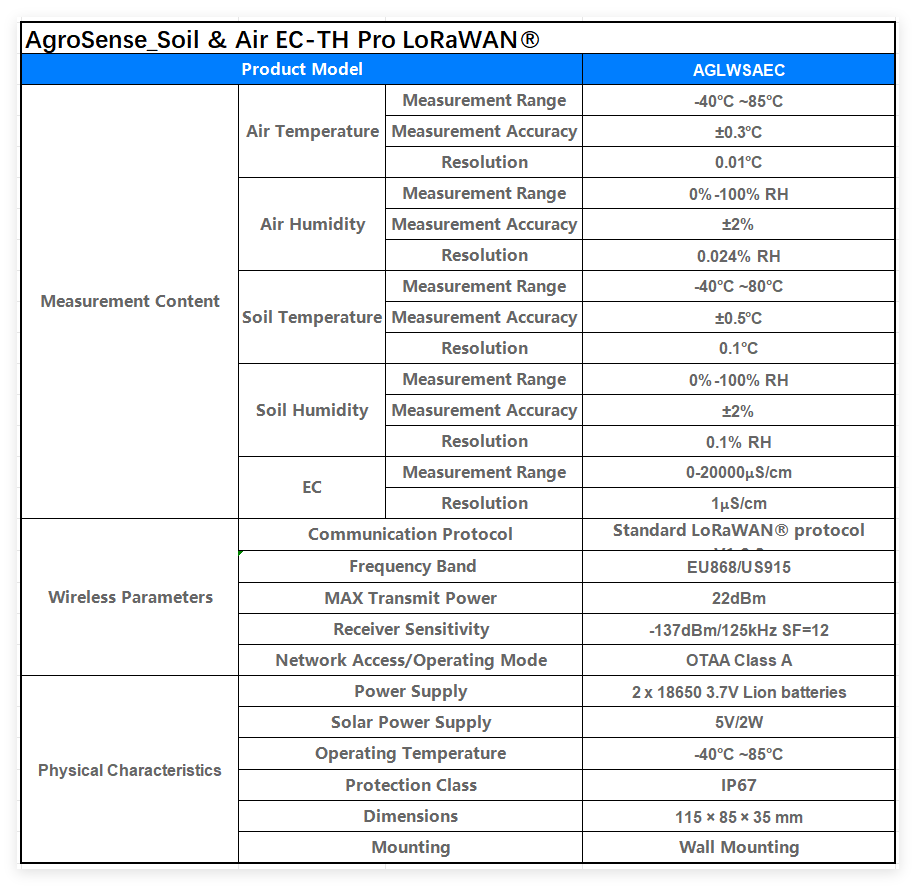
AgroSense_Soil & Air EC-TH Pro LoRaWAN®
3. Usage
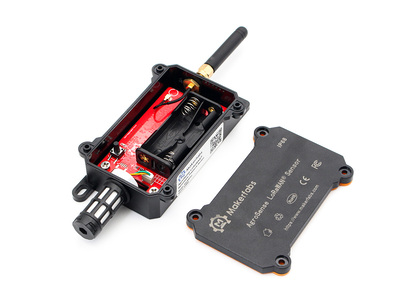
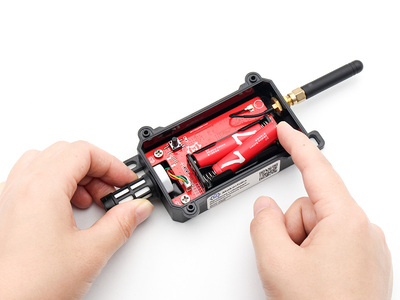
Step1:Battery Installation Open the product case, and insert two AAA batteries into the battery compartment. Press button Useror RST, if the LED does not light up, please check if the battery is dead and needs to be replaced or if the battery is installed backward. If LED flashes then the device is successfully powered up.
Step2:Server Configuration
Ensure your gateway works fine, and connect AgroSense LoRaWAN® Sensor to the IoT Server.
Step3: wall-mounted use
Tighten the screws on the four corners of the case after putting the cover on, Wall mounting the product for use.

For more detailed usage of Agrosense_4 Channel Relay you can refer to manual. https://github.com/Makerfabs/Agrosense-Decoder/tree/main/Agrosense_4%20Channel%20Relay
4. TTN and ThingSpeak
4.1 TTN configuration
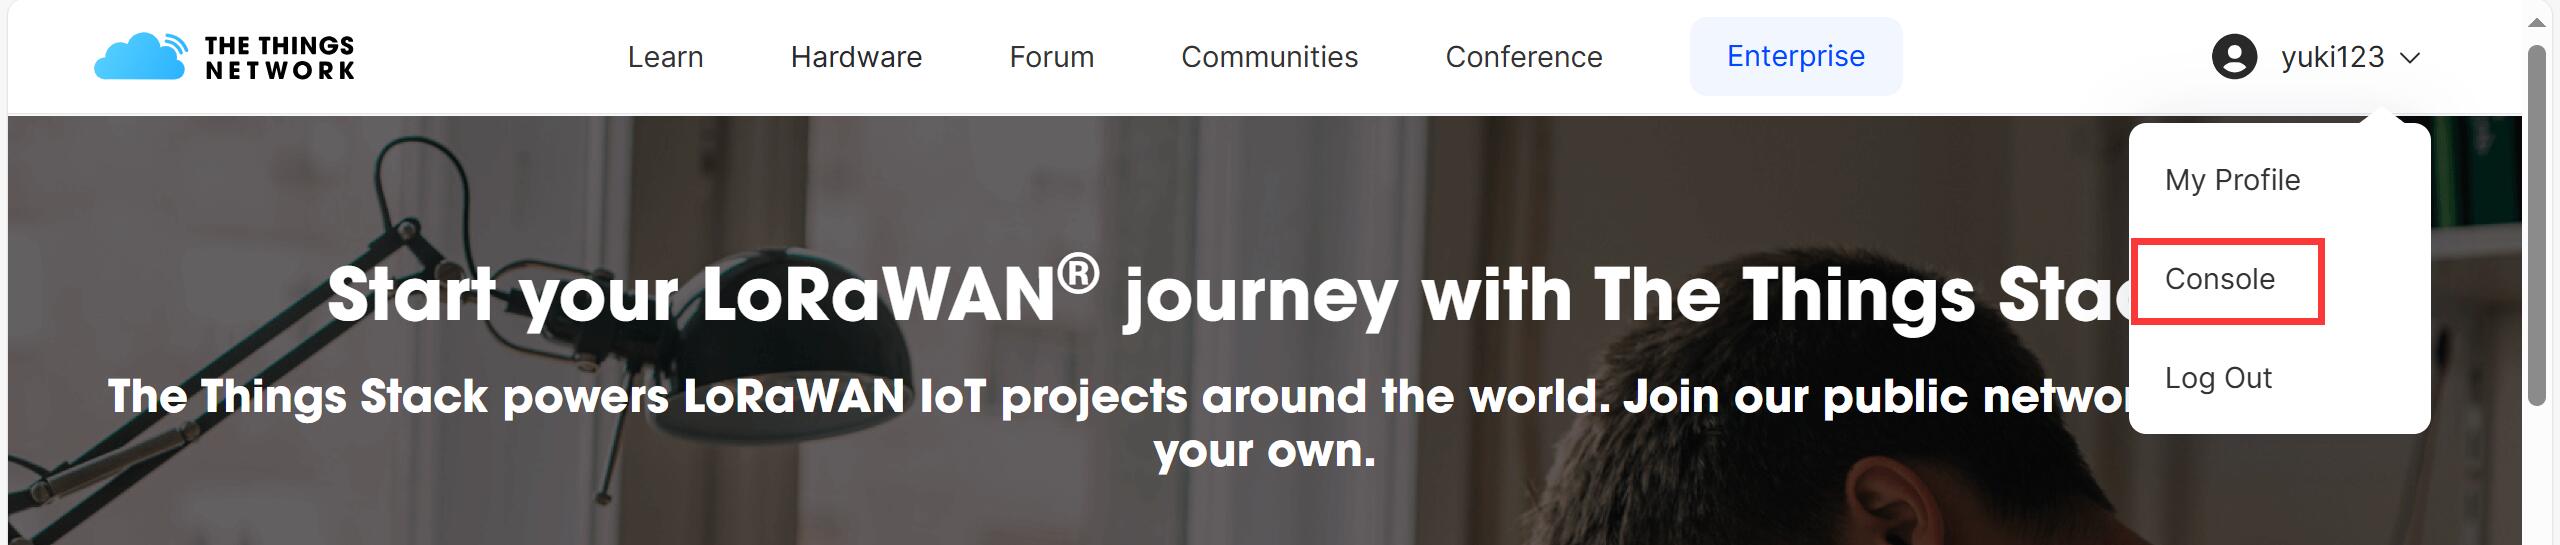
- Open The Things Network and register an account.
-
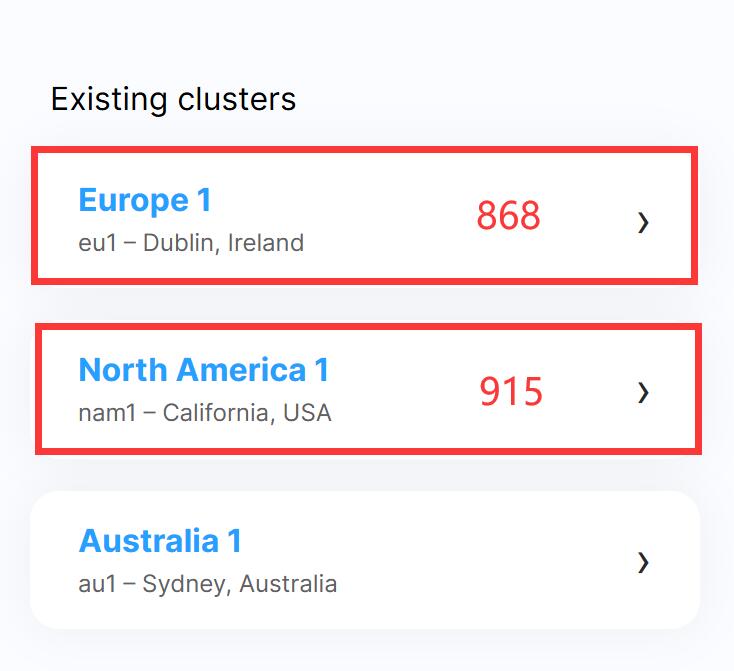
Select the correct region.
-
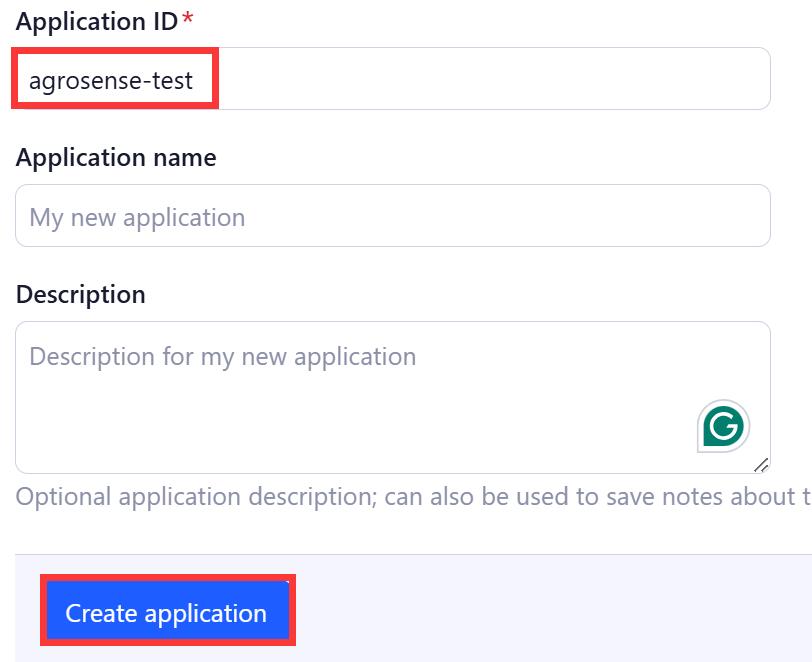
Create new application.

-
Enter your Application ID, and click "Create application"
-
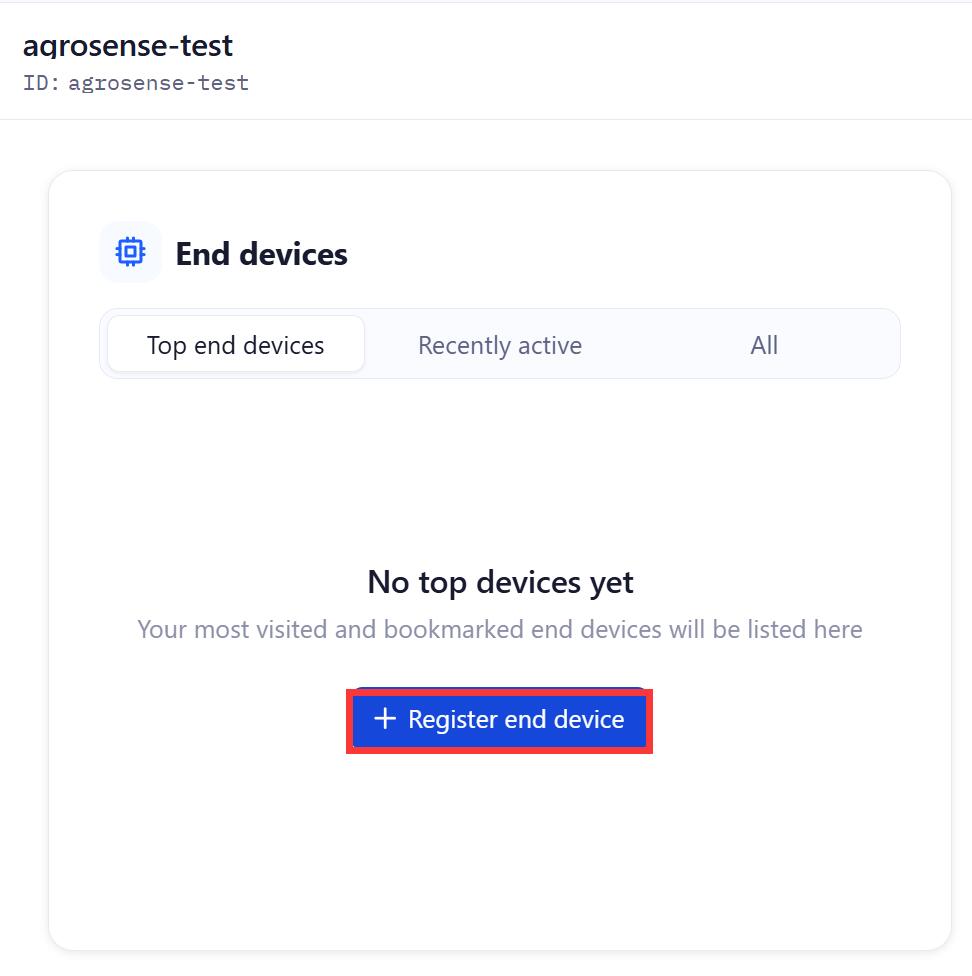
Click "+ Register end device"
-
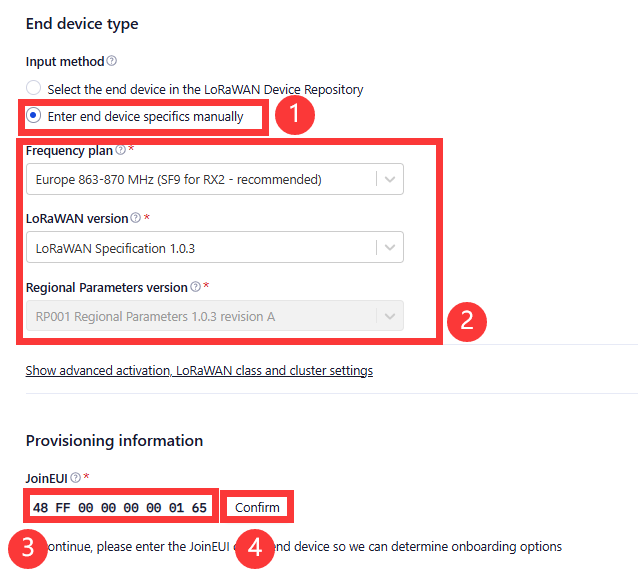
Choose "Enter end device specifics manually"
- Select the three options as shown in the image below.(Take 868 for example)
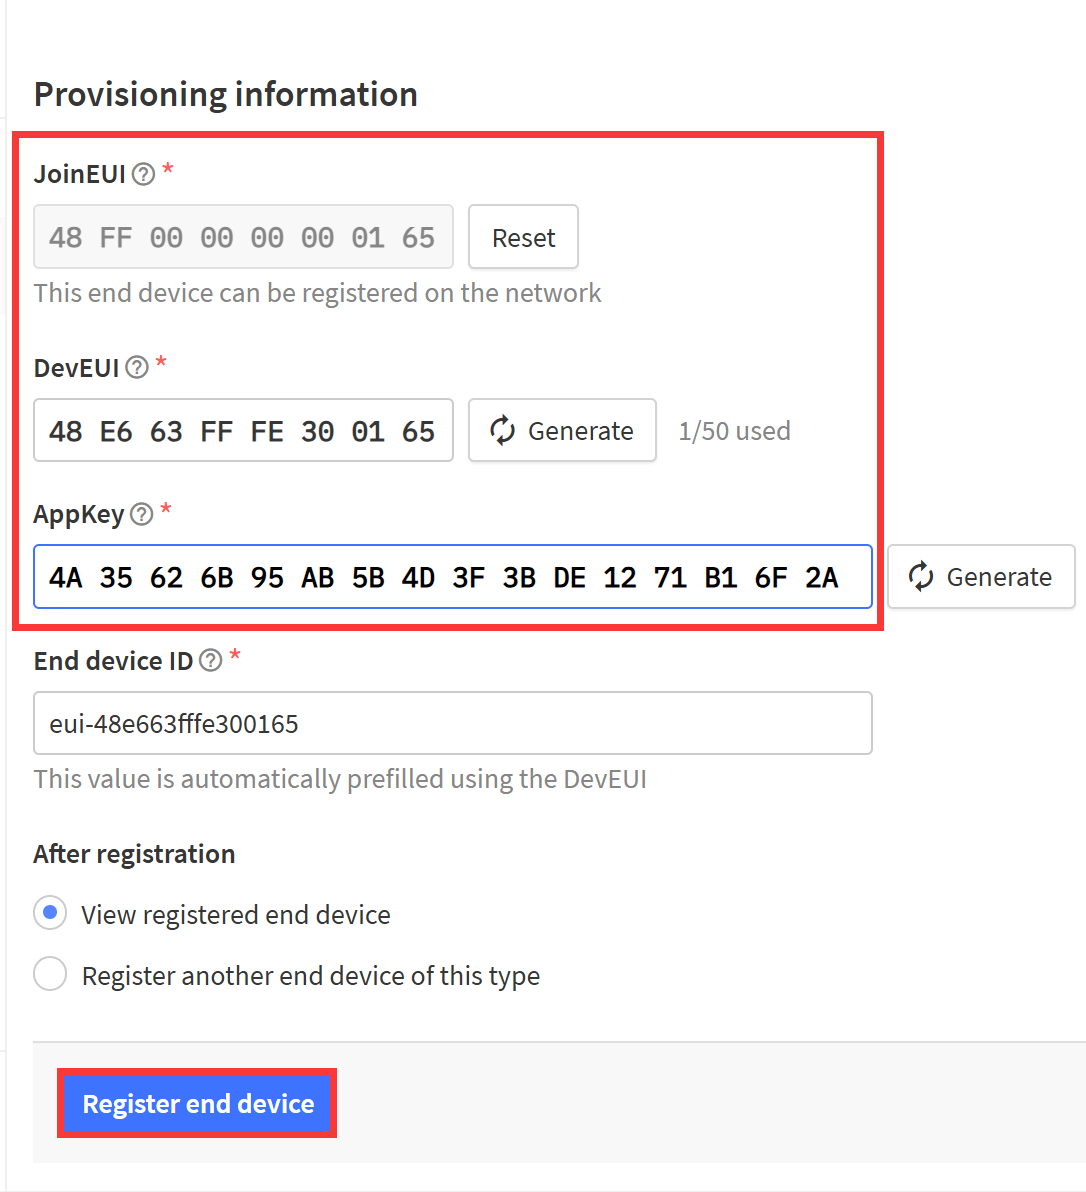
- Enter you joinEUI, DevEUI, Appkey data.
Notice: On the AgroSense LoRaWAN® Sensor label, you can get DVE EUI, APP EUI, APP KEY data. Enter them in "Provisioning information" correctly.
| AgroSense LoRaWAN® Sensor label | <--> | Provisioning information |
|---|---|---|
| APP EUI | <--> | JoinEUI |
| DEV EUI | <--> | DevEUI |
| APP KEY | <--> | AppKey |
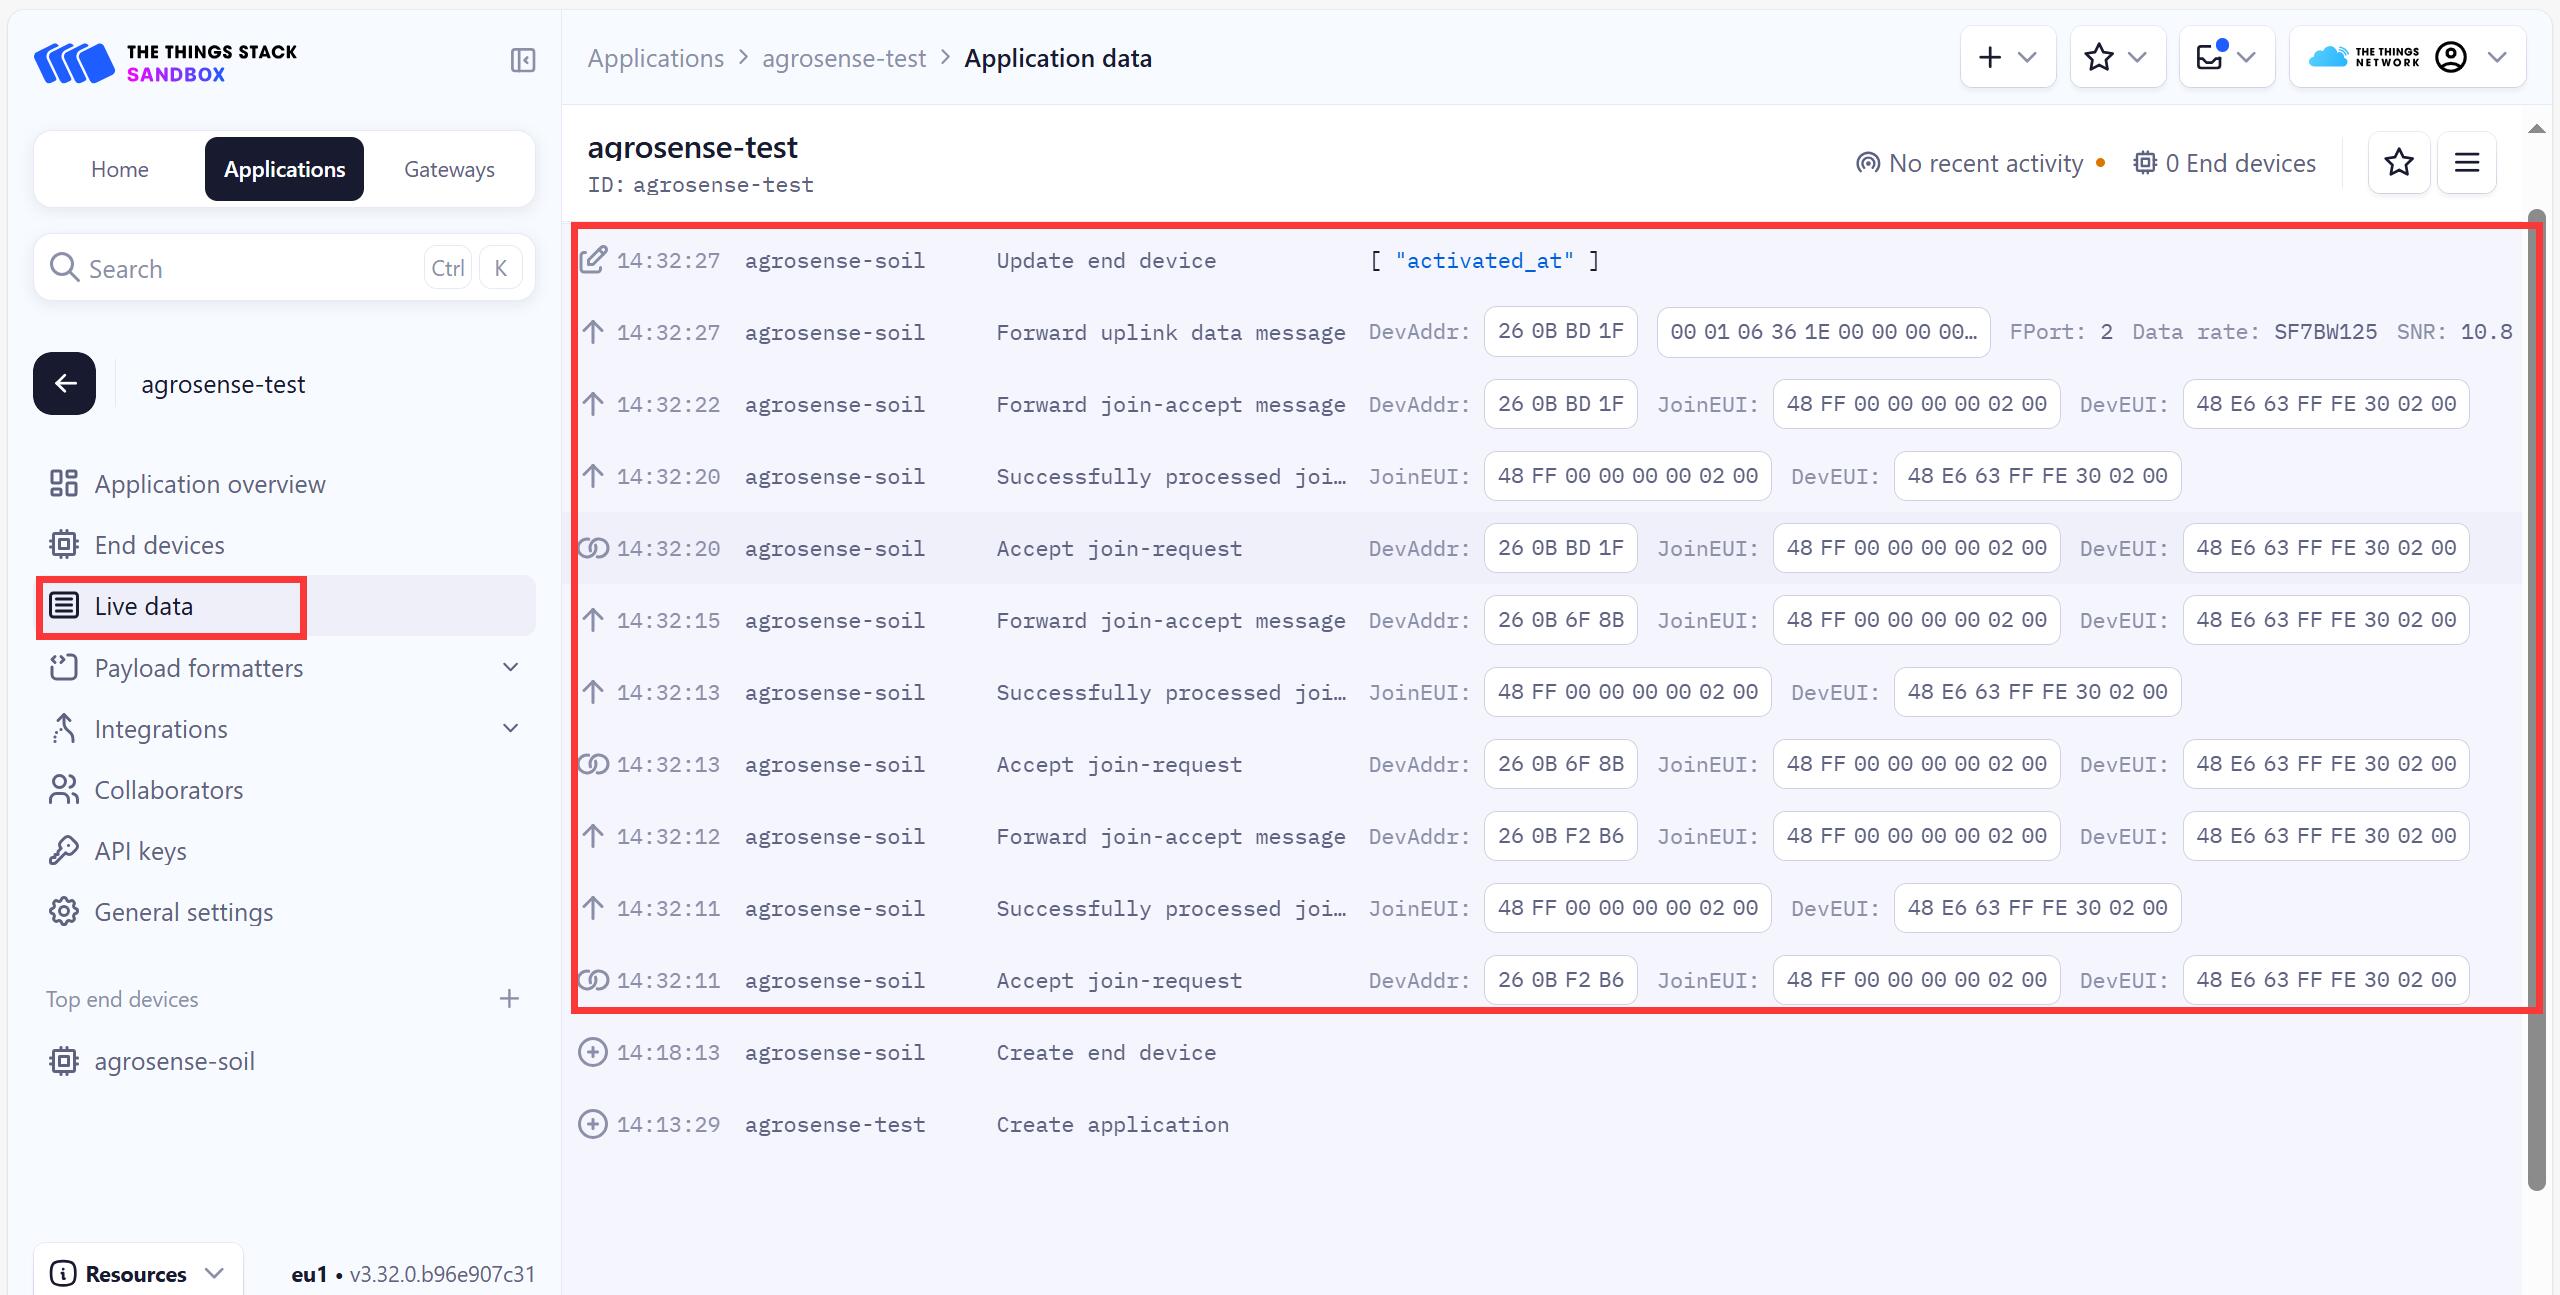
- Press AgroSense LoRaWAN® Sensor's Botton User and wait a few seconds after led flashes, if you find that led flashes a second time, it proves that the network connects successfully.
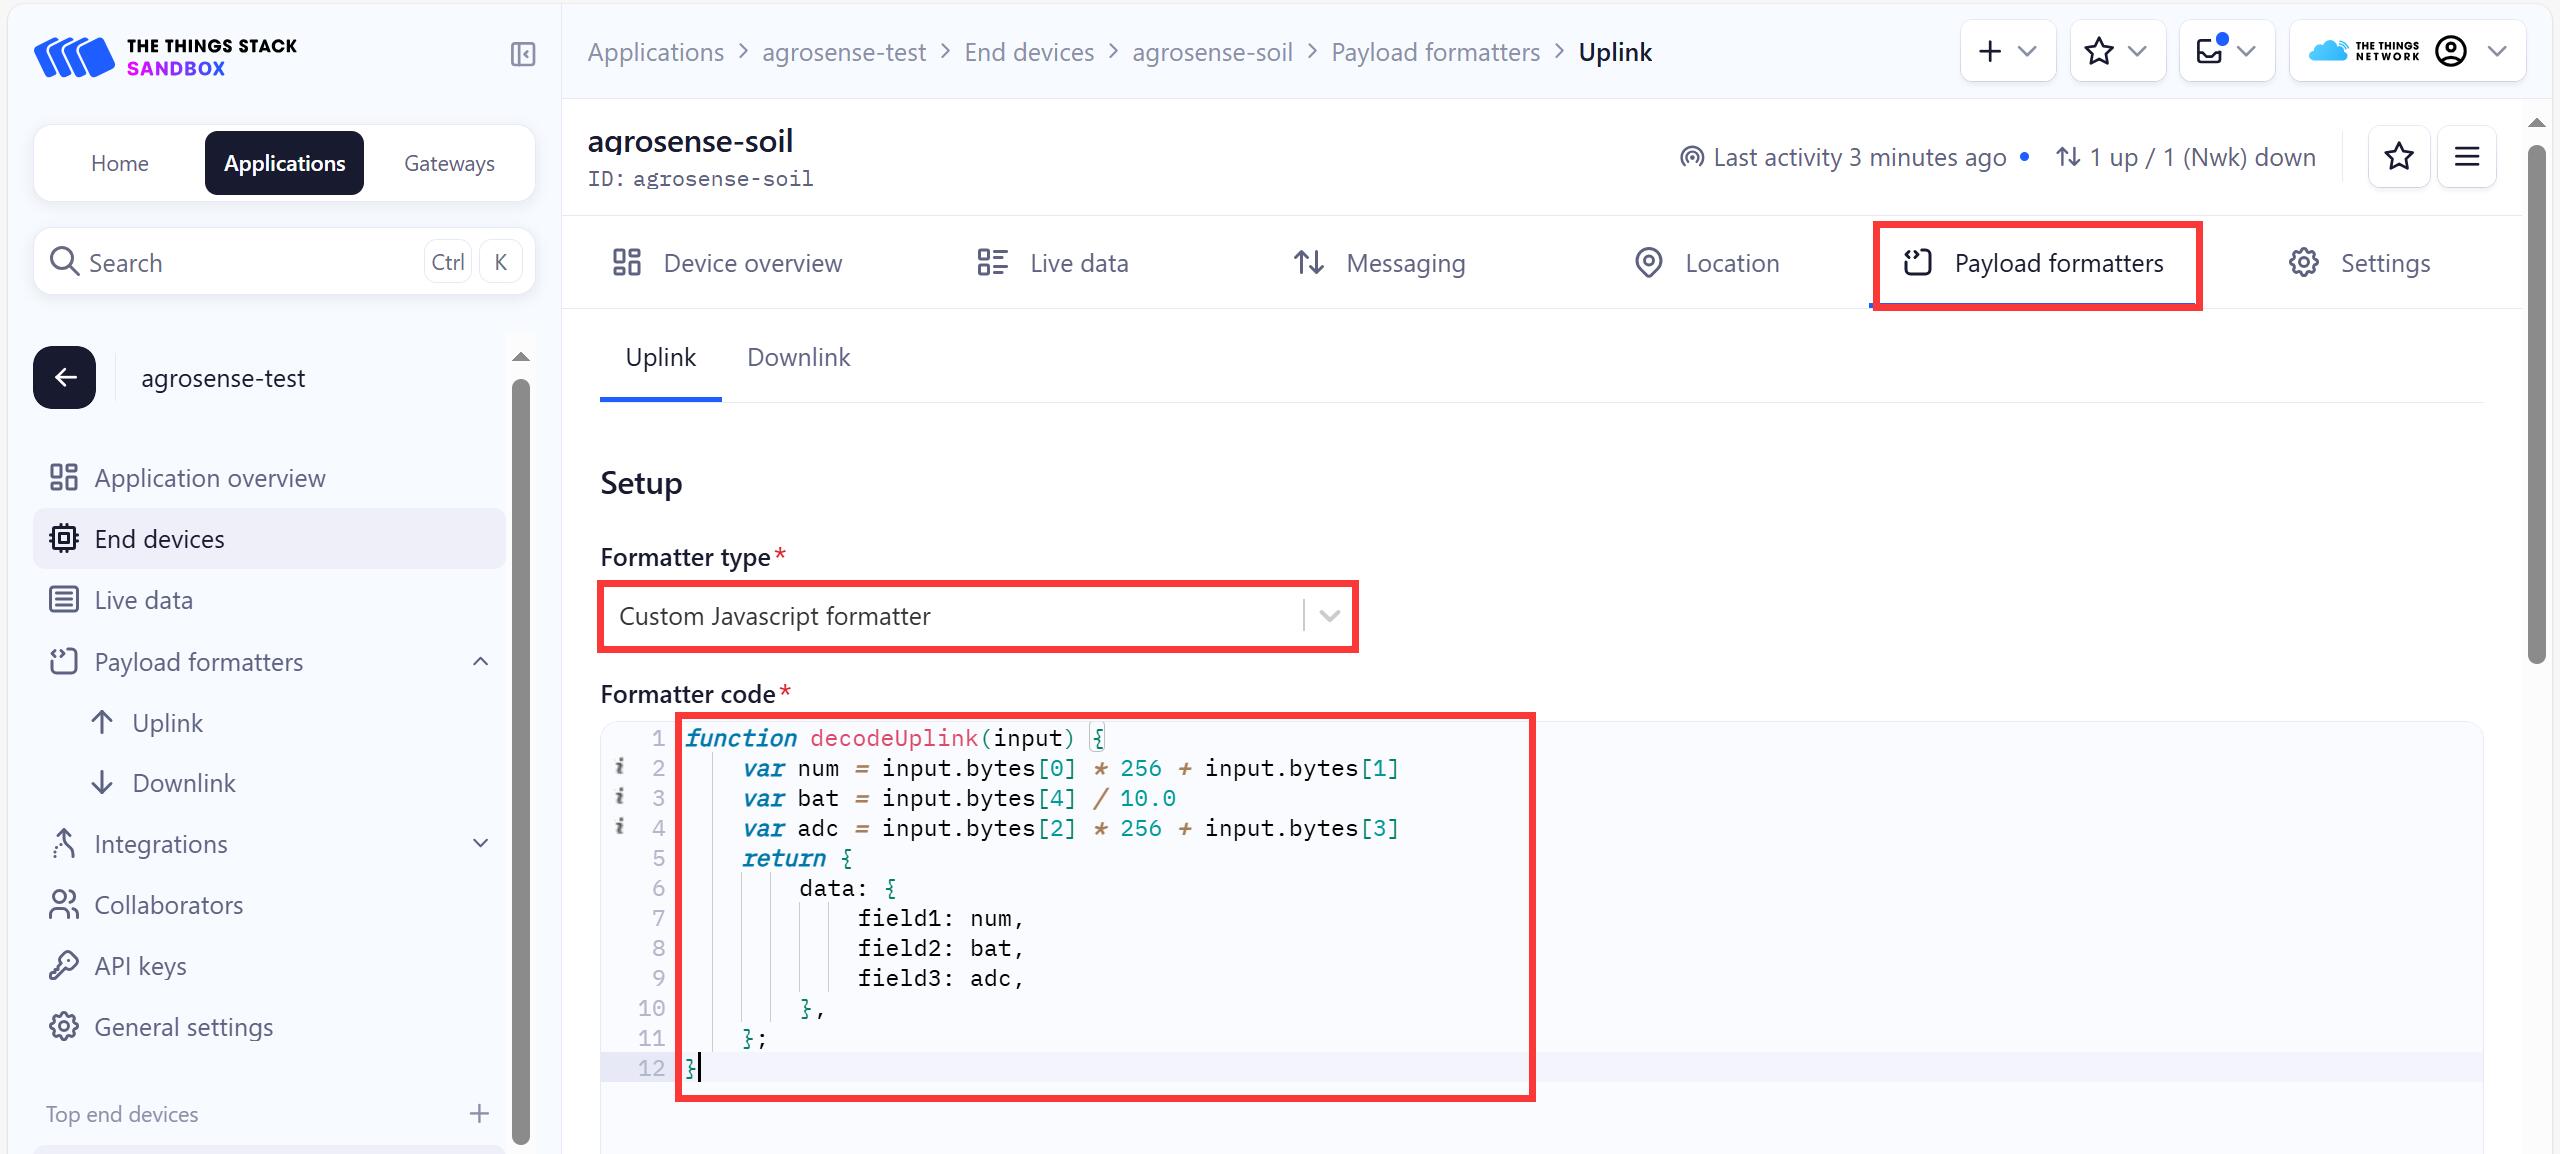
4.2 Payload formatters
Navigate to Payload formatters, select Formatter type to Custom Javasript formatter, Then select the type of product and copy the following code:https://github.com/Makerfabs/Agrosense-Decoder
4.3 Parsing data
After the TTN acquires the data, please parse the data according to the data format to obtain the sensor data.
4.3.1 AgroSense_Barometric Pressure Sensor
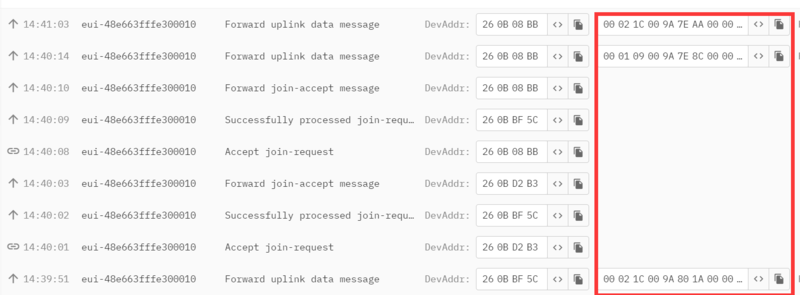
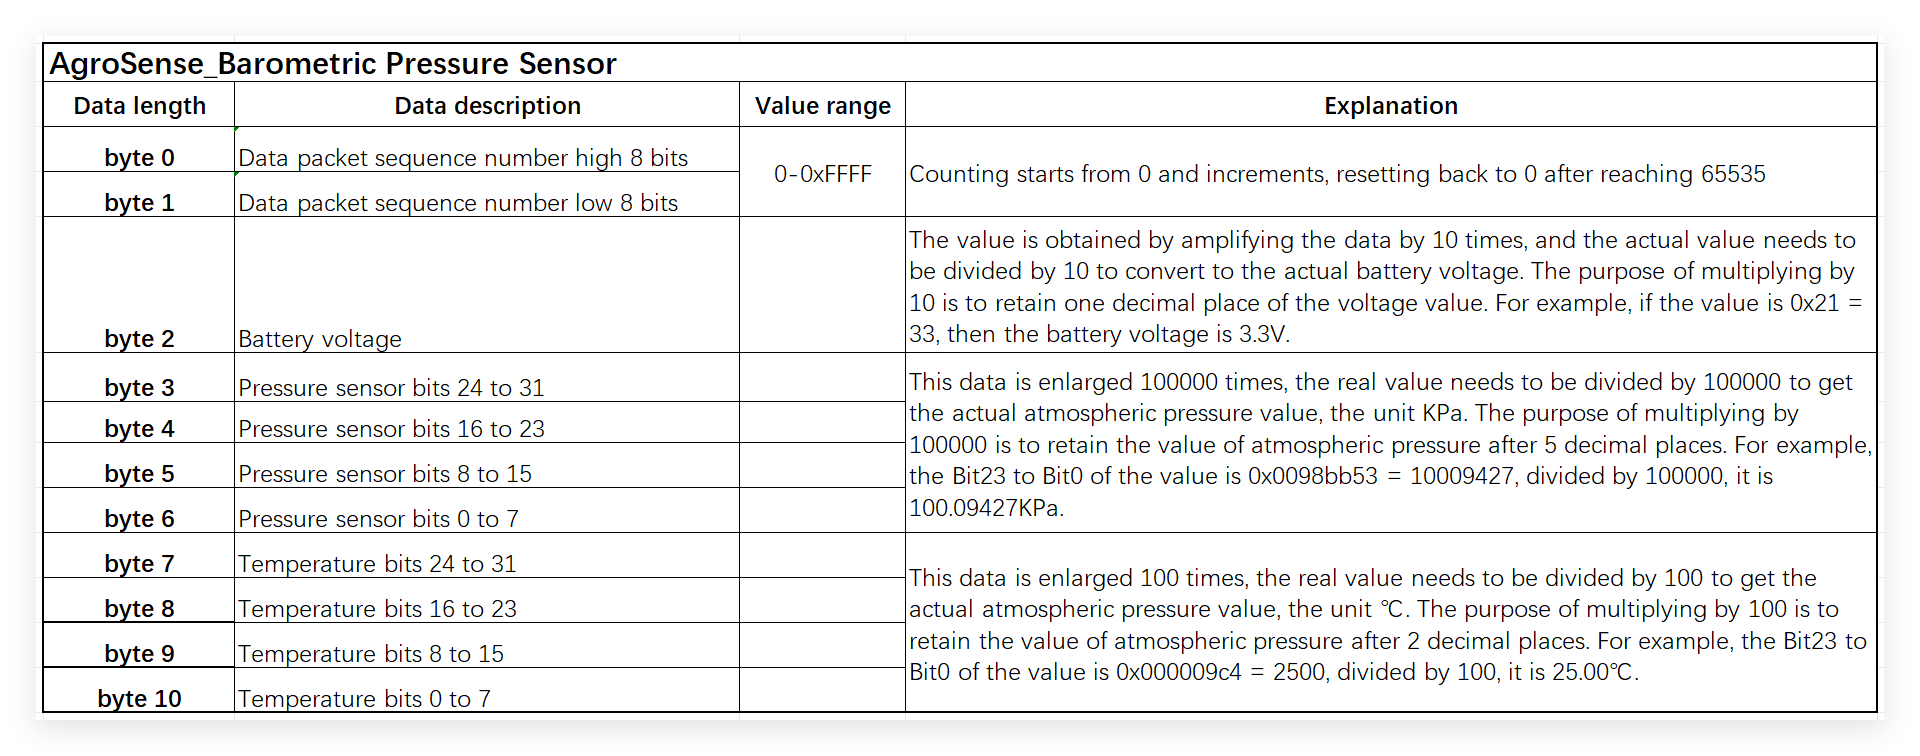
Example: 0x00, 0x02, 0x1C, 0x00, 0x9A, 0x7E, 0xAA, 0x00, 0x00, 0x0A, 0x6C
Data parsing:
-
Battery voltage is 2.8 V.
-
Atmospheric pressure is 101.24970 KPa.
-
Temperature is 26.68℃.
4.3.2 AgroSense_Light Intensity Sensor
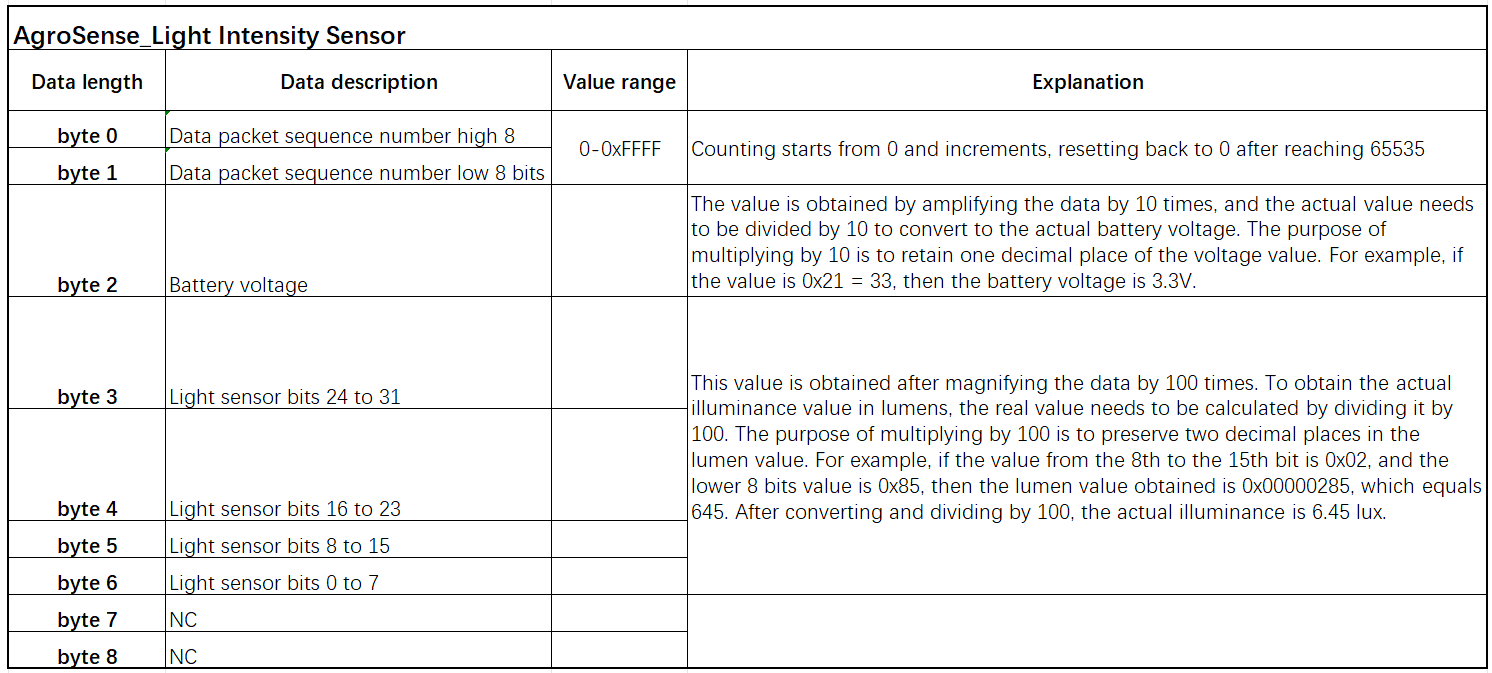
Example: 0x00, 0x03, 0x1D, 0x00, 0x00, 0x22, 0xD4, 0x00, 0x00
Data parsing:
-
Battery voltage is 2.9V.
-
Light Intensity is 89.16 lx
4.3.3 AgroSense_Air Temperature and Humidity Sensor

Example: 0x00, 0x04, 0x1D, 0x01, 0x89, 0x00, 0xF8, 0x00, 0x00
Data parsing:
-
Battery voltage is 2.9V.
-
Humility is 39.3%
-
Temperature is 24.8 ℃.
4.3.4 AgroSense Temperature and Humidity Sensor_SHT31
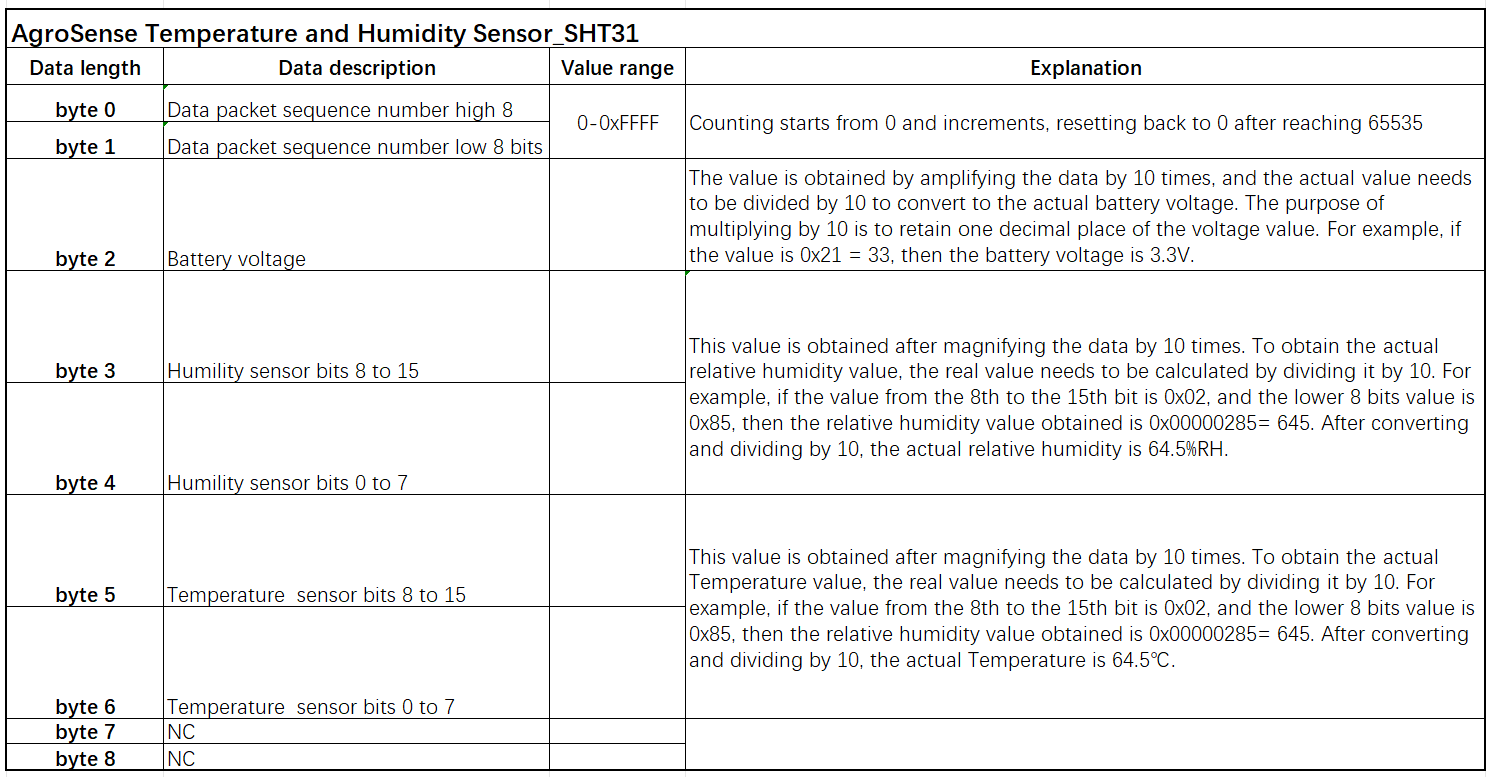
Example: 0x00, 0x04, 0x1D, 0x01, 0x89, 0x00, 0xF8, 0x00, 0x00
Data parsing:
-
Battery voltage is 2.9V.
-
Humility is 39.3%
-
Temperature is 24.8 ℃.
4.3.5 AgroSense_RTD PT1000 Temperature Sensor
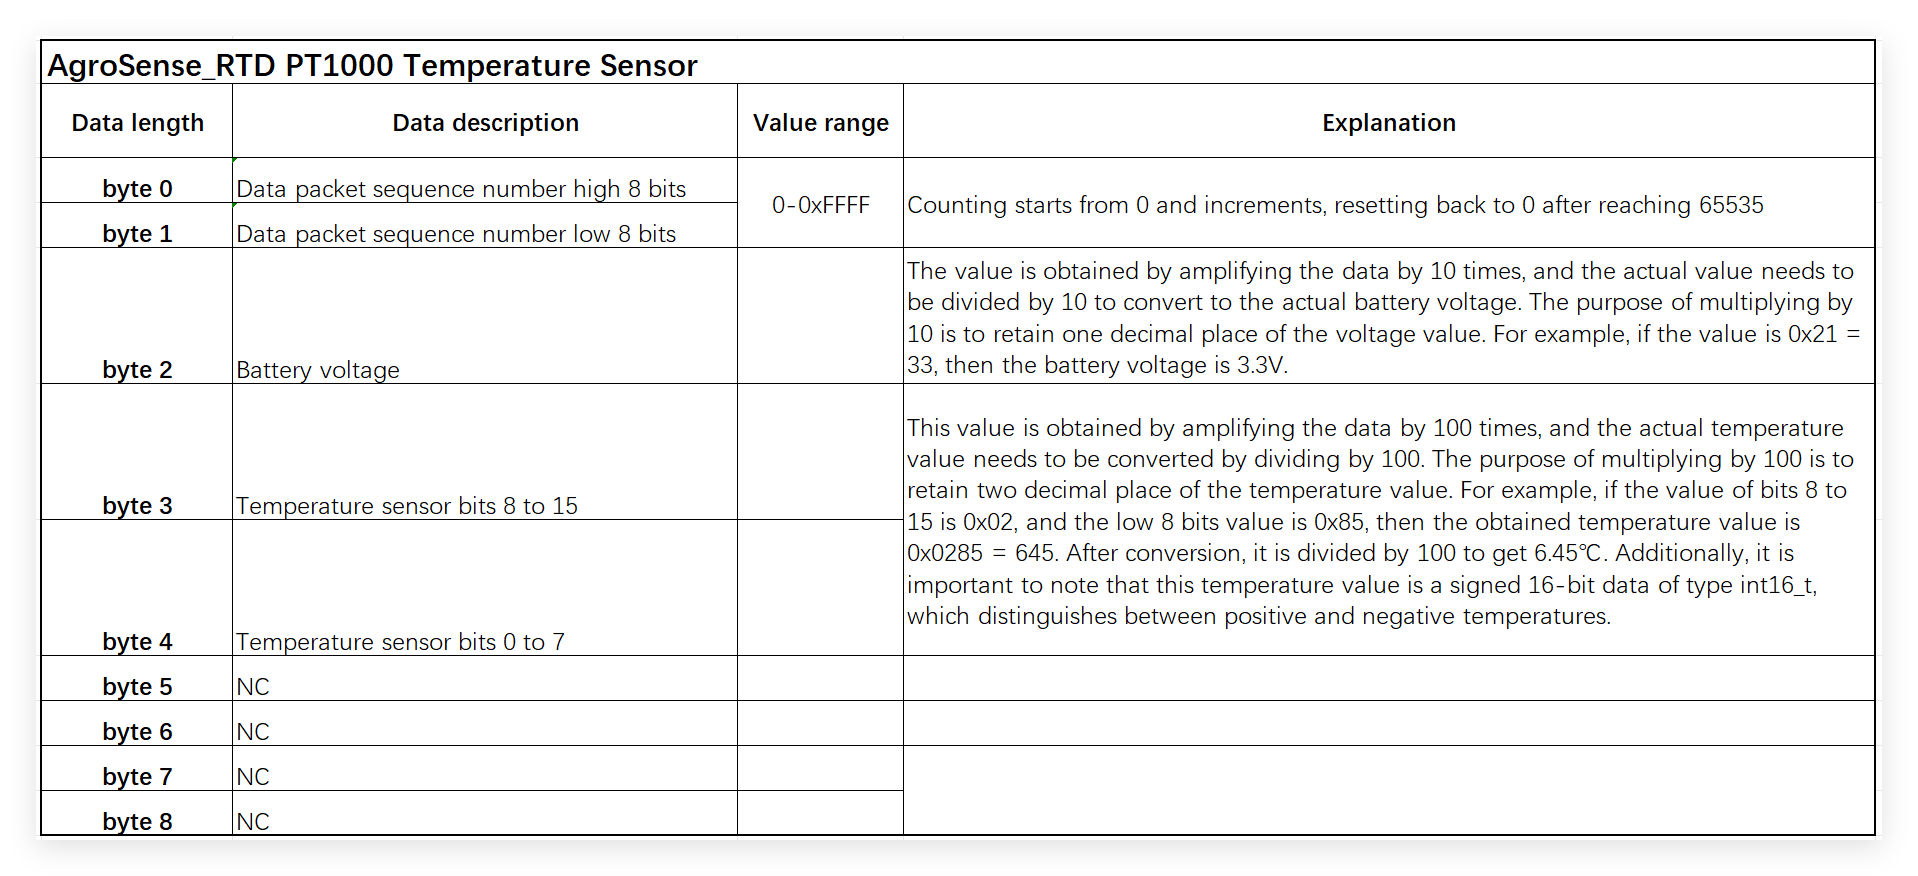
Example: 0x00, 0x03, 0x1D, 0x07, 0x30, 0x00, 0x00, 0x00, 0x00
Data parsing:
-
Battery voltage is 2.9V.
-
Industrial Temperature is 18.4 ℃
4.3.6 AgroSense Soil Moisture Sensor
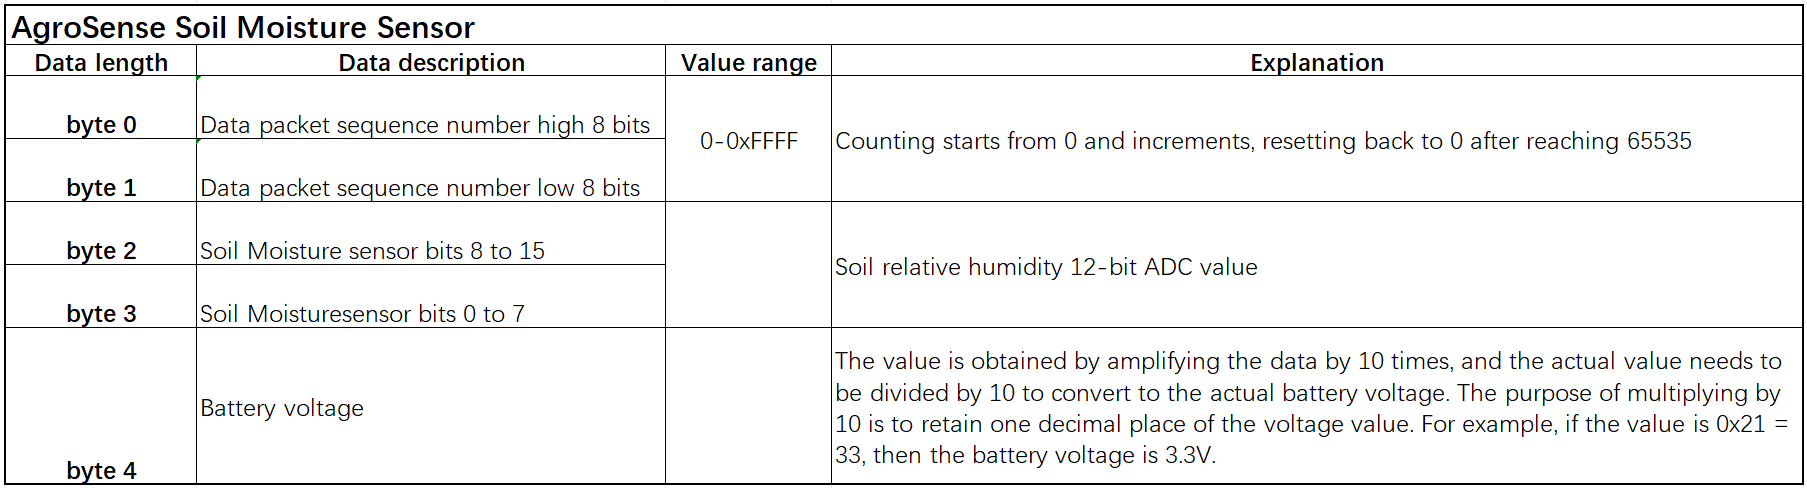
Example: 0x00, 0x08, 0x05, 0xC7, 0x1E
Data parsing:
-
Soil ADC value is 1479.
-
Battery voltage is 3.0V.
4.3.7 AgroSense-carbon dioxide(CO2) sensor
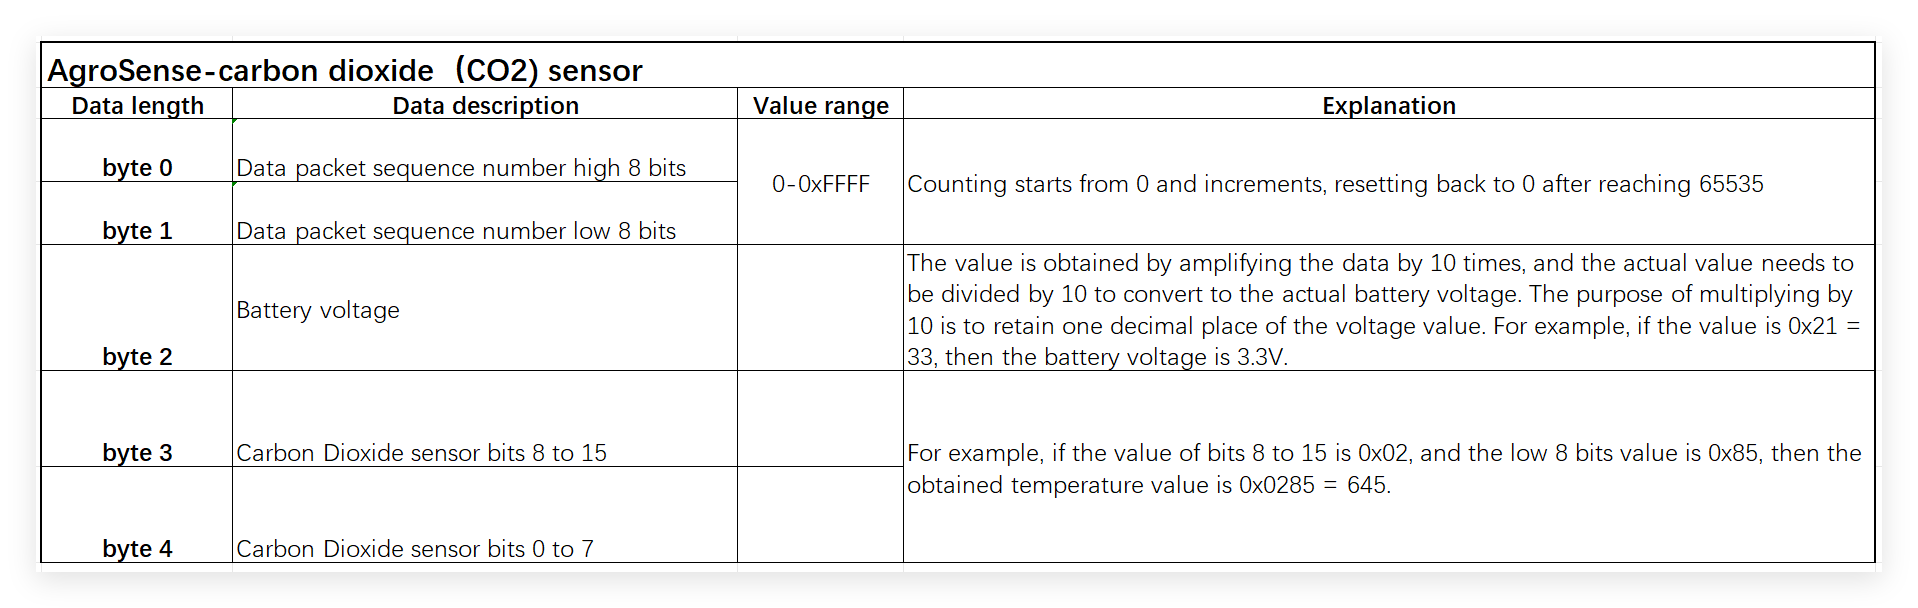
Example: 0x00, 0x01, 0x28, 0x02, 0x06
Data parsing:
-
Battery voltage is 4.0V.
-
CO2 is 518 ppm
4.3.8 AgroSense_Positioning Water Leak Sensor

Example: 0x00, 0x03, 0x1D, 0x00, 0x00, 0x02, 0x00, 0x00, 0x00, 0x03
Data parsing:
- Battery voltage is 2.9 V.
- water leakage symbol is 0.(Normal state)
- Number of leaks is 2.
- Length of last leak is 3s.
4.3.9 AgroSense_None-Position Rope Type Water Leak Sensor
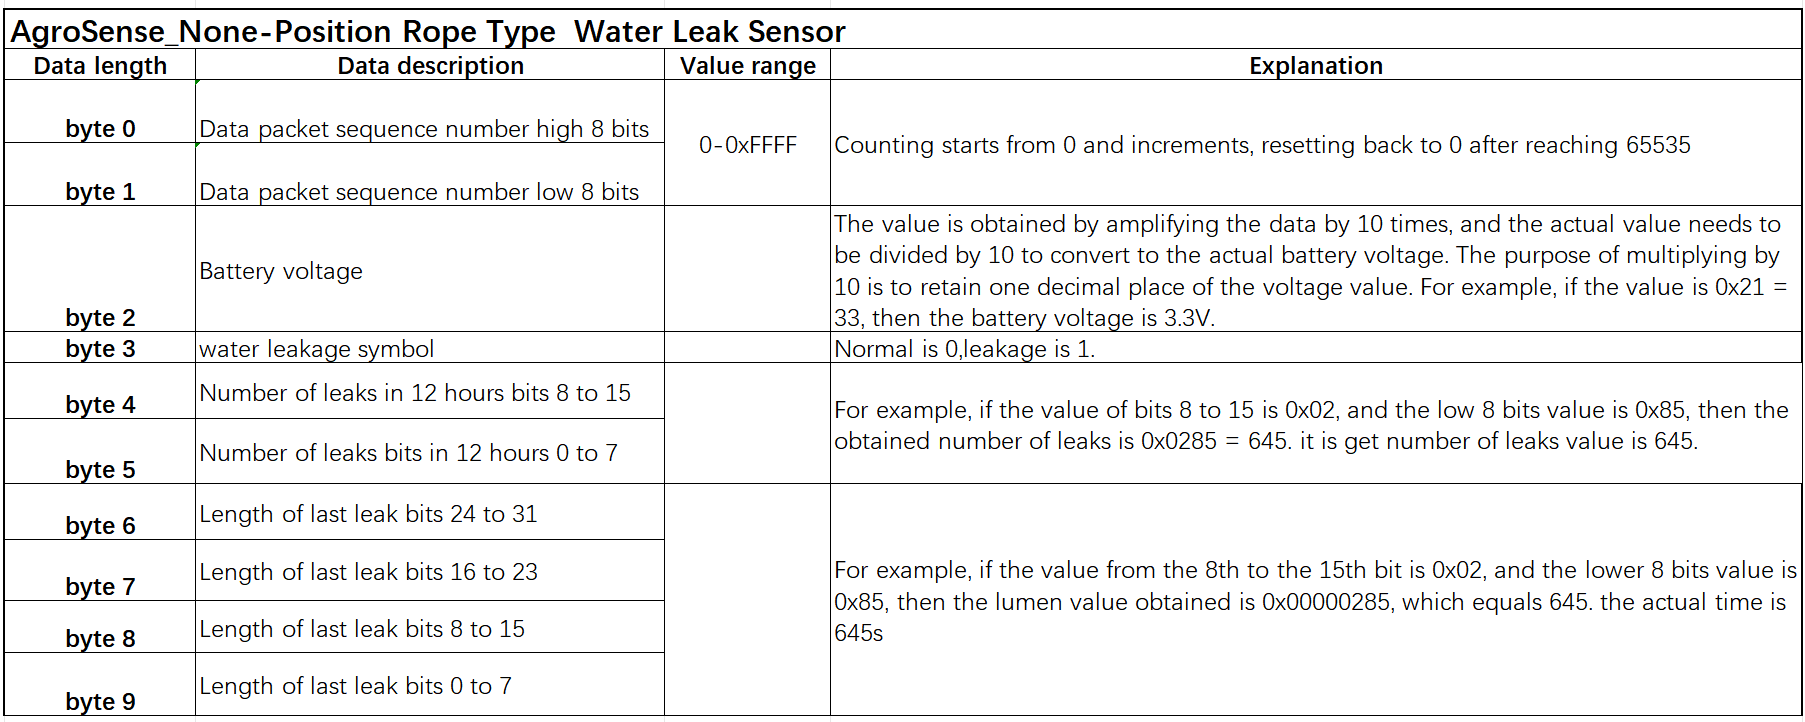
Example: 0x00, 0x03, 0x1D, 0x00, 0x00, 0x02, 0x00, 0x00, 0x00, 0x03
Data parsing:
- Battery voltage is 2.9 V.
- water leakage symbol is 0.(Normal state)
- Number of leaks is 2.
- Length of last leak is 3s.
4.3.10 AgroSense_GPS Tracker_PA1010D Sensor
Version: V1.0
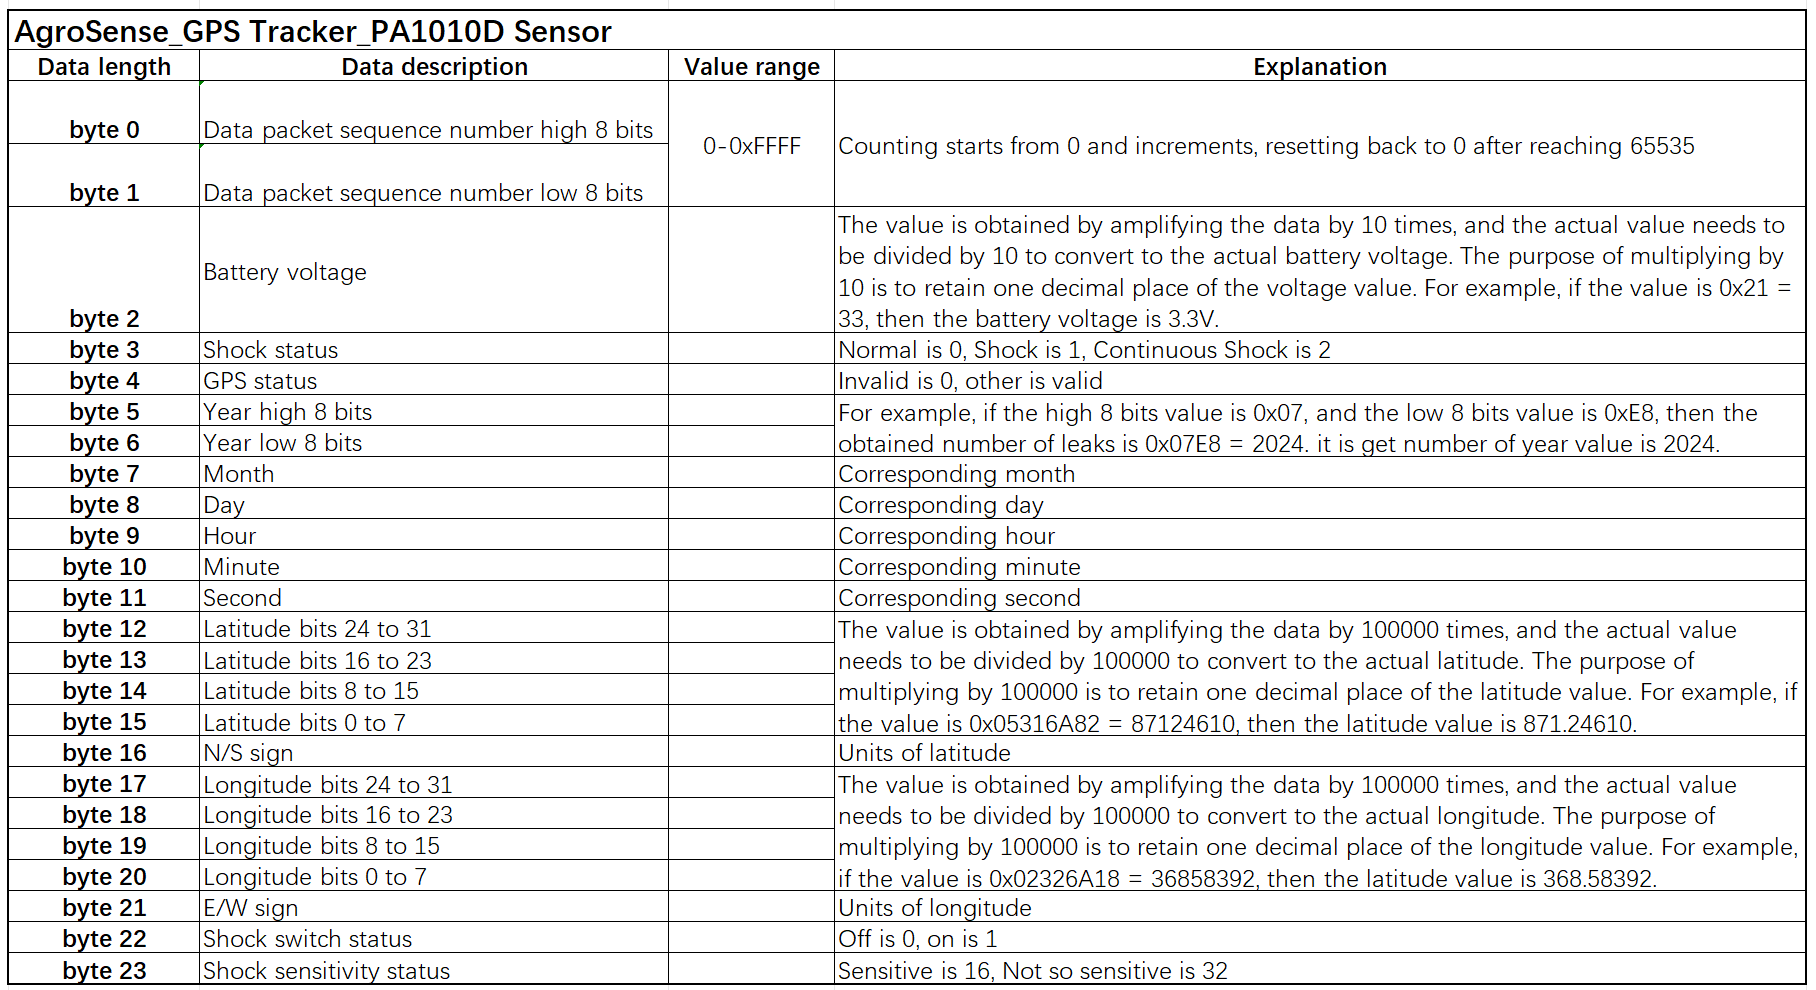
Example: 0x00, 0x06, 0x24, 0x00, 0x01, 0x07, 0xE8, 0x0A, 0x19, 0x08, 0x39, 0x10, 0x00, 0x22, 0x7F, 0x7E, 0x4E, 0x00, 0xAD, 0xB1, 0x89, 0x45, 0x00
Data parsing:
- Battery voltage is 3.6 V.
- Latitude value is 22.60862
- Longitude value is 113.83177
- Shock status is 0.(No shock)
Version: V2.0
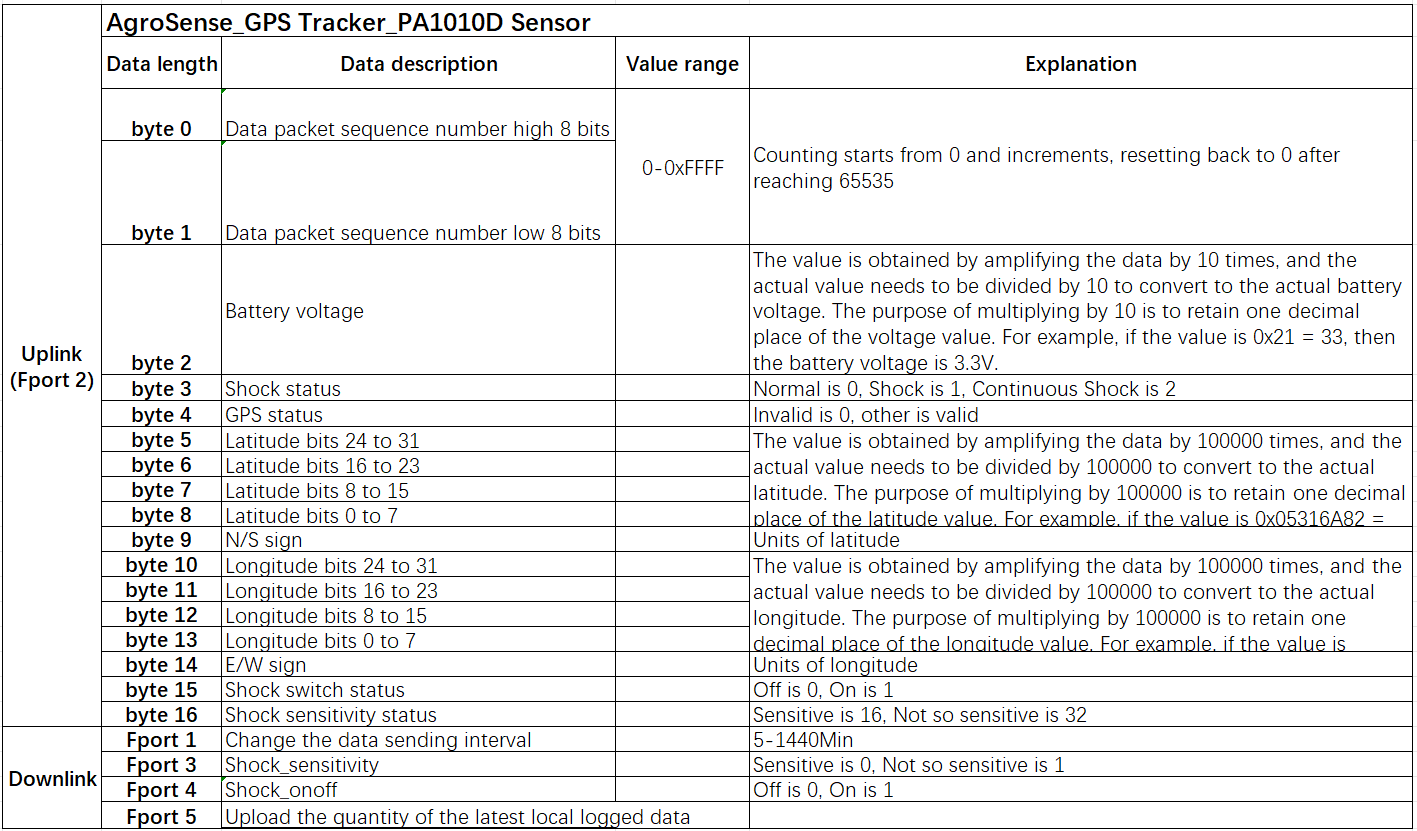
Example: 0x00, 0x06, 0x24, 0x00, 0x01, 0x00, 0x22, 0x7F, 0x7E, 0x4E, 0x00, 0xAD, 0xB1, 0x89, 0x45, 0x00
Data parsing:
- Battery voltage is 3.6 V.
- Latitude value is 22.60862
- Longitude value is 113.83177
- Shock status is 0.(No shock)
4.3.11 AgroSense_GPS Tracker NEO_6M Sensor
Version: V1.0
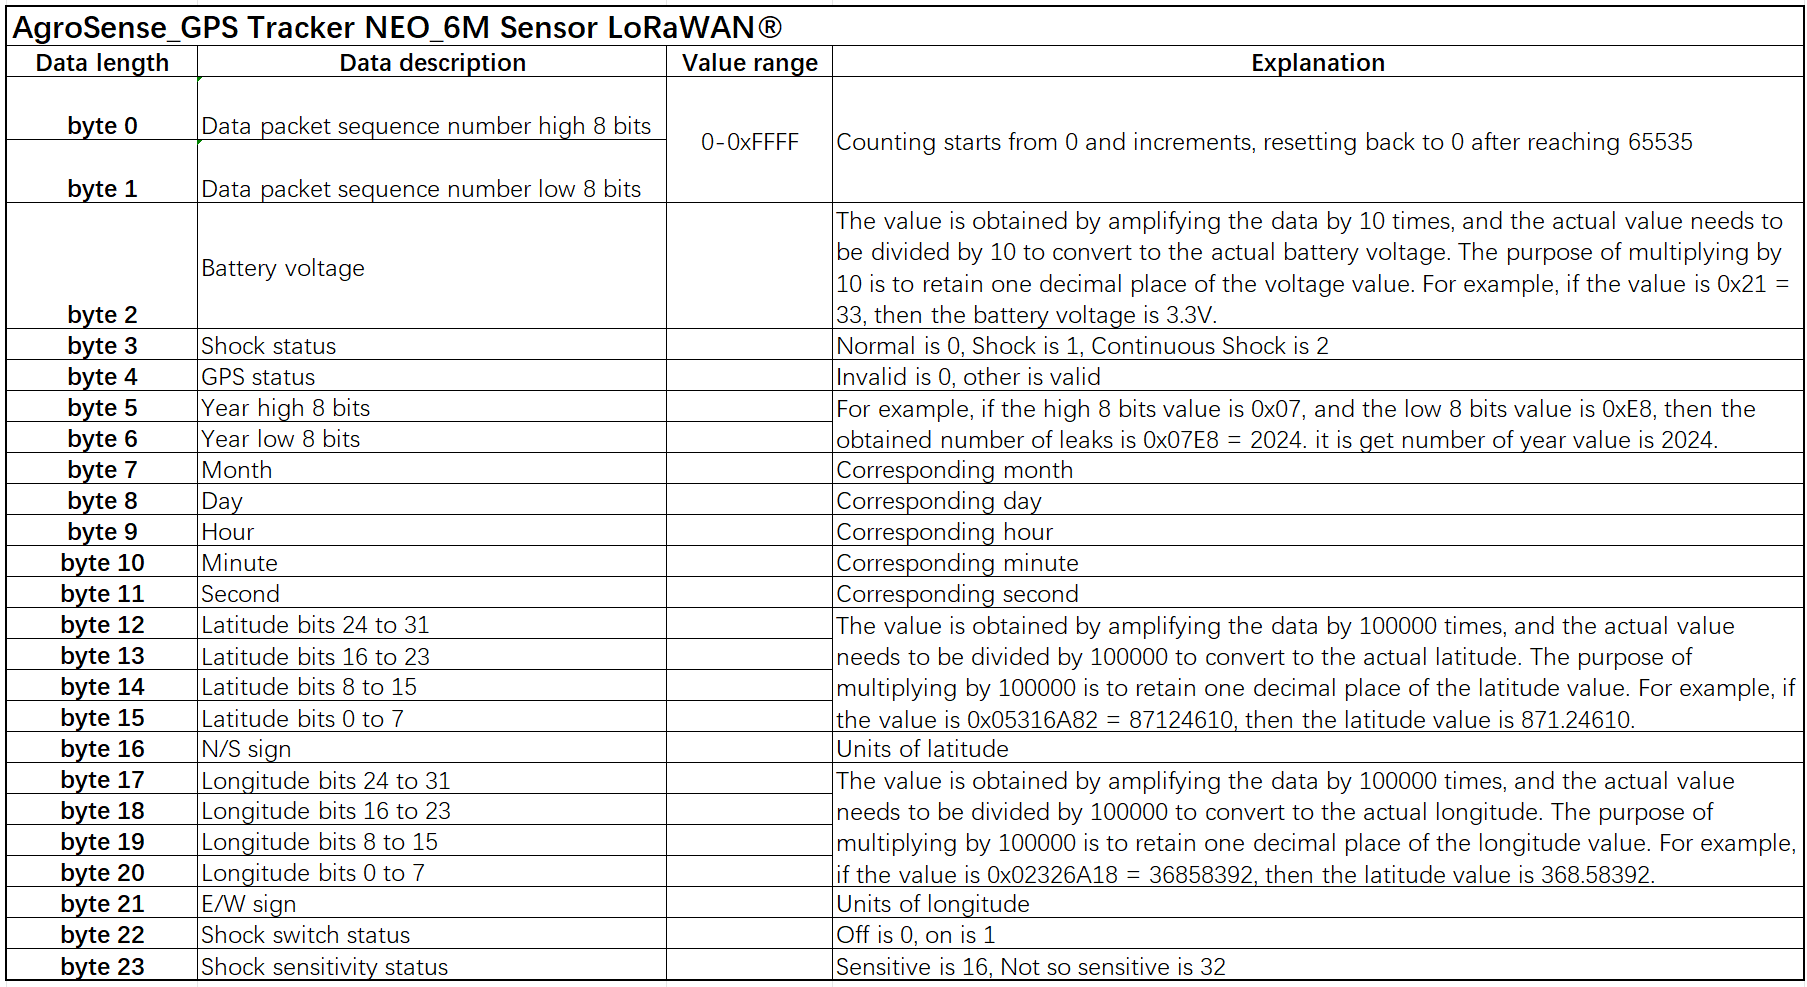
Example: 0x00, 0x06, 0x24, 0x00, 0x01, 0x07, 0xE8, 0x0A, 0x19, 0x08, 0x39, 0x10, 0x00, 0x22, 0x7F, 0x7E, 0x4E, 0x00, 0xAD, 0xB1, 0x89, 0x45, 0x00
Data parsing:
- Battery voltage is 3.6 V.
- Latitude value is 22.60862
- Longitude value is 113.83177
- Shock status is 0.(No shock)
Version: V2.0
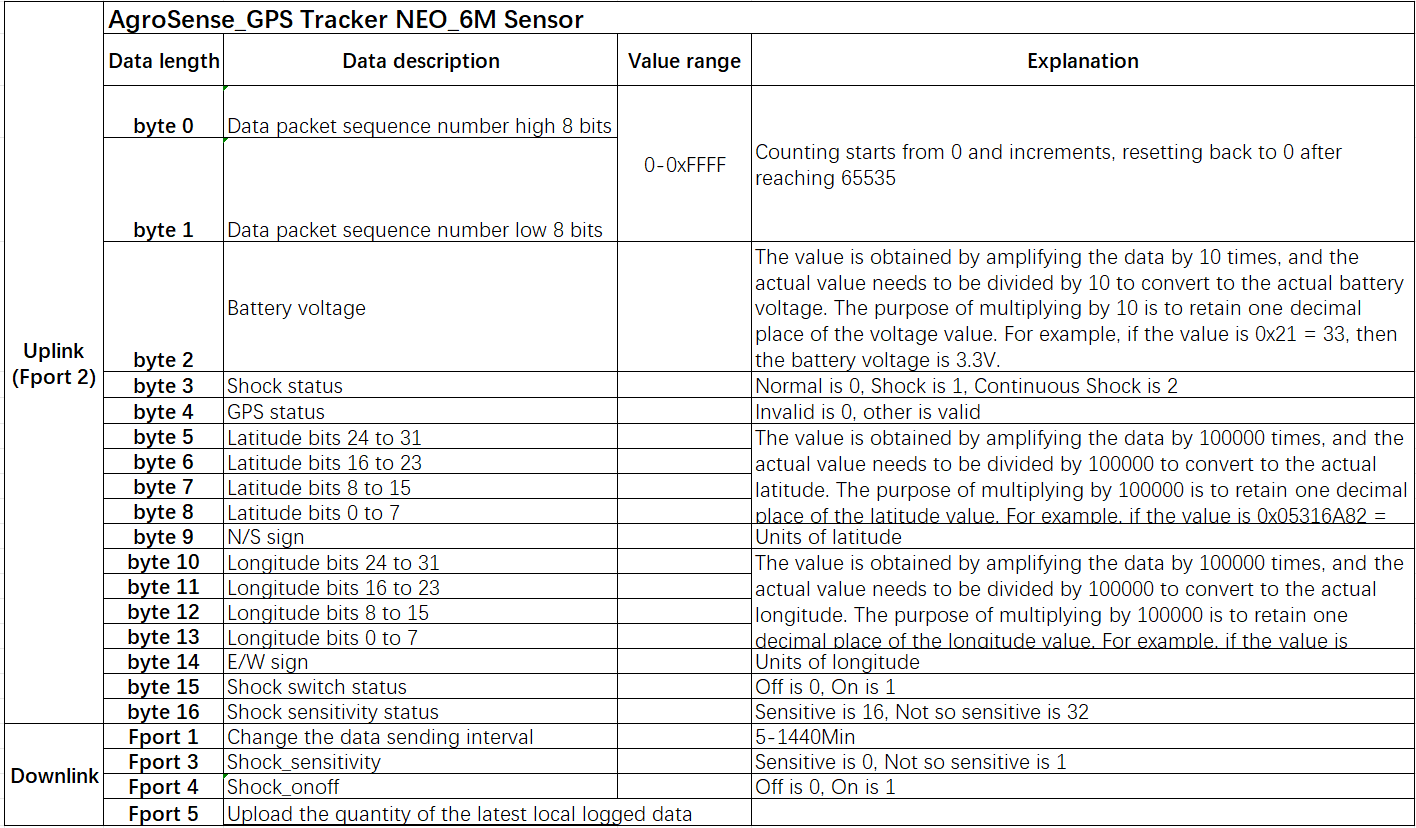
Example: 0x00, 0x06, 0x24, 0x00, 0x01, 0x00, 0x22, 0x7F, 0x7E, 0x4E, 0x00, 0xAD, 0xB1, 0x89, 0x45, 0x00
Data parsing:
- Battery voltage is 3.6 V.
- Latitude value is 22.60862
- Longitude value is 113.83177
- Shock status is 0.(No shock)
4.3.12 AgroSense_Leaf Moisture Sensor
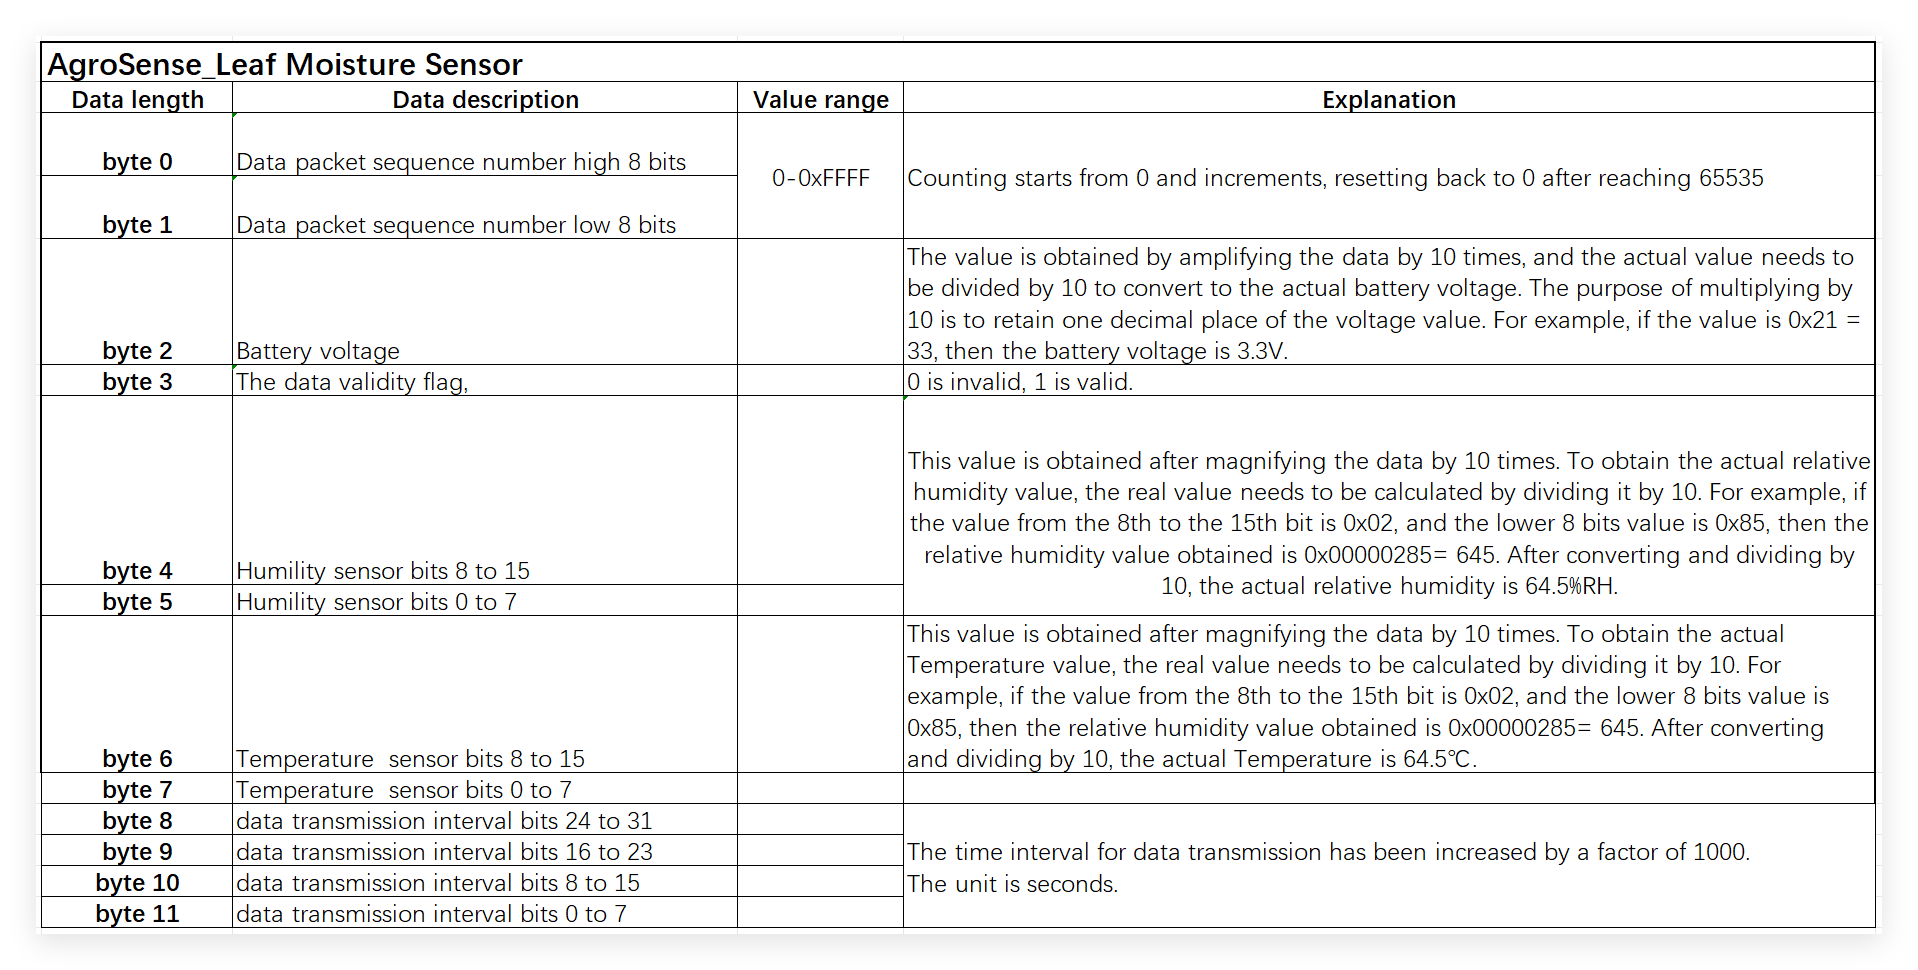
Example: 0x00, 0x01, 0x28, 0x01, 0x00, 0x33, 0x01, 0x3F, 0x00, 0x36, 0xEE, 0x80
Data parsing:
- Battery voltage is 4V.
- Humility value is 5.1%.
- Temperature value is 31.9℃.
- Data transmission interval value is 3600s.
4.3.13 AgroSense_Pipe Pressure Sensor
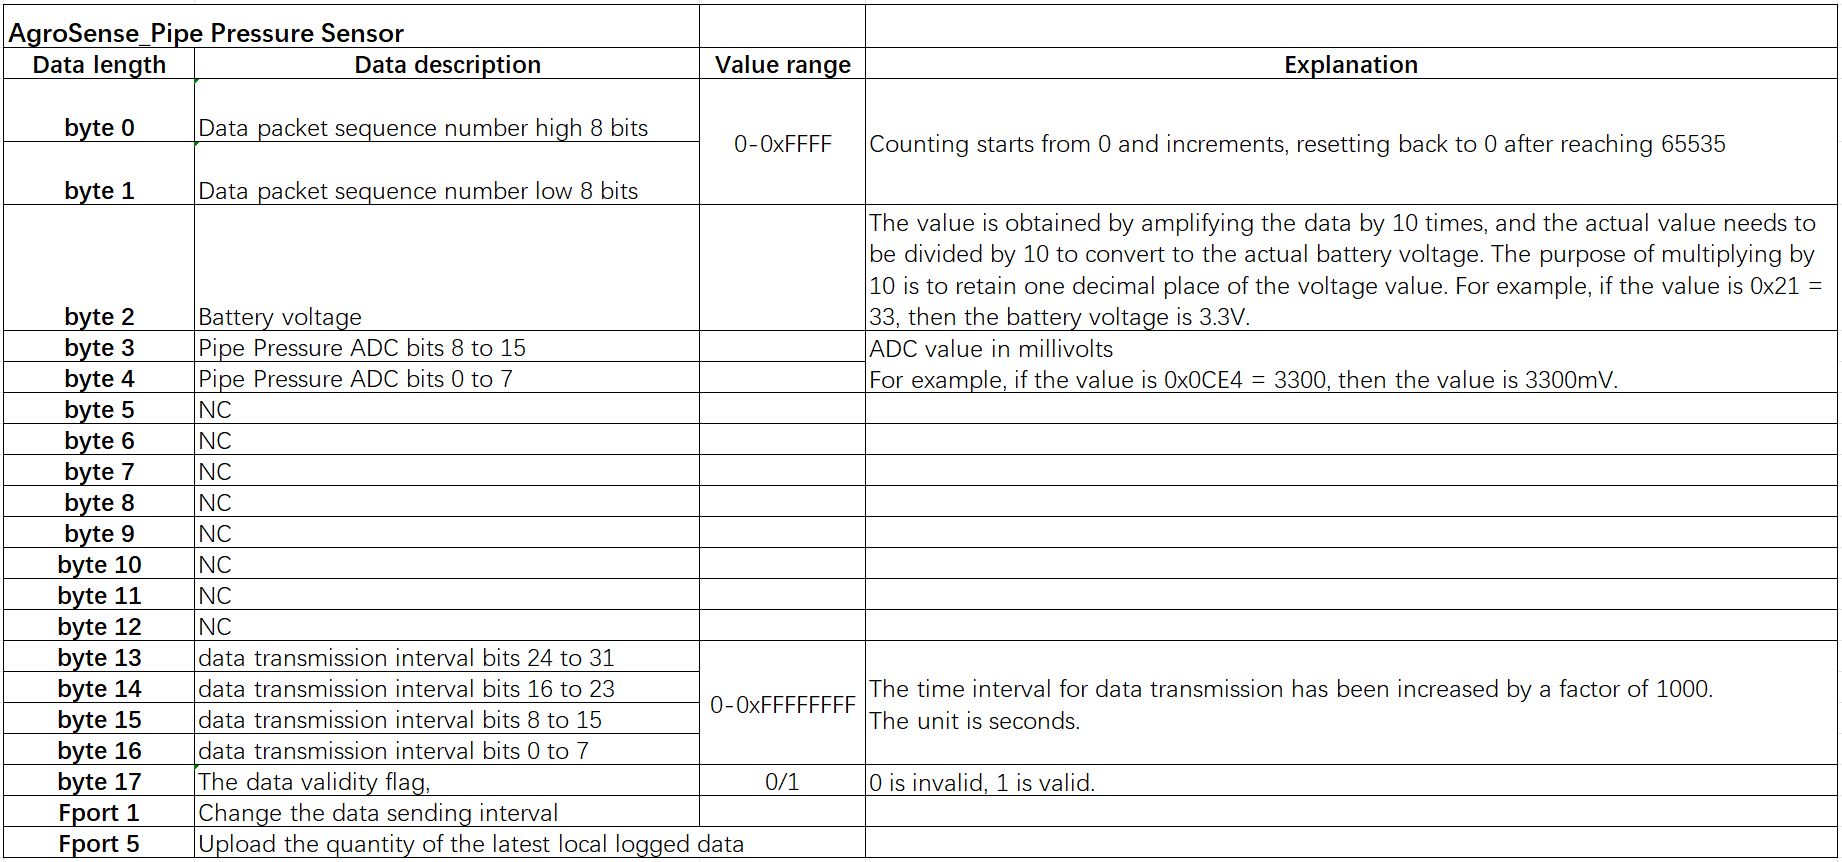
Example: 0x00, 0x01, 0x28, 0x0C, 0xE4, 0x00, 0x00, 0x00, 0x00, 0x00, 0x00, 0x00, 0x00, 0x00, 0x36, 0xEE, 0x80, 0x01
Data parsing:
- Battery voltage is 4V.
- Pipe Pressure ADC is 3300mV.(The output is a voltage value, the pressure has to be converted in the decoder.)
- Data transmission interval value is 3600s.
4.3.14 AgroSense_LoRaWAN® 4-Channel ADC 12 bits
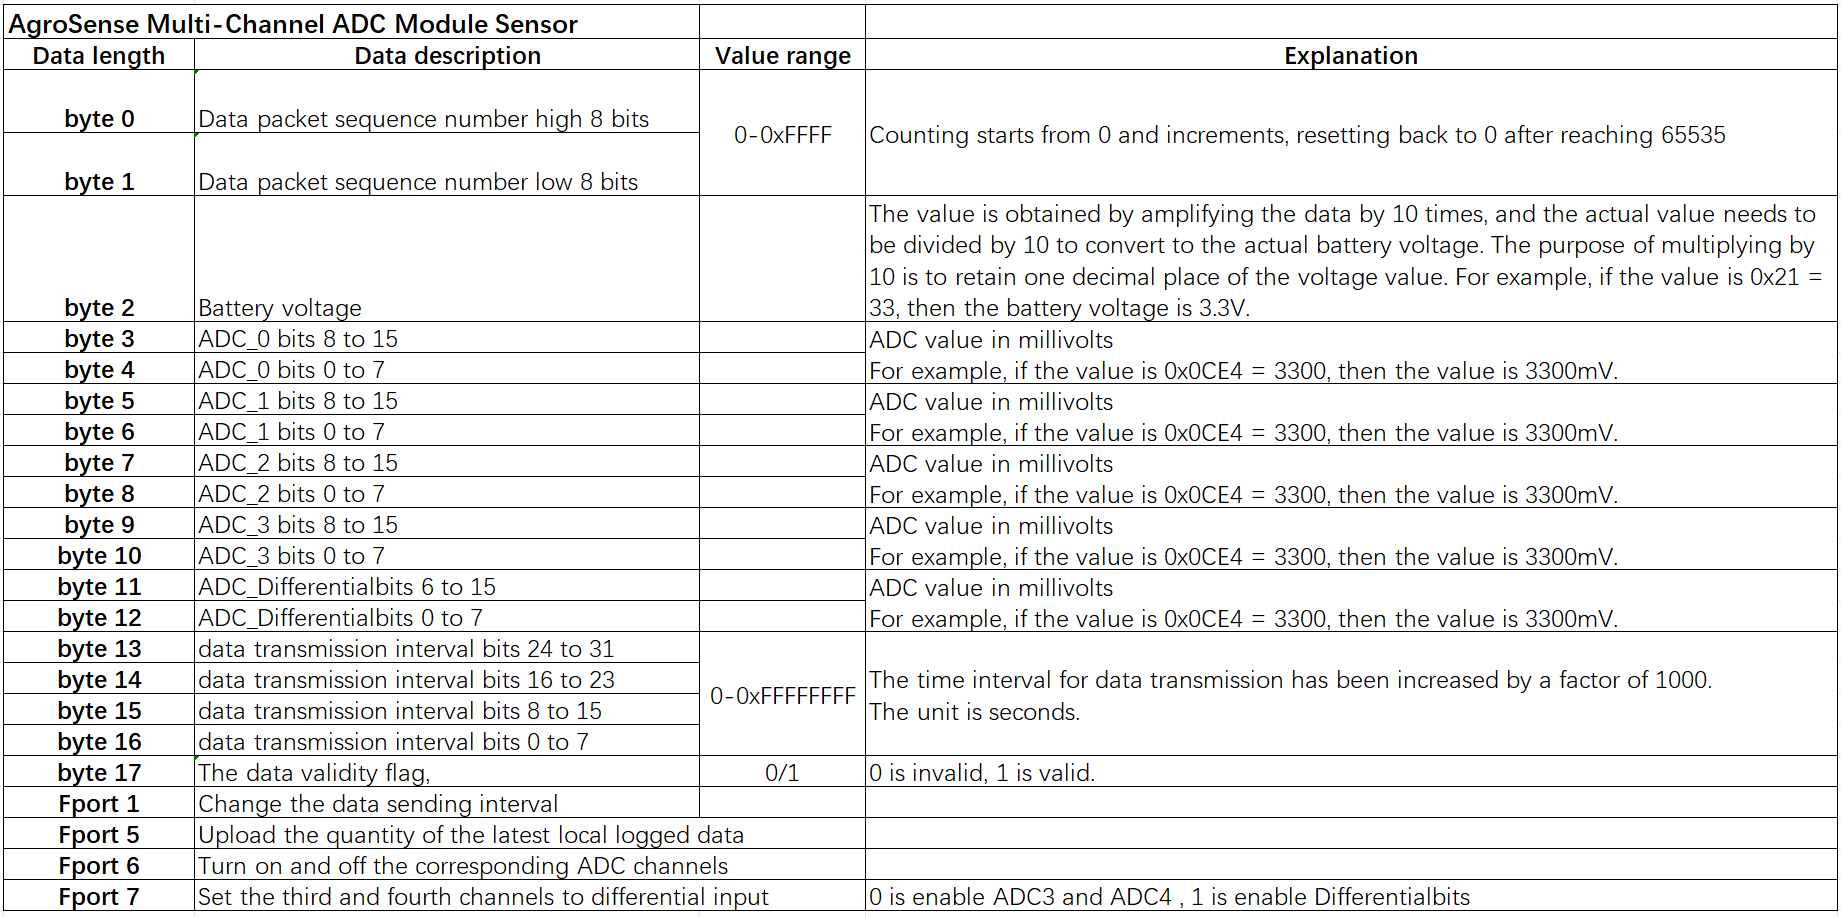
Example: 0x00, 0x01, 0x28, 0x0C, 0xE4, 0x0C, 0xC4, 0x0A, 0xE4, 0x0A, 0xAA, 0x0B, 0xB4, 0x00, 0x36, 0xEE, 0x80, 0x01
Data parsing:
- Battery voltage is 4V.
- ADC_0 is 3300mV.
- ADC_1 is 3268mV.
- ADC_2 is 2788mV.
- ADC_3 is 2730mV.
- ADC_Differentialbits is 2996mV.
- Data transmission interval value is 3600s.
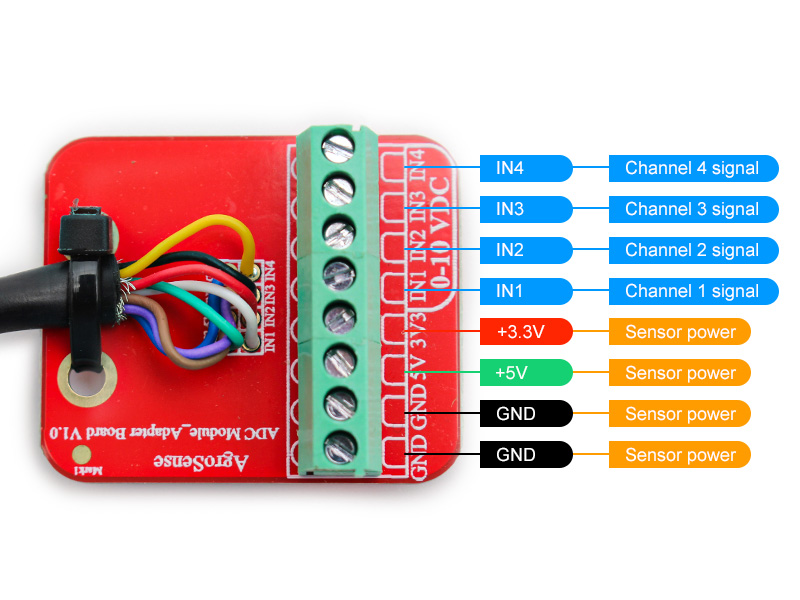
Wiring diagram
IN1–IN4 are connected to the sensor signal lines, while 3.3V and 5V are connected to the sensor power supply.
4.3.15 AgroSense_Soil Monitor
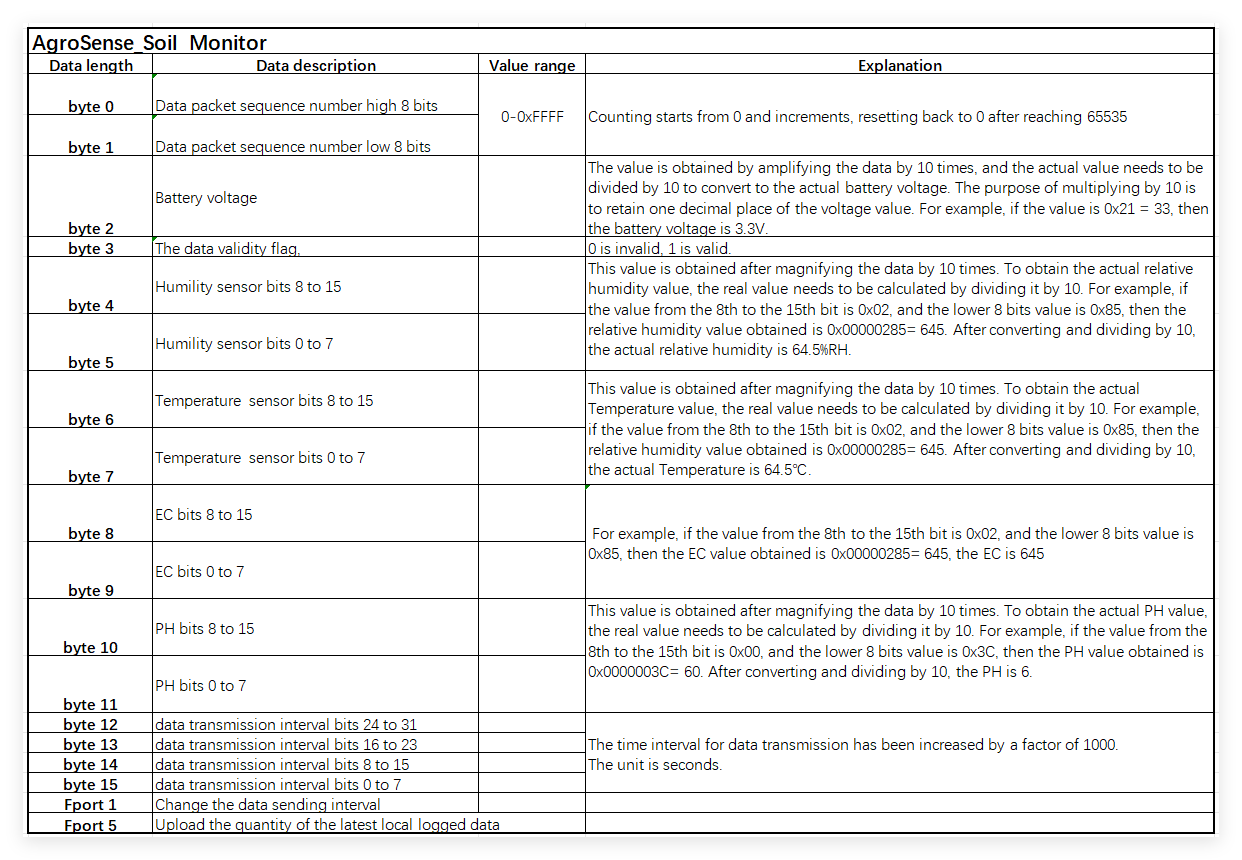
Example: 0x00, 0x01, 0x28, 0x01, 0x00, 0x33, 0x01, 0x3F, 0x02, 0x85, 0x00, 0x3C, 0x00, 0x36, 0xEE, 0x80
Data parsing:
- Battery voltage is 4V.
- Humility value is 5.1%.
- Temperature value is 31.9℃.
- EC value is 645.
- PH value is 6.
- Data transmission interval value is 3600s.
4.3.16 Agrosense_4 Channel Relay
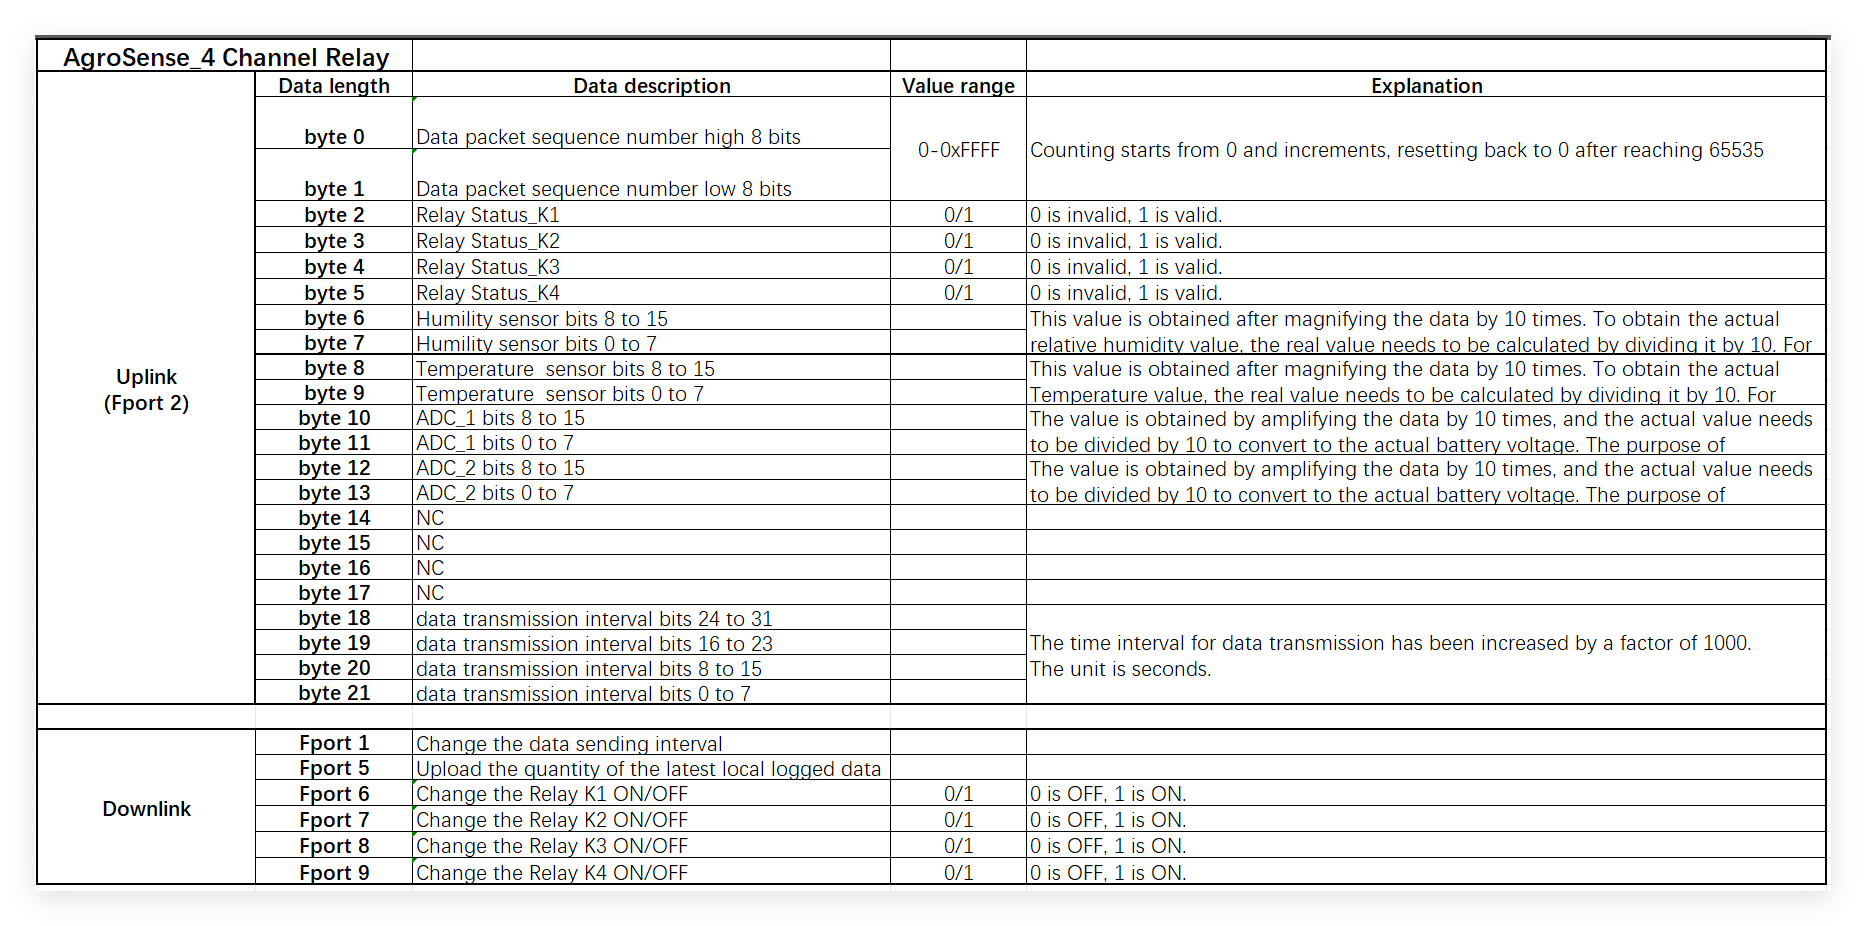
Example: 0x00, 0x01, 0x01, 0x00, 0x00, 0x00, 0x02, 0x00, 0x00, 0xDE, 0X00, 0X0C, 0X00, 0X21, 0X00, 0X00, 0X00, 0X00, 0x00, 0x09, 0x27, 0xC0
Data parsing:
- Humility value is 51.2%.
- Temperature value is 22.2℃.
- ADC1 value is 1.2v
- ADC2 value is 3.3v
- Relay1 status is ON.
- Relay2 status is OFF.
- Relay3 status is OFF.
- Relay4 status is OFF.
- Data transmission interval value is 600s.
For more detailed usage of Agrosense_4 Channel Relay you can refer to manual. https://github.com/Makerfabs/Agrosense-Decoder/tree/main/Agrosense_4%20Channel%20Relay
4.3.17 AgroSense_Ultrasonic Ranger Sensor

Example: 0x00, 0x01, 0x21, 0x01, 0x2C, 0x00, 0x09, 0x27, 0xC0
Data parsing:
- Battery voltage is 3.3V.
- Ranger value is 300mm.
- Data transmission interval value is 600s.
4.3.18 AgroSense_2 Channel Non-invasive AC Current Monitor
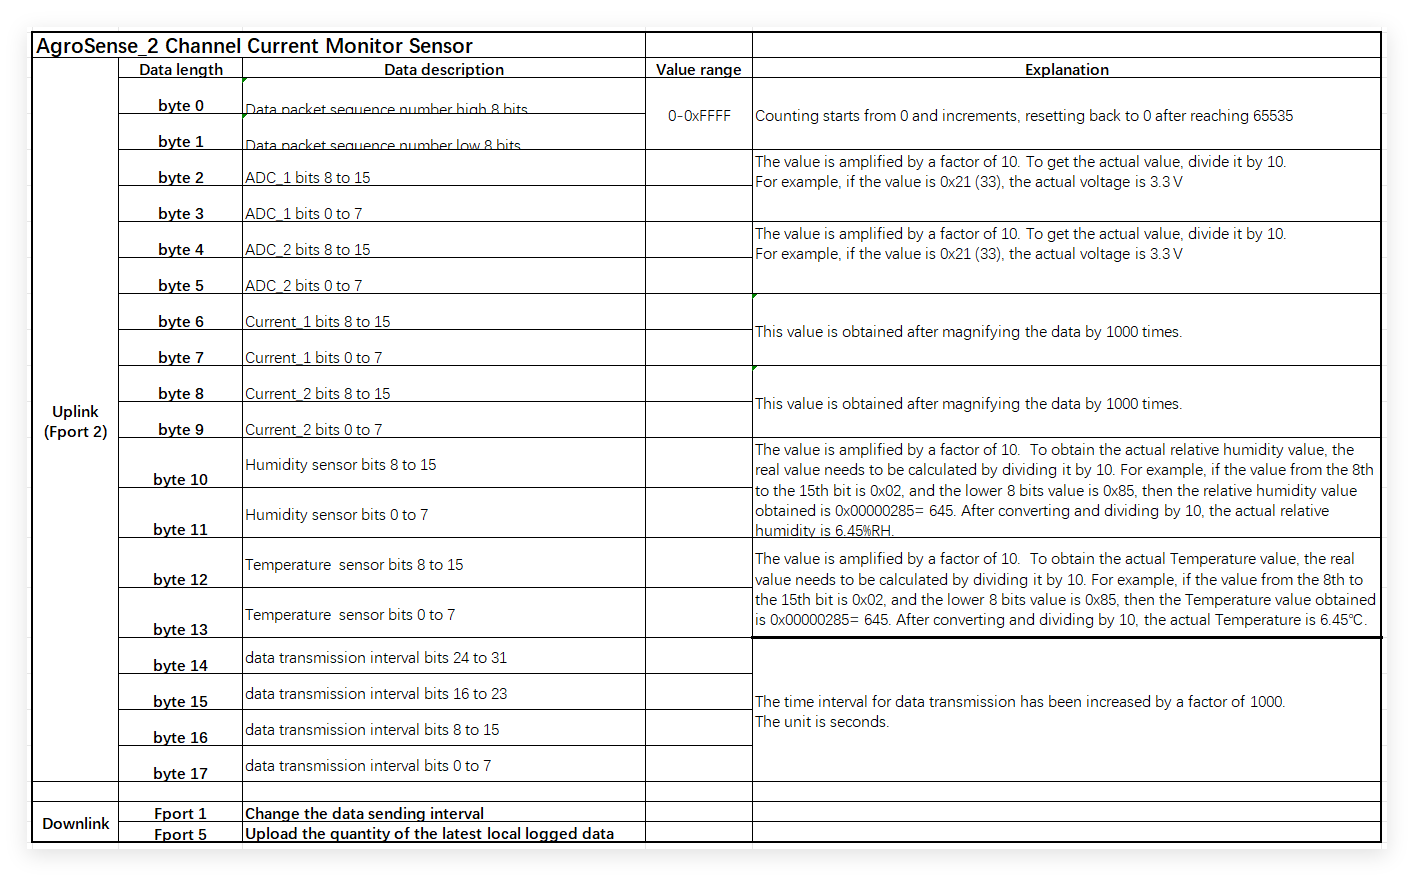
Example:0x00 0x8C 0x00 0x08 0x00 0x20 0x01 0x40 0x00 0x40 0x01 0xCC 0x01 0x15 0x00 0x00 0xEA 0x60
Data parsing:
- ADC1 value is 1.0v
- ADC2 value is 3.2v
- Current_1 is 0.5v
- Current_2 is 0.1v
- Humility value is 46.1%
- Temperature value is 27.8℃
- Data transmission interval value is 60s
4.3.19 AgroSense Valve & Water Flow
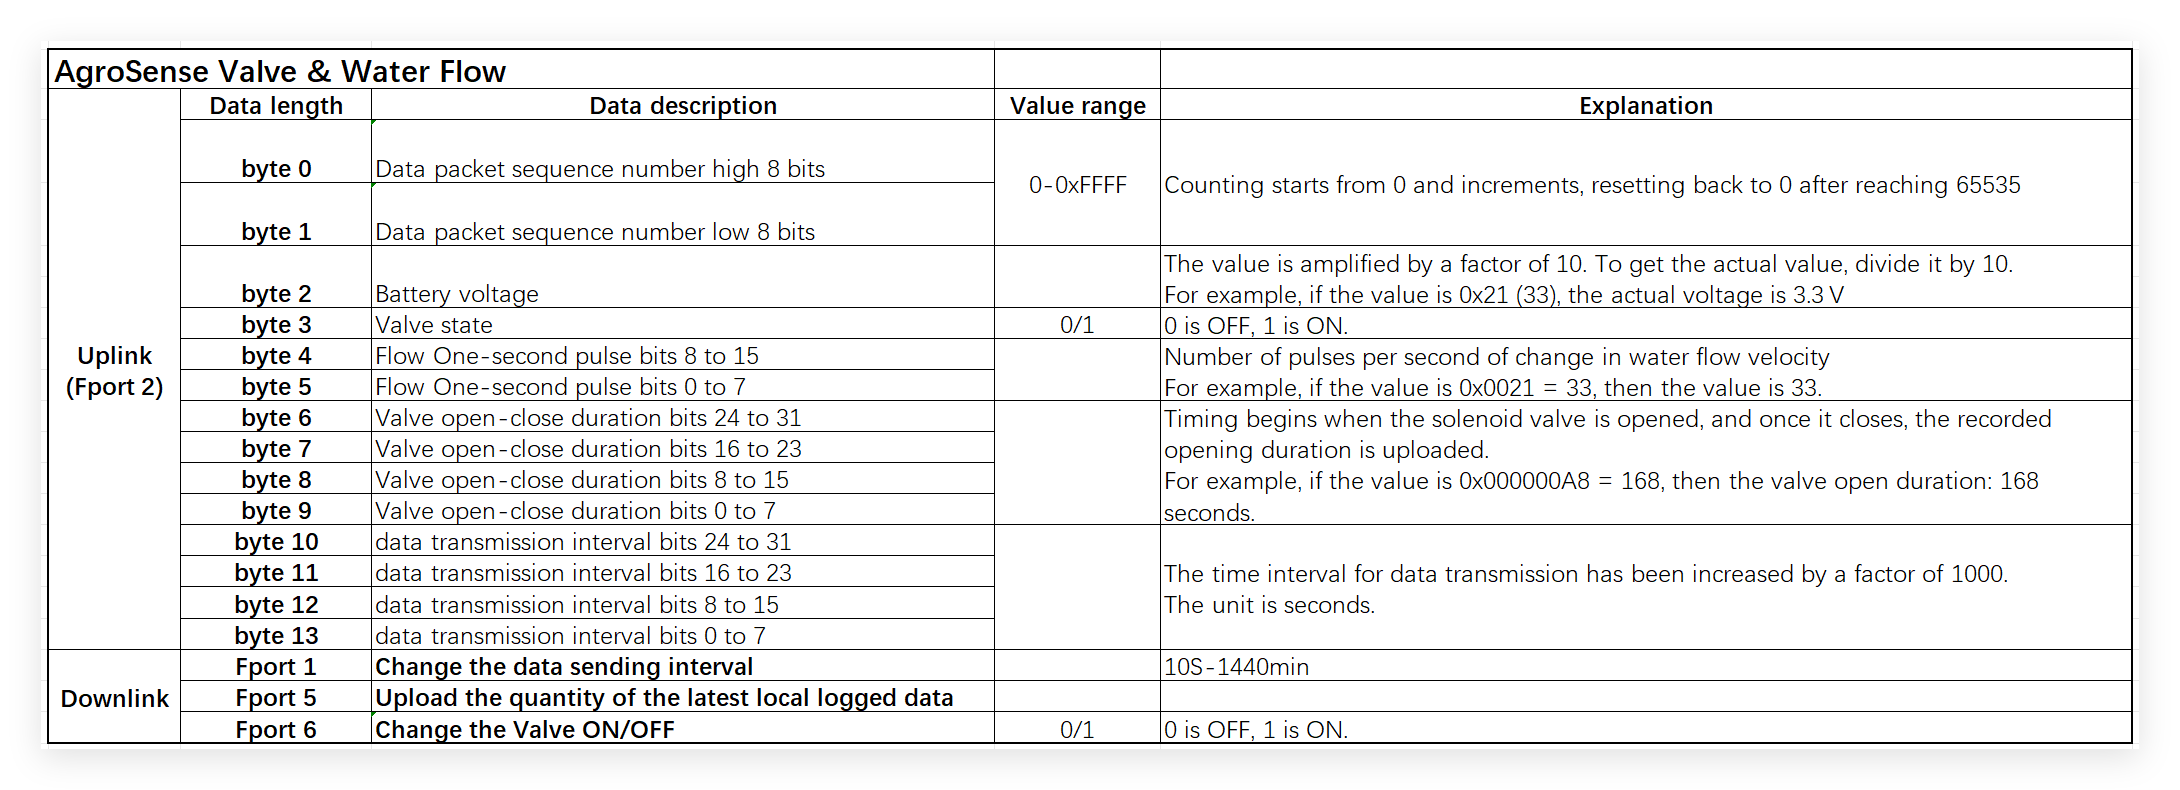
Example:0x00 0x01 0x24 0x01 0x00 0x21 0x00 0x00 0x00 0x00 0x00 0x09 0x27 0xC0
Data parsing:
- Battery voltage is 3.6V.
- Valve status is ON.
- Flow One-second pulse change is 33.
- Valve open-close duration is 0.(The timing will be uploaded when the valve closes)
- Data transmission interval value is 600s
4.3.20 AgroSense_Soil & Air EC-TH Pro
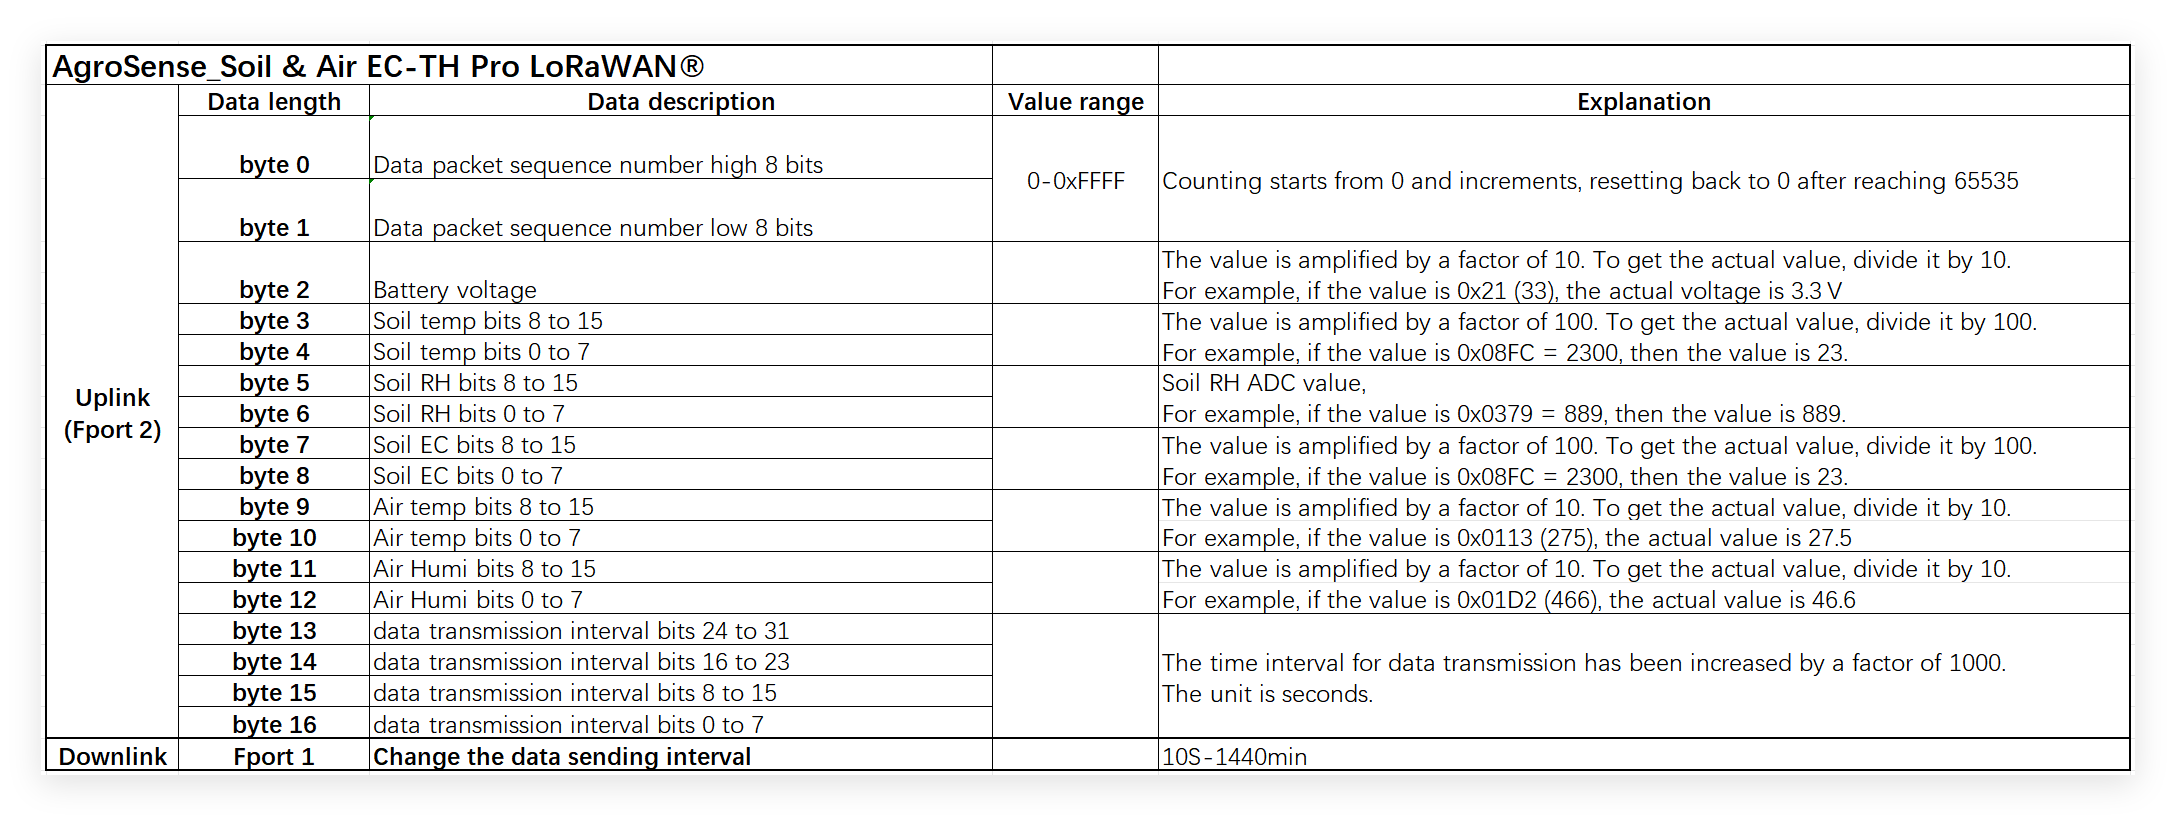
Example:0x00 0x01 0x24 0x08 0xFC 0x03 0x79 0x08 0xFC 0x01 0x13 0x01 0xD2 0x00 0x36 0xEE 0x80
Data parsing: - Battery voltage is 3.6V.
-
Soil temp is 23℃.
-
Soil RH is 889.
-
Soil EC is 23μS/cm.
-
Air temp is 27.5℃.
-
Air Humi is 46.6%.
-
Data transmission interval value is 3600s.
4.4 Data Parsing to ThingSpeak
1.1 Create a Channel:
- Log in to ThingSpeak.
- Click on “My Channels”.
- Click on “+ New Channel”.
- Fill in the Channel name and field names (e.g., Field1: Temperature, Field2: Humidity).
- Click on “Save Channel”.

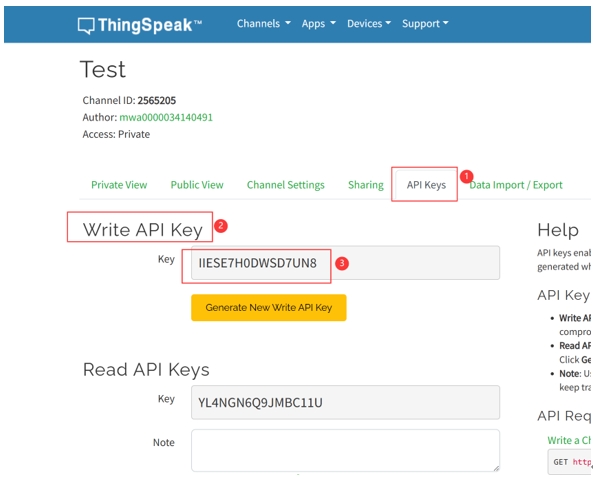
1.2 Obtain the Write API Key:
- Open the newly created Channel.
- Click on the “API Keys” tab.
- Copy the “Write API Key”.
2.1 Configure Payload Formatter:
- In the device details page, click on the “Payload Formatters” tab.
- Click on the “Uplink” tab.
- Select “Custom JavaScript Formatters”.
- Write JavaScript code to parse the binary data sent from the device.
- Finally click "Save changes".
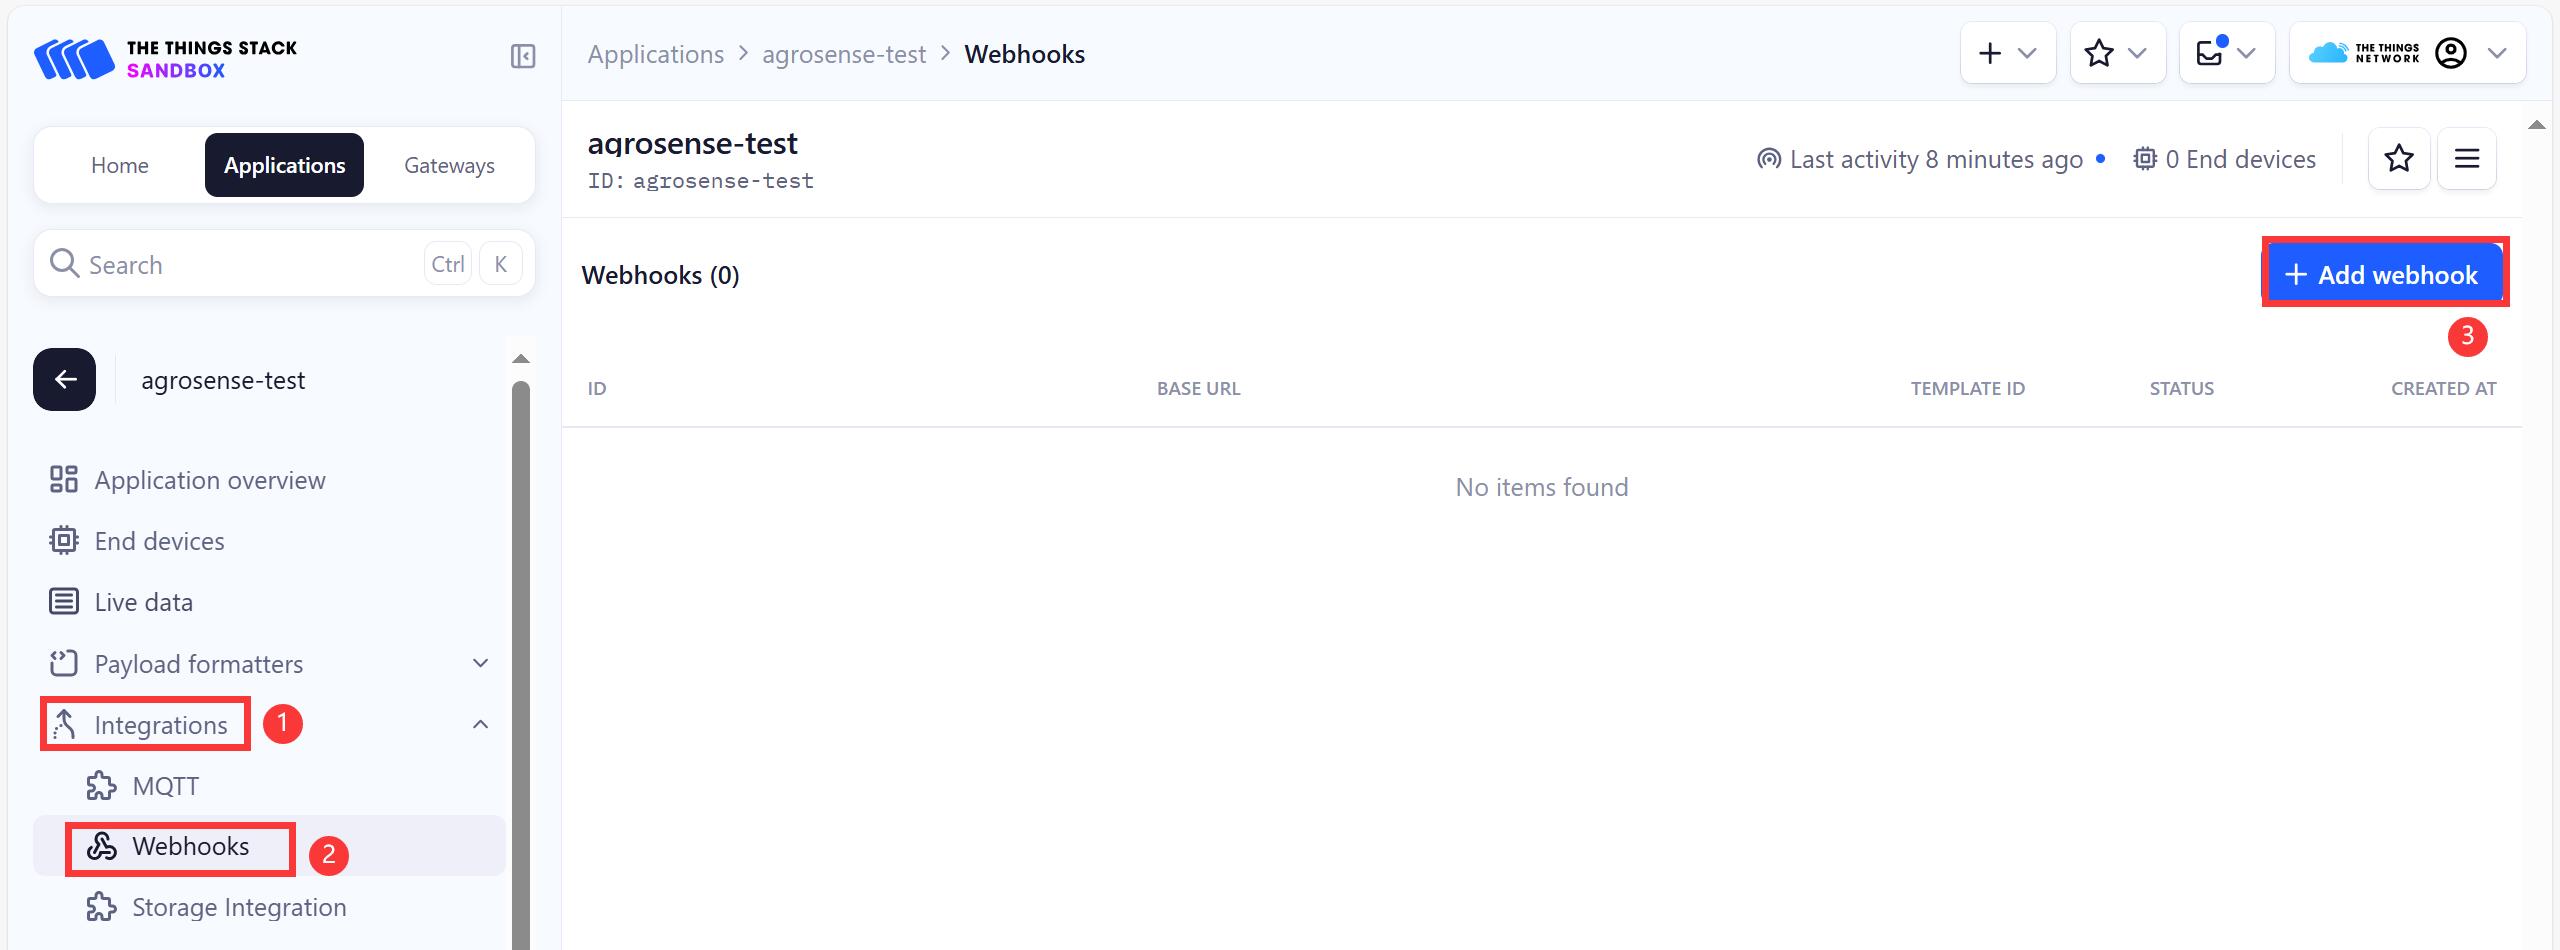
2.2 Configure Webhooks:
- In the application page, click on the “Integrations” tab.
- Select “Webhooks”.
-
Click on “+ Add webhook”.
-
Choose the “ThingSpeak” template.
- Fill in the following information and click on “Create ThingSpeak webhook”.
| Webhook ID | <--> | Any unique ID |
|---|---|---|
| Channel ID | <--> | Your ThingSpeak Channel ID |
| API Key | <--> | Your ThingSpeak Write API Key |
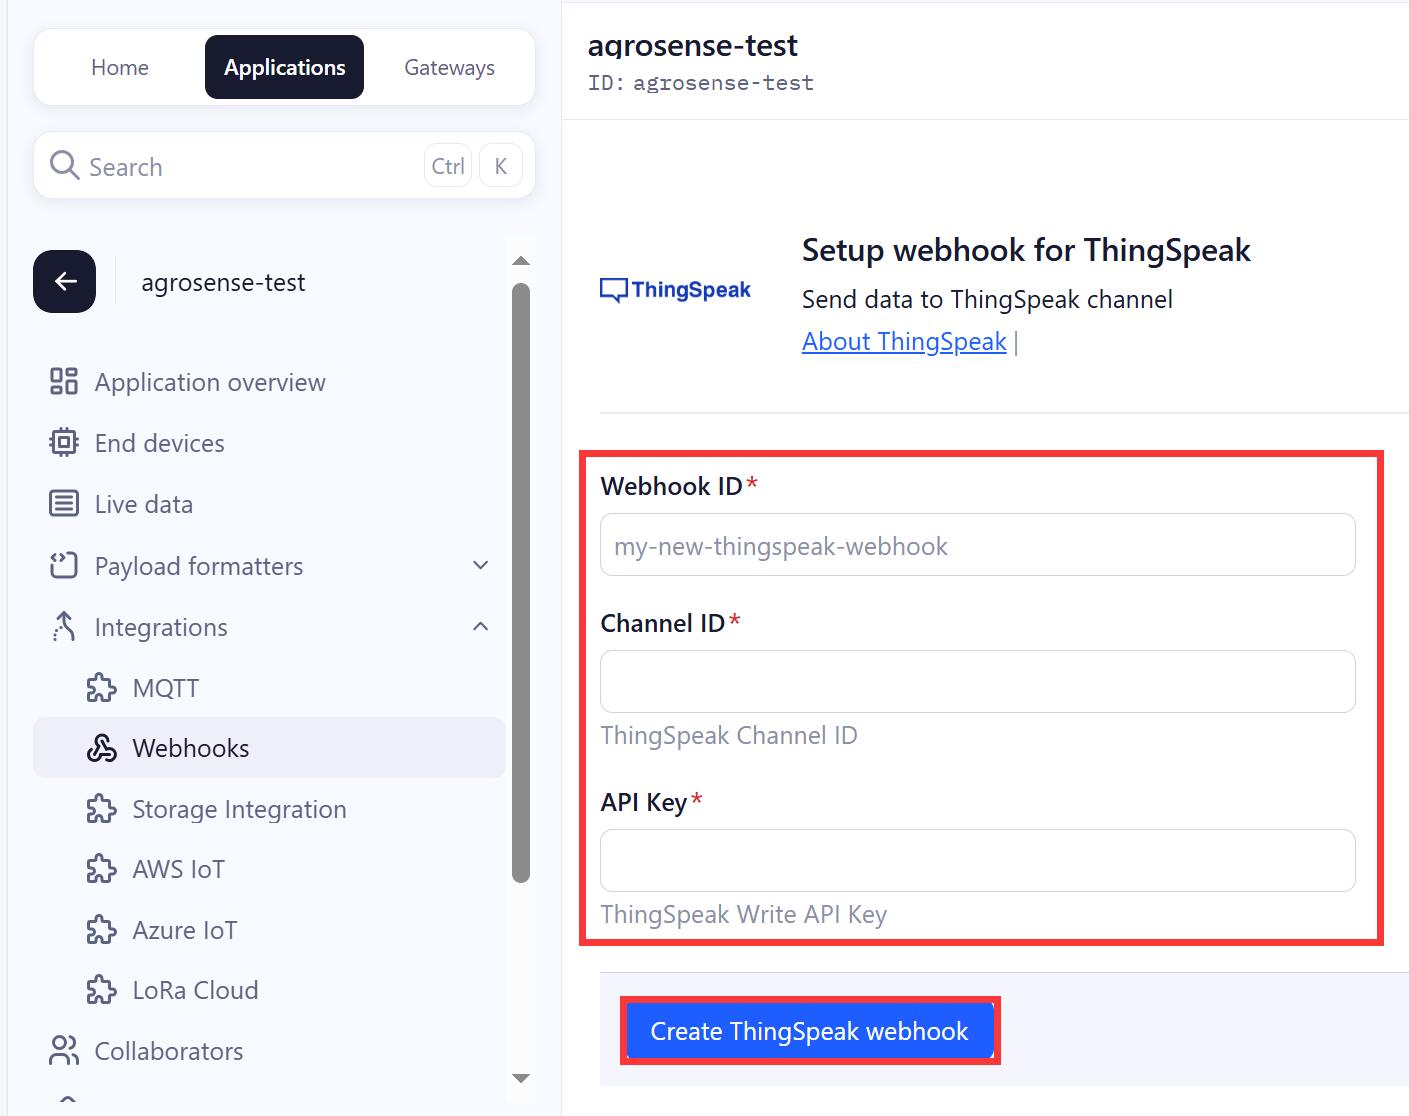
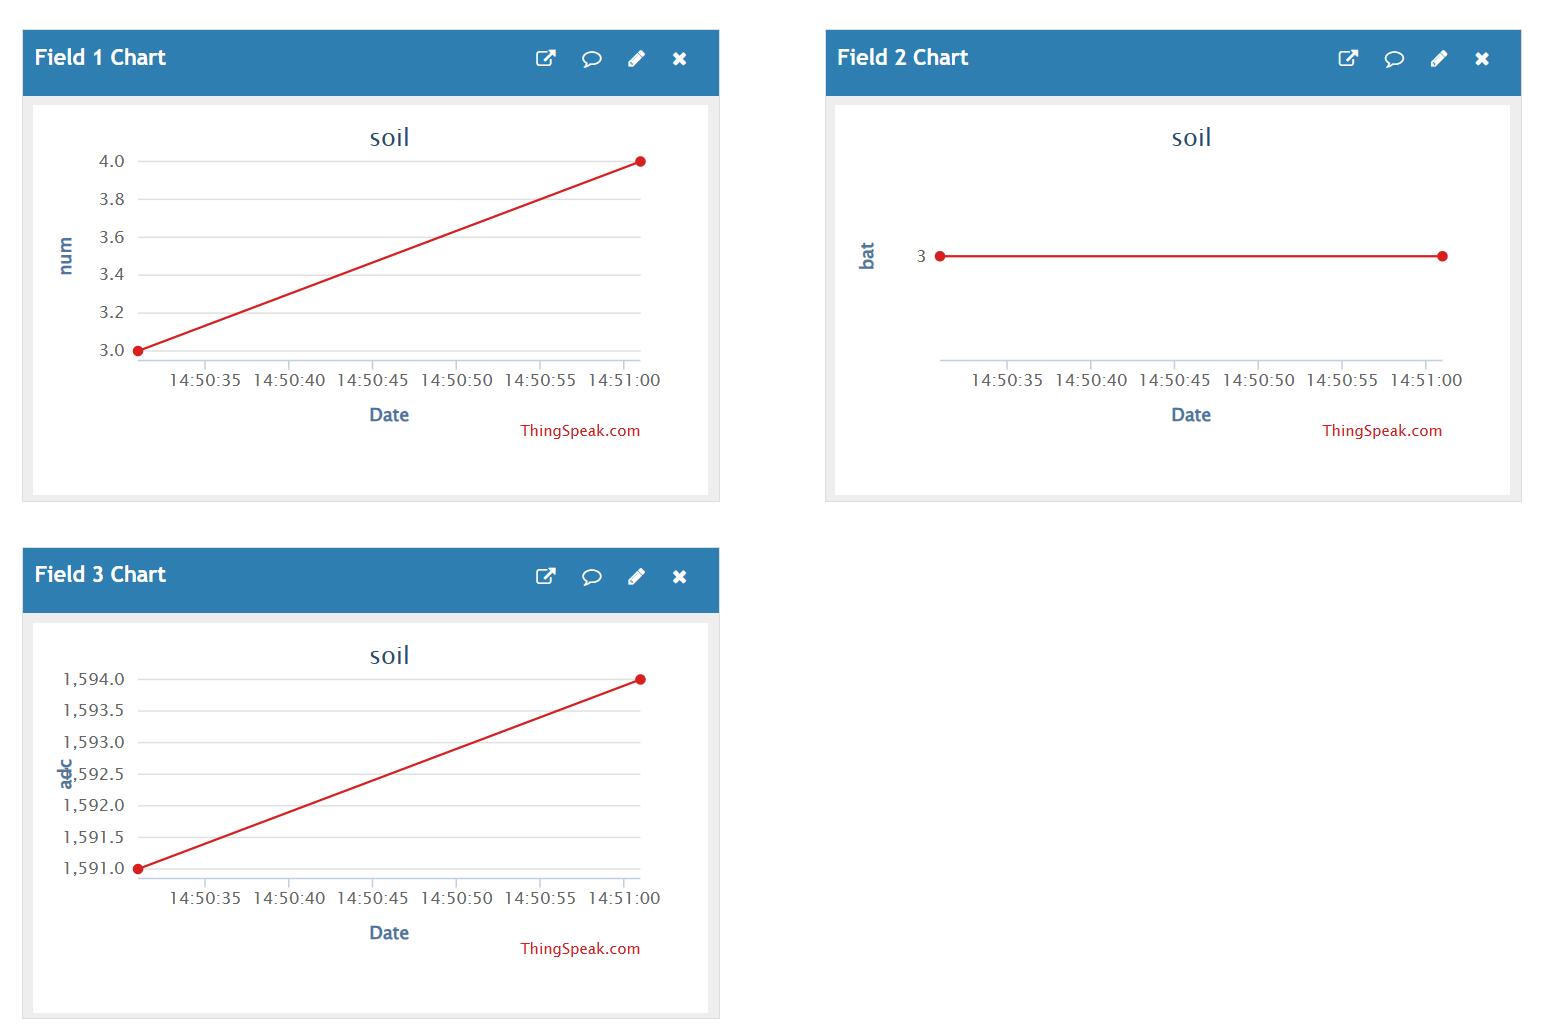
- Press AgroSense LoRaWAN® Sensor's Botton User , you will successfully see the data in Thingspeak.
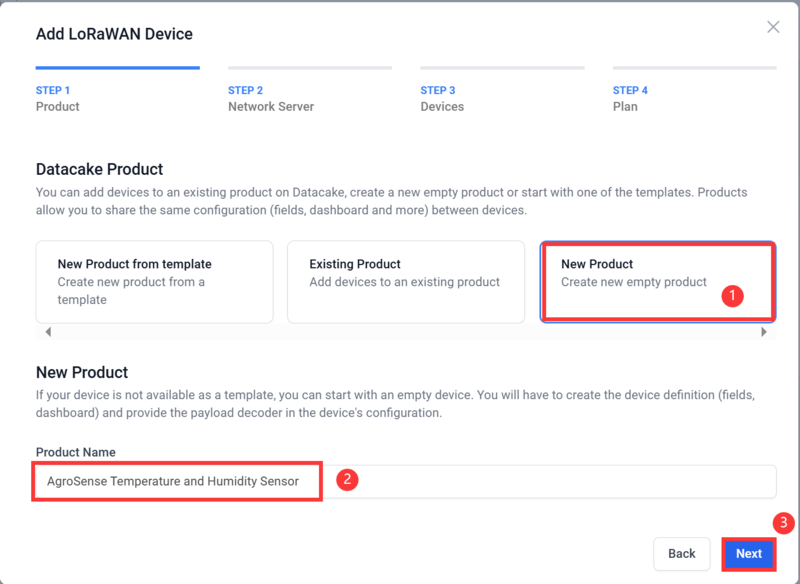
5. Datacake
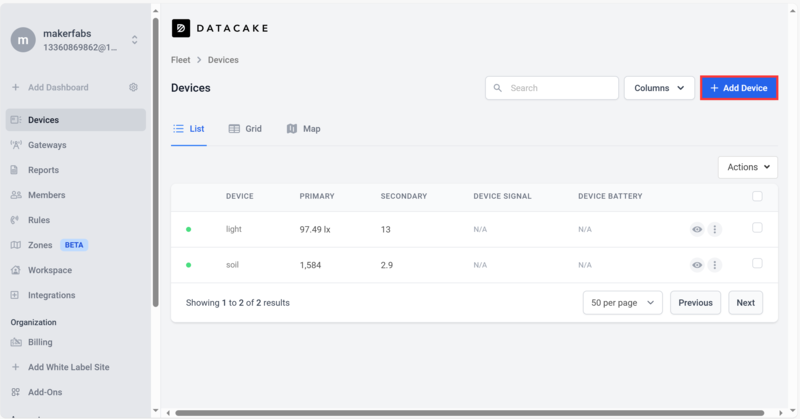
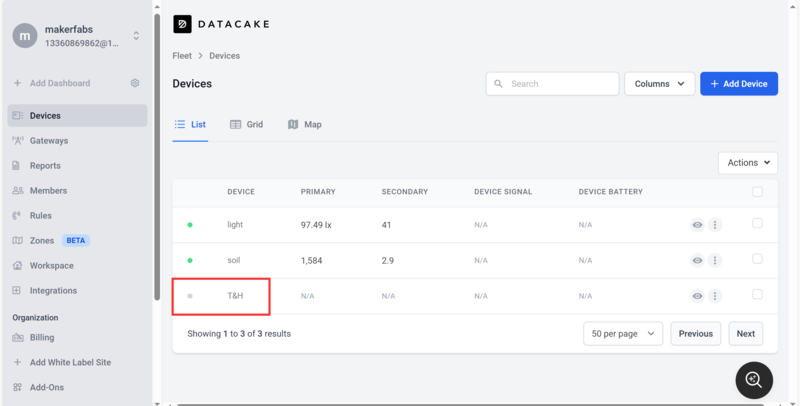
1、Login datacake or Create Account.

2、Click “Add Device”.
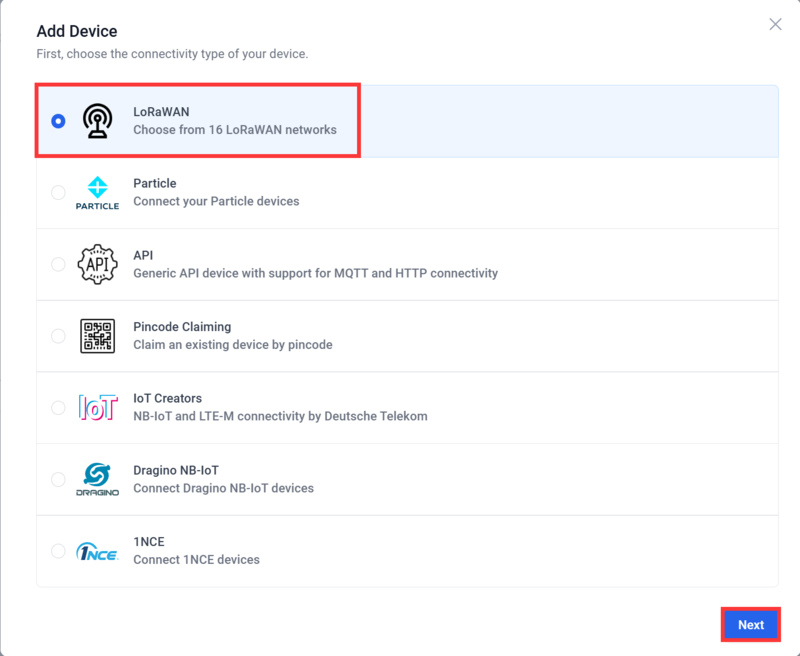
3、Select LoRaWAN and click “Next”.
4、Select a Product based on your needs, take "Create new empty product" as an example.
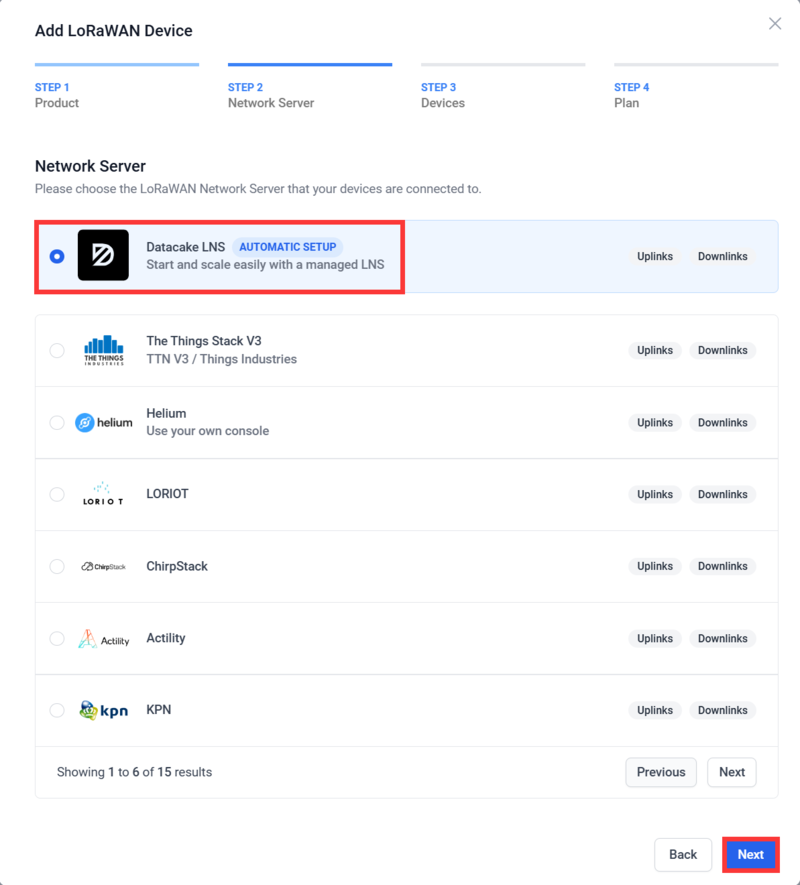
5、Select “Datacake LNS”.
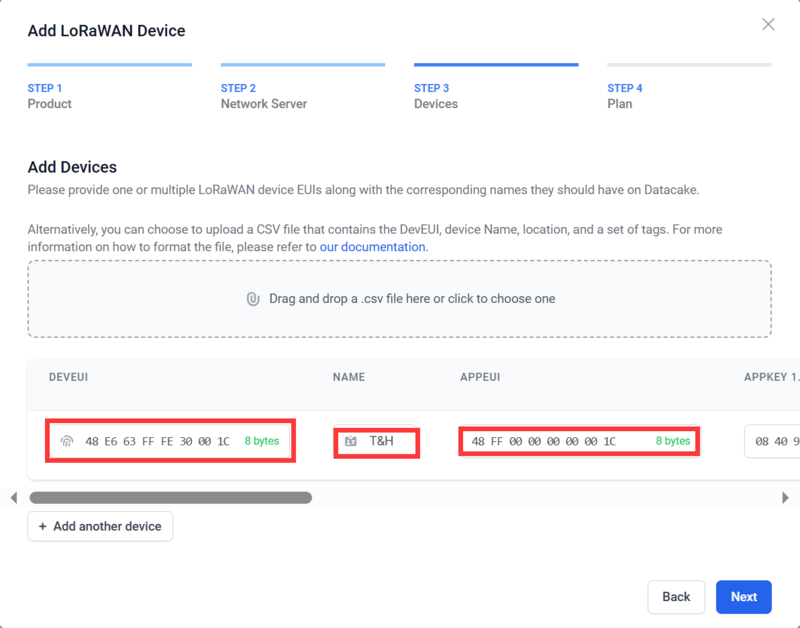
6、Enter DEVEUI、APPEUI、APPKEY、FREQUENCY and DEVICE CLASS.
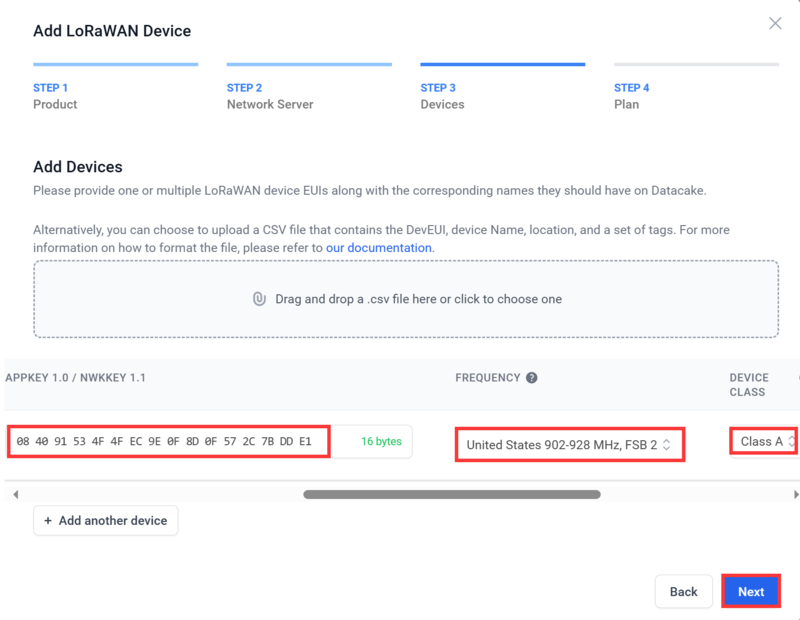
7、Choose the type according to your needs, and click “Add 1 device”.

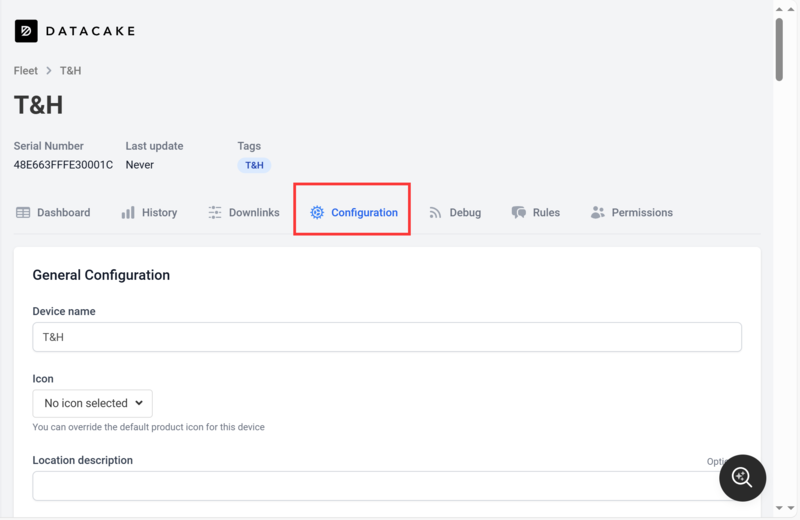
8、Click to go to the device you just added.
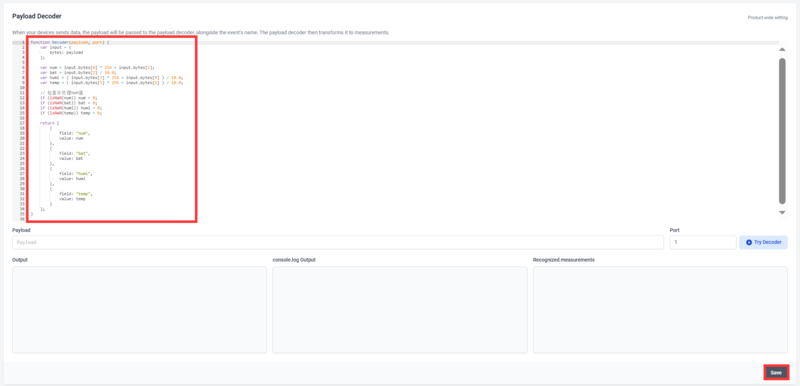
9、Click “Configuration”, enter Decoder and click “Save”.
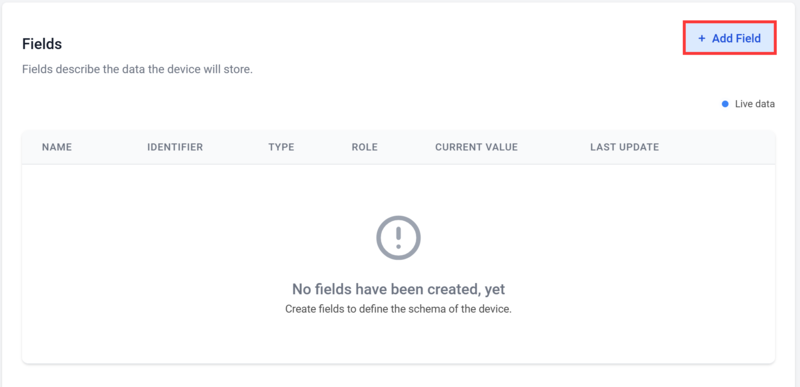
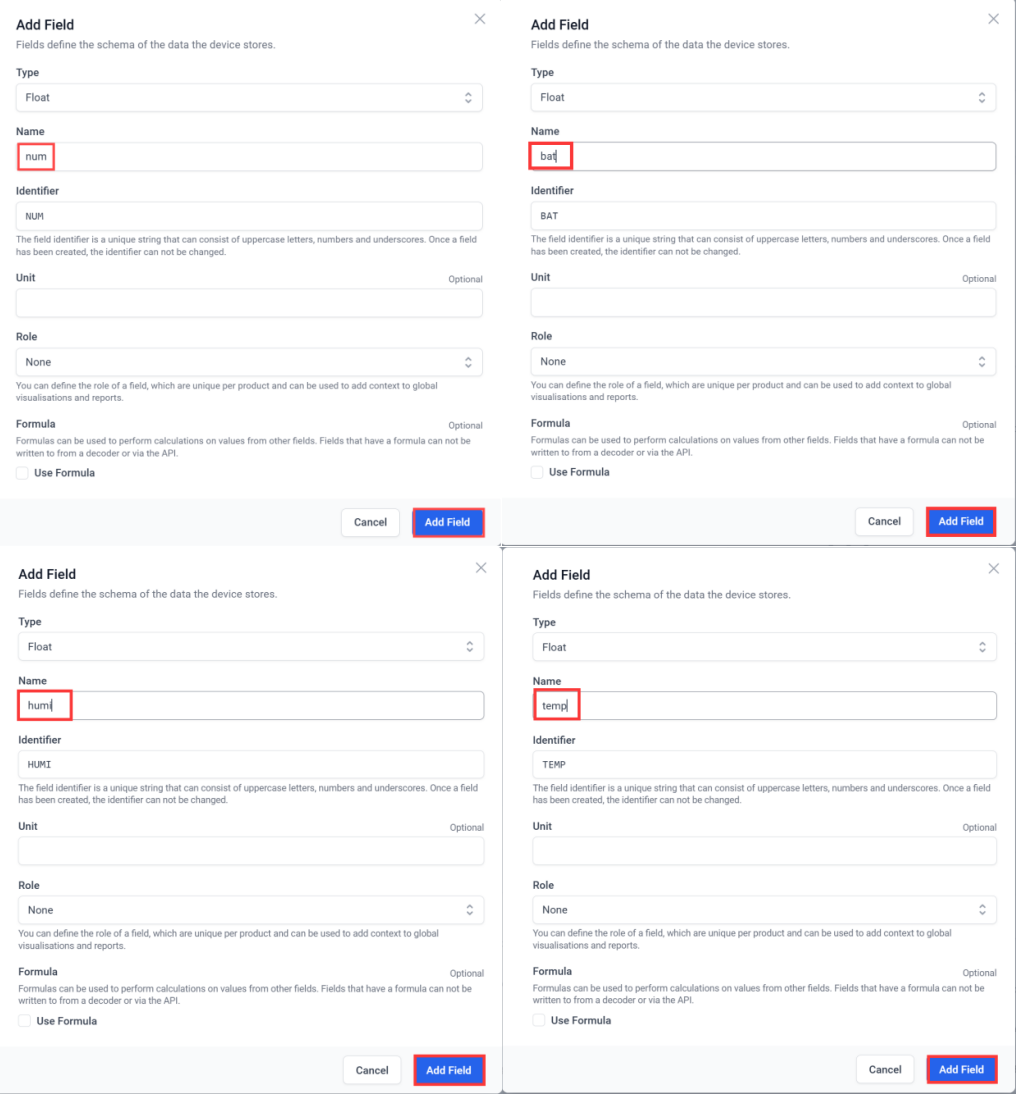
10、Follow the steps to add a field.
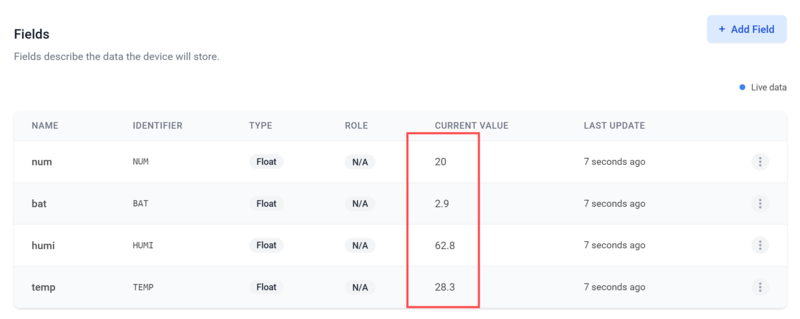
11、Press RST button, wait until the sensor connects to the gateway successfully, you will see the data the sensor is currently reading.
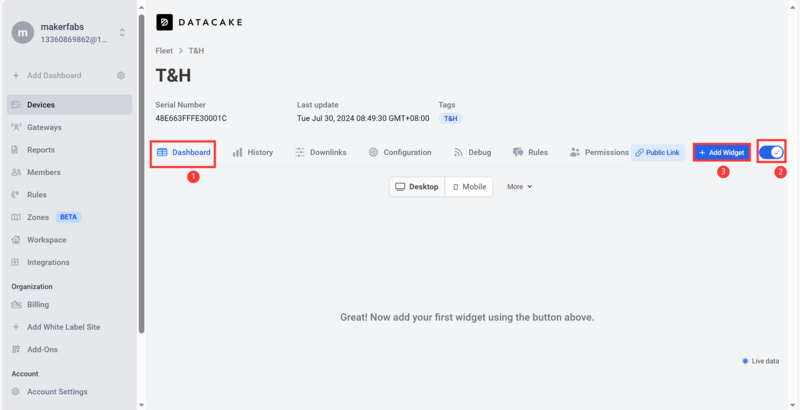
12、To get a better look at the data, we can add widget.
Click “Dashboard-->switch-->+ Add Widget”.
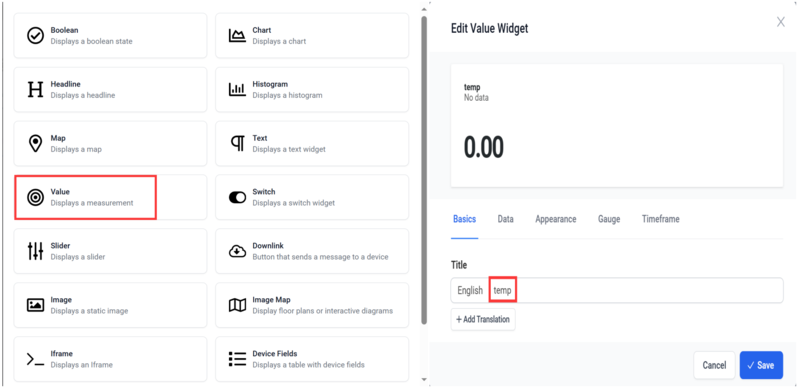
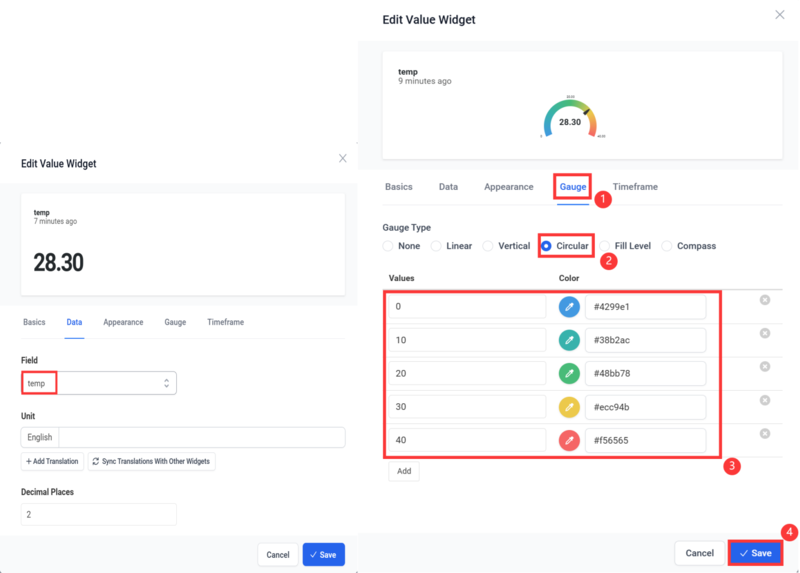
13、Select “Value” and set Title, Field and presentation form as well as the interval color.
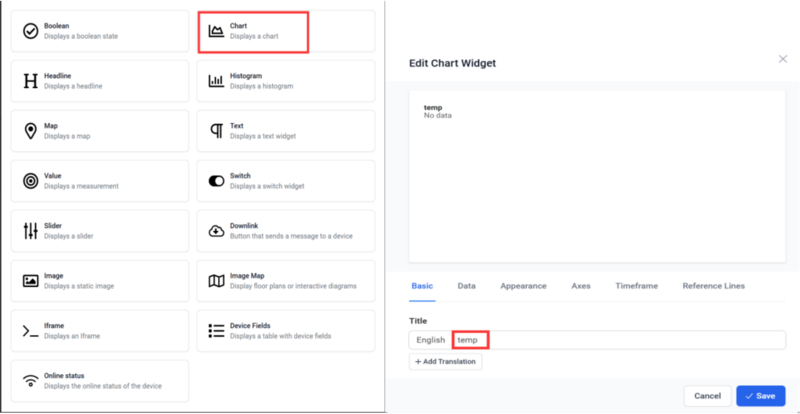
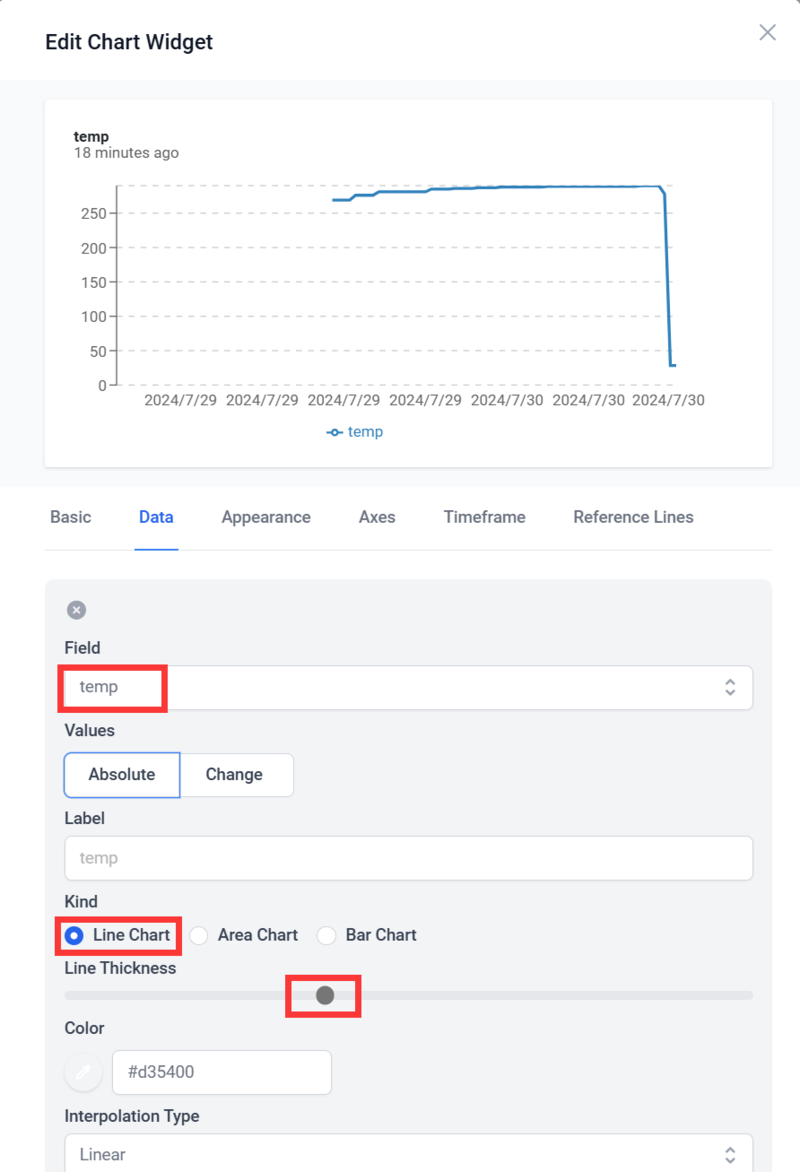
14、Select Chart and set Title, Field, Kind, Line Thickness and click “save”.
15、Select Device Fields, check “Fields” and click “Save”.

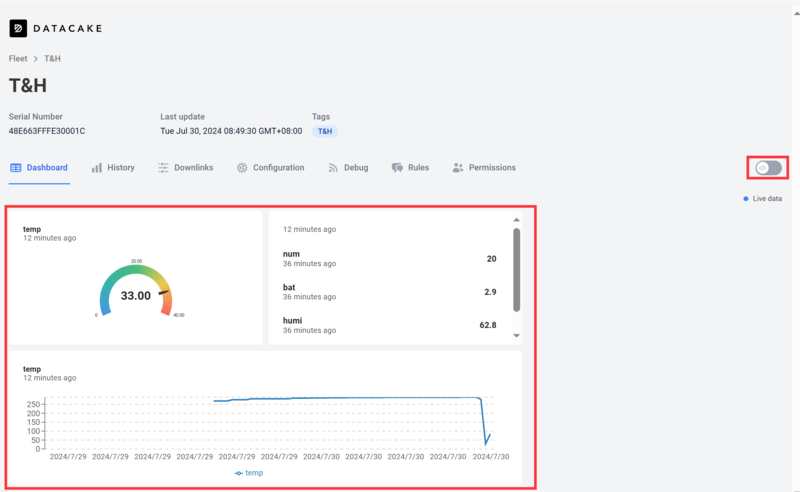
16、Click the switch to save, and you can see the data visually.
6. Downlink
AgroSense devices support adjusting the time interval using downlink. Here's a guide to using downlink at TTN and Datacake.
6.1 TTN
- Click “Payload formatters-->Downlink” and follow the steps.
Formatter code you can find in Github.

- Click “Save changes”.

- Click “Messaging-->Schedule downlink”.
Note: you must use this format:
{
  "minutes": 5
}
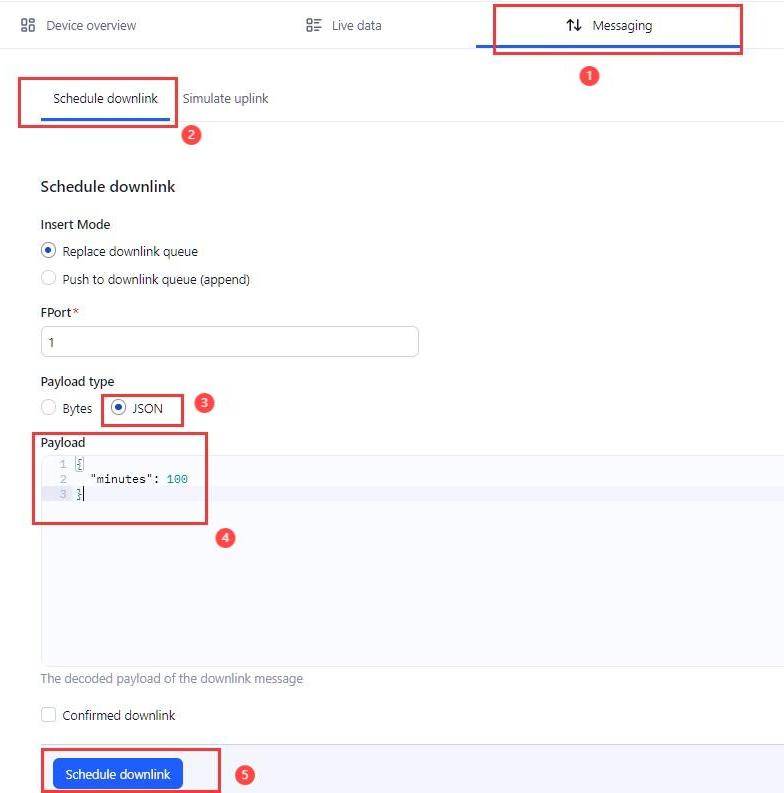
- The modified interval will be updated after the next data upload.
6.2 Datacake
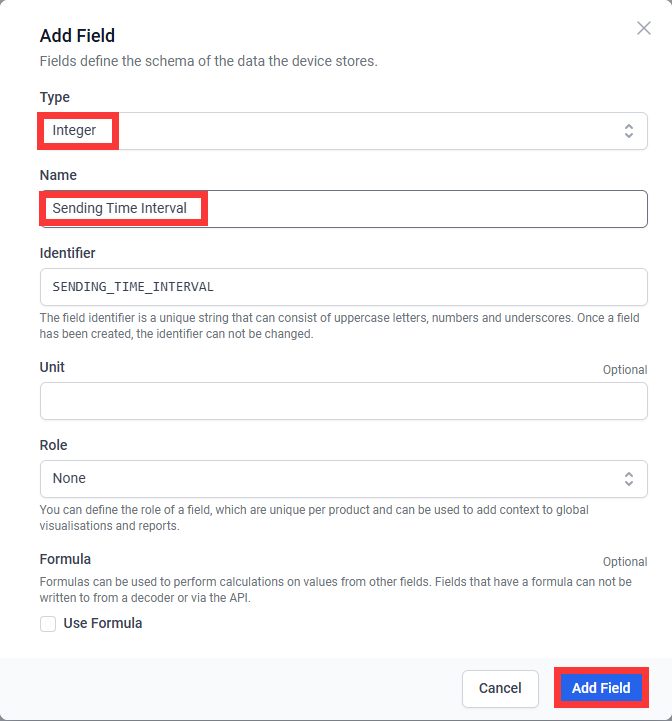
- Click “Configuration-->Fields-->+Add Field”.
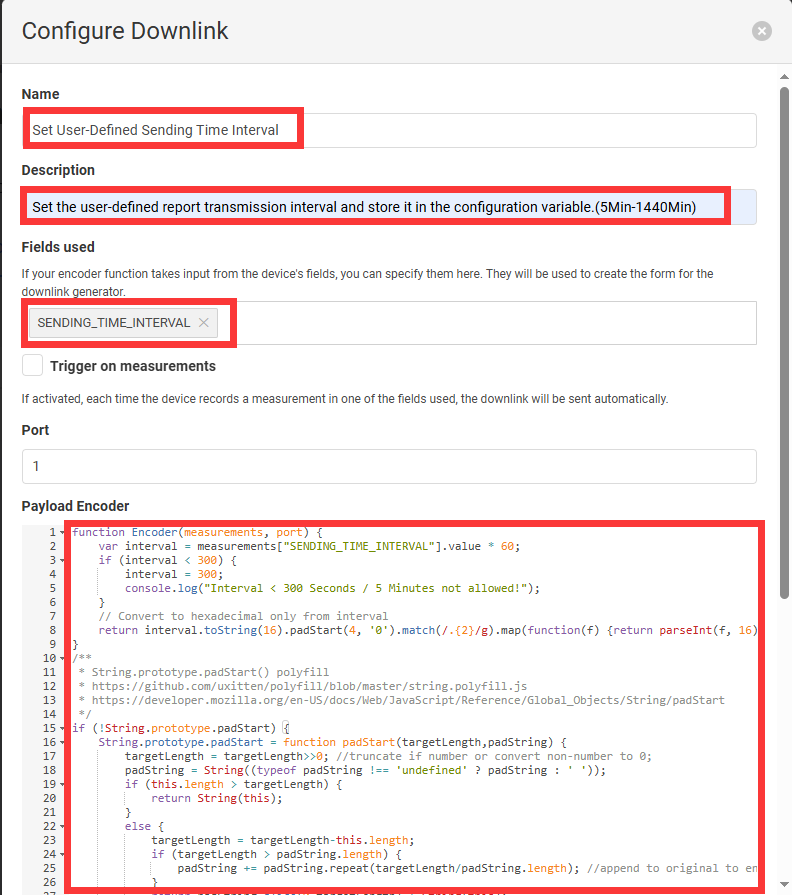
- Click ”Downlink-->Add Downlink”.

Enter name、description、fields used and payload encoder respectively.
Name: Set User-Defined Sending Time Interval.
Description: Set the user-defined report transmission interval and store it in the configuration variable.(5Min-1440Min).
Payload Encoder: copy in Github.
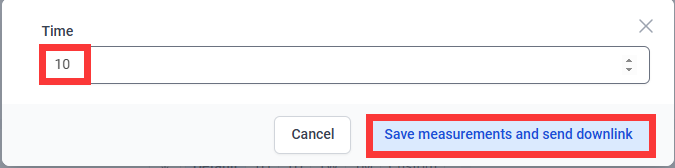
- Click “Dashboard-->switch-->+ Add Widget”.

- Select “Downlink” and setting as follow image.
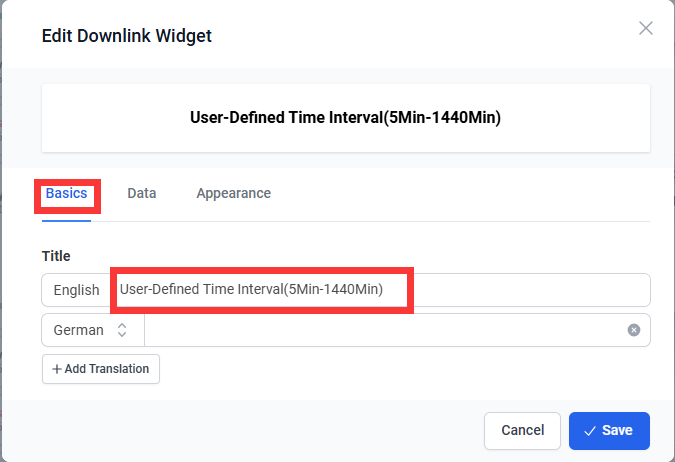
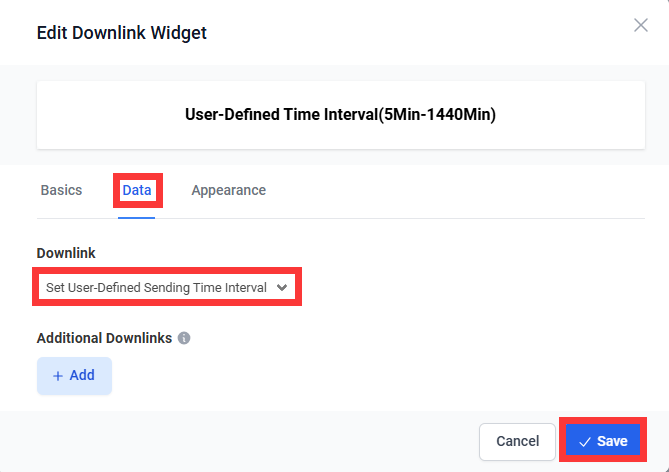
- Click the switch to save, and you can click to change your time Interval.