MaESP Audio
Introduction
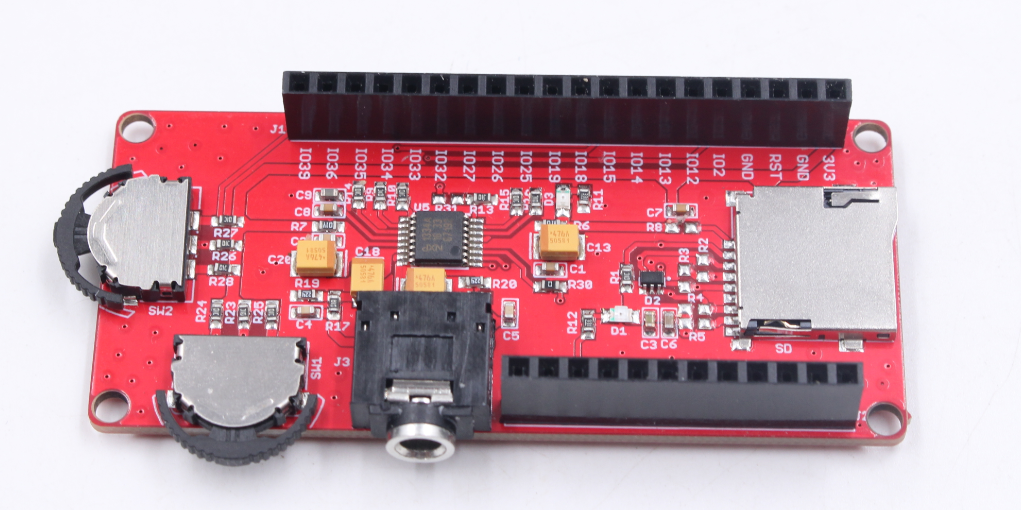
The MaESP Audio board uses the uDA1334 digital to analog converter (DAC), which converts I2S (not be confused with I2C) audio to an analog signal to drive speakers. The I2S Audioboard converts the digital audio signals using the I2S standard to an analog signal.
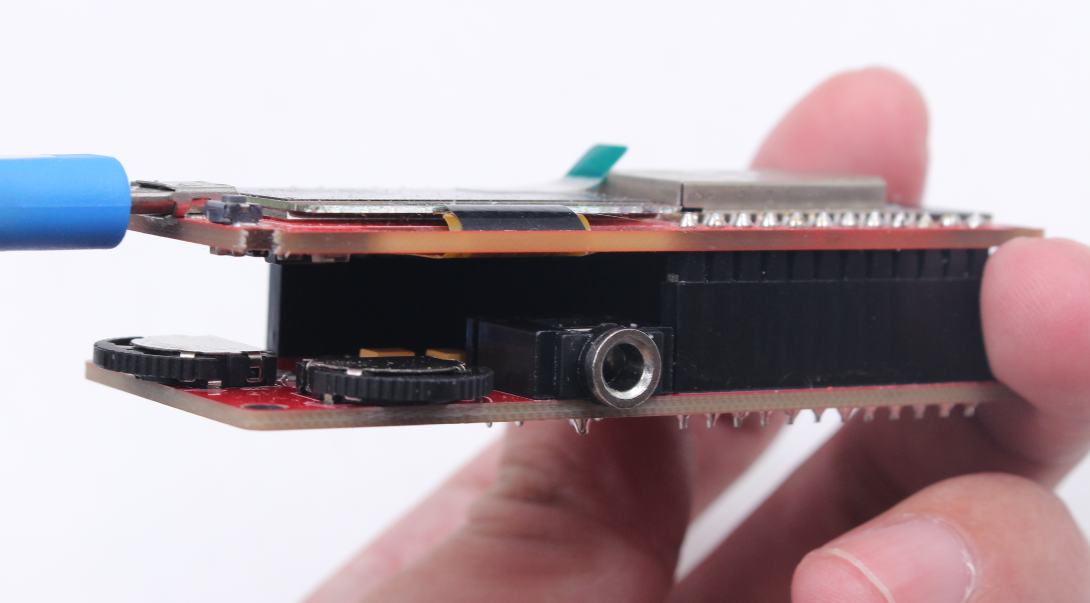
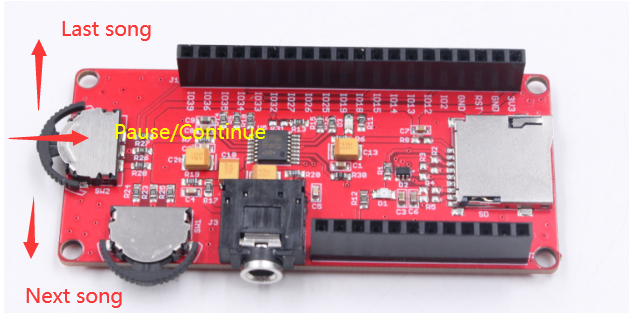
There 2 navigator switches, suitable for applications such as MP3 player: Previous / Next/ Confirm, and Audio adjusting. They're also a Micro-SD holder and audio jack on the board, which makes it ready to use for a real MP3 player.
Model:MPAUDIO
Features
- NXP Low power Audio DAC: uDA1334
- Integrated digital filter plus DAC
- Supports sample frequencies from 8 to 100 kHz
- Automatic system clock versus sample rate detection
- Low power consumption
- I2S-bus and LSB-justified format compatible
- Digital de-emphasis for 44.1 kHz sampling rate
- Support Micro SD Card
- Working Temperature: -40 – 85℃
- Size: 70*32.6mm
Required Materials
1.MaESP ESP32 OLED
2.MaESP Audio v2.0
3.microUSB Cable
4.Speaker
5.PC
6.microSD card
- System diagram
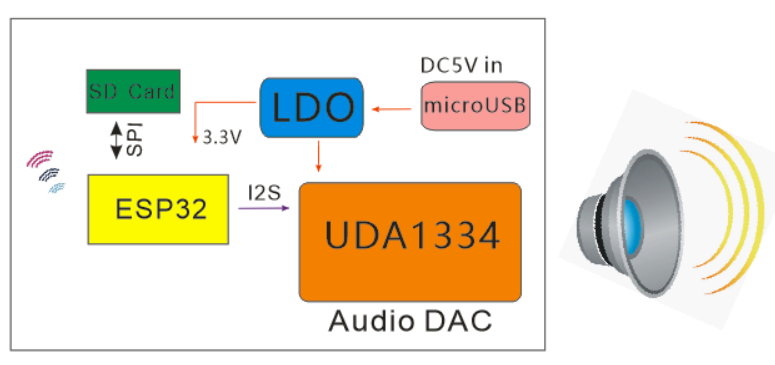
- MaESP Audio can’t work alone, it need work with MaESP ESP32(Wrover).

Usage
Warning: Don't operate when powered on in case of a short circuit.
This guide help you how to use MaESP Audio with MakESP ESP32 to fulfill text to speech(TTS). It’s very simple and easy to understand. It also can play music from SD card or Flash too.
MaESP ESP32(Wrover) used USB-to-UART(CP2104) to upload firmware, you can install the CP2102 driver from: https://www.silabs.com/products/development-tools/software/usb-to-uart-bridge-vcp-drivers
Indicator LED Status
| Indicator LED | Status |
|---|---|
| D3 | Light on when powered on, light off when powered off |
| D1 | Light on when IO21 output low, light off when IO21 output High |
Project_1: Text to speech
The example uses MicroPython programming, very simple and easy to understand.
MaESP Audio board cannot work alone. It needs a microcontroller like ESP32(Wrover) to drive it. With MaESP ESP32(Wrover) and MaESP Audio, they can be directly combined to fulfill various functions of audio.
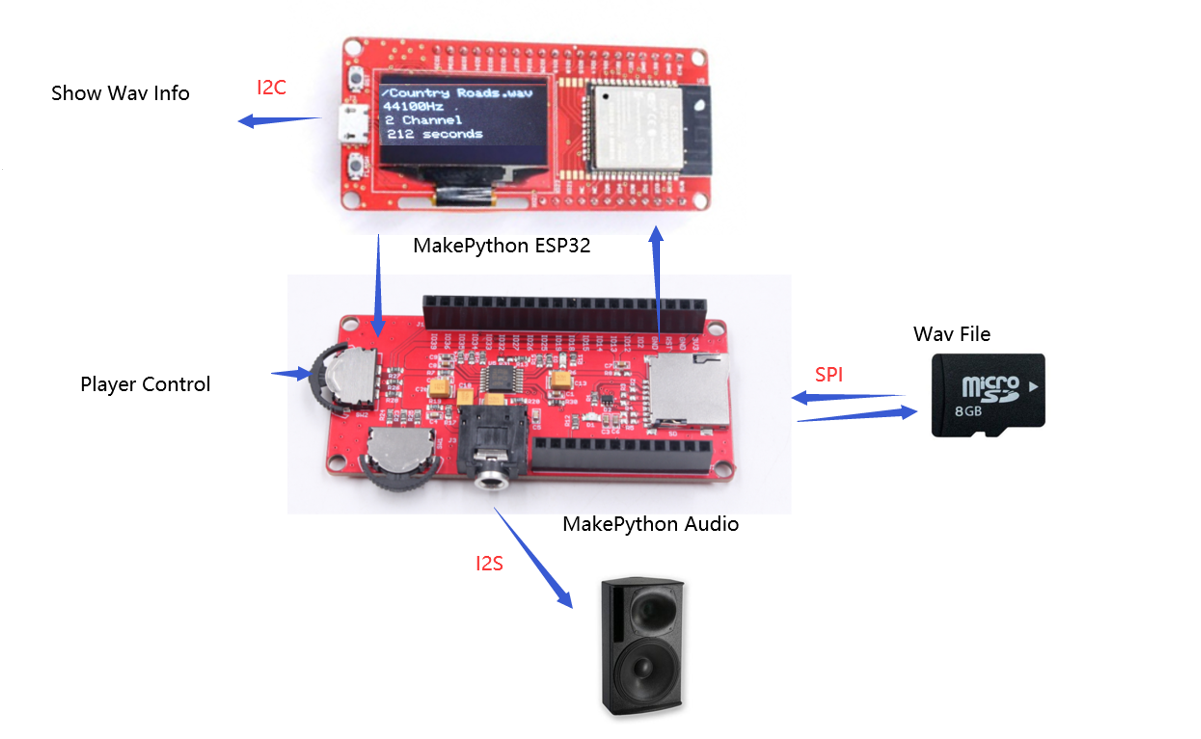
You can get MaESP ESP32 OLED from here
Note: MaESP ESP32 Wroom’s RAM is not enough for audio application, so you need MaESP ESP32(Wrover)
Hardware interface:
| I2S Interface | ESP32 PIN | Remark |
|---|---|---|
| I2S_BCK | IO26 | |
| I2S_LCK | IO25 | WS |
| I2S_DIN | IO27 |
ESP32 Booting Mode:
| PIN | Default | SPI Boot(Running Mode) | Download Boot(Download Mode) |
|---|---|---|---|
| GPIO0 | Pull-up | 1 | 0 |
| GPIO2 | Pull-down | Don’t care | 0 |
| GPIO12(MTDI) | Pull-down | 0 | 0 |
Note: The internal LDO (VDD_SDIO) output 3.3V when GPIO12 set to LOW; the internal LDO (VDD_SDIO) output 1.8V when GPIO12 set to HIGH; so it may get fails when you downloading the firmware if you had inserted the MaESP Audio.
Project_1: tts-test
1.Connecting MakePython ESP32 to PC via microUSB cable.
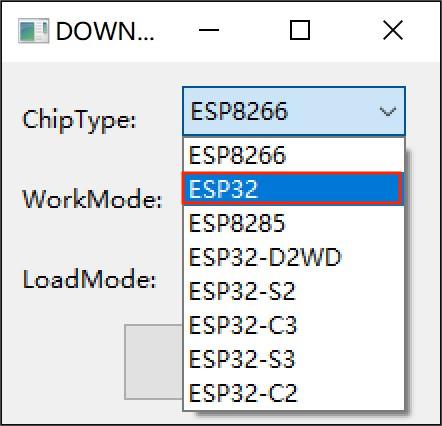
2.Open flash_download_tools_v3.9.5,Select ESP32 DownloadTool
3.Select the related COM port, baud rate 921600,erase the ESP32 first, and find the firmware bin file esp32_tts.bin,address 0x1000
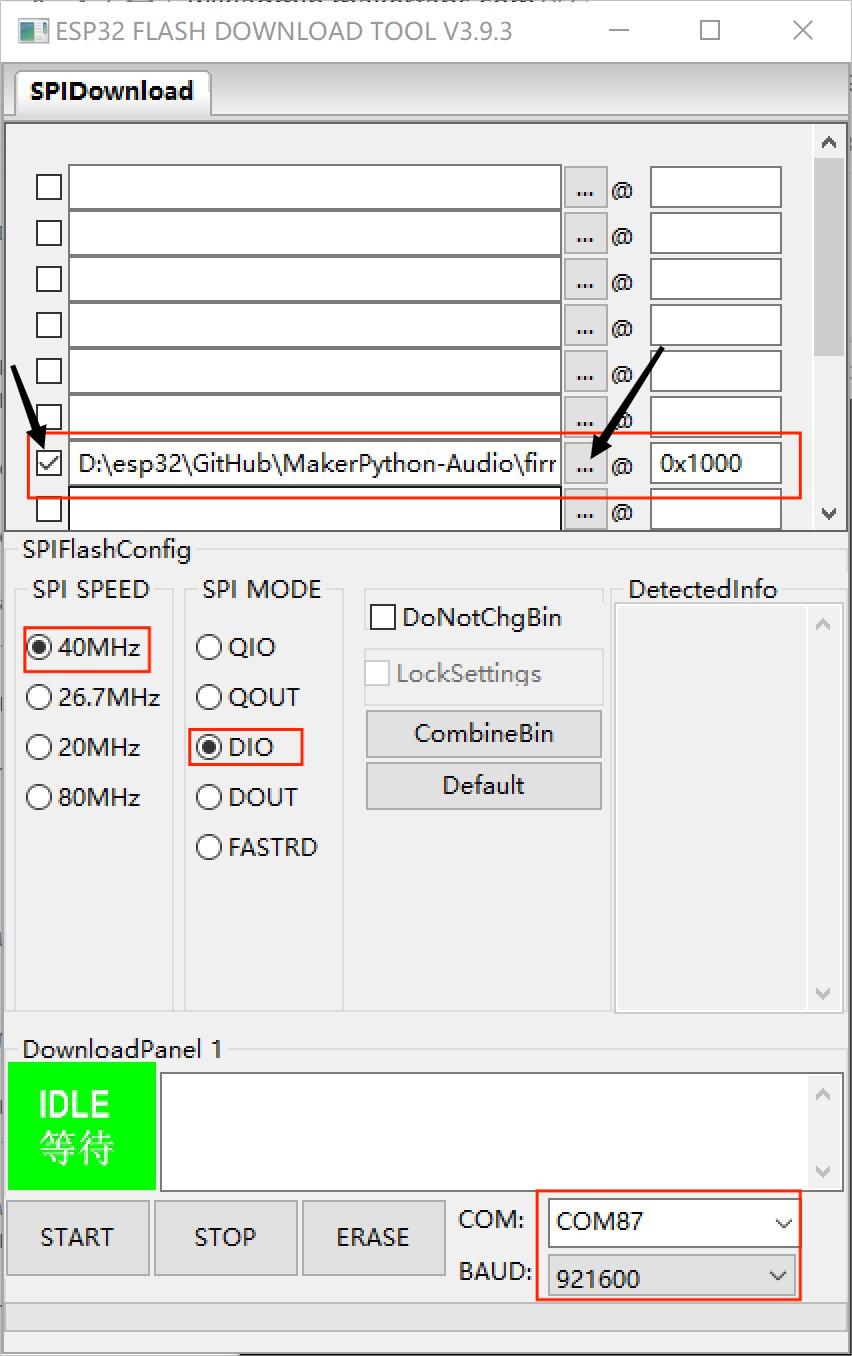
Note: In my PC, there is COM272 that may different in your PC.
5.Click the START to download the firmware.
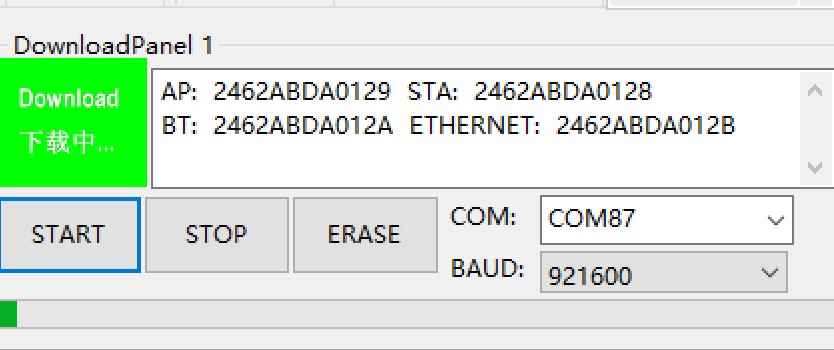
Wait until it finished.
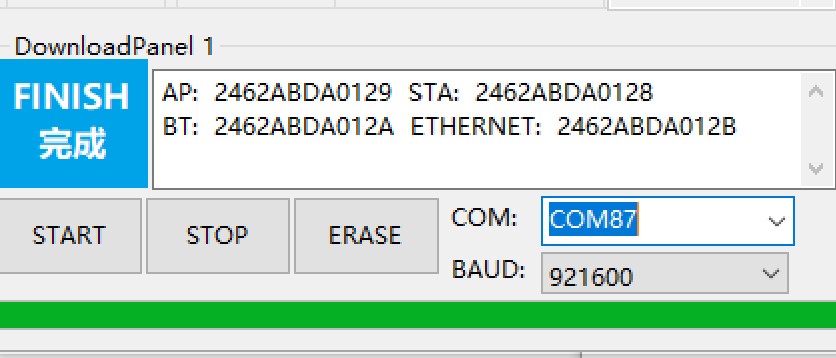
6.Insert the ESP32 board to MaESP Audio
7.Open open the Thoony
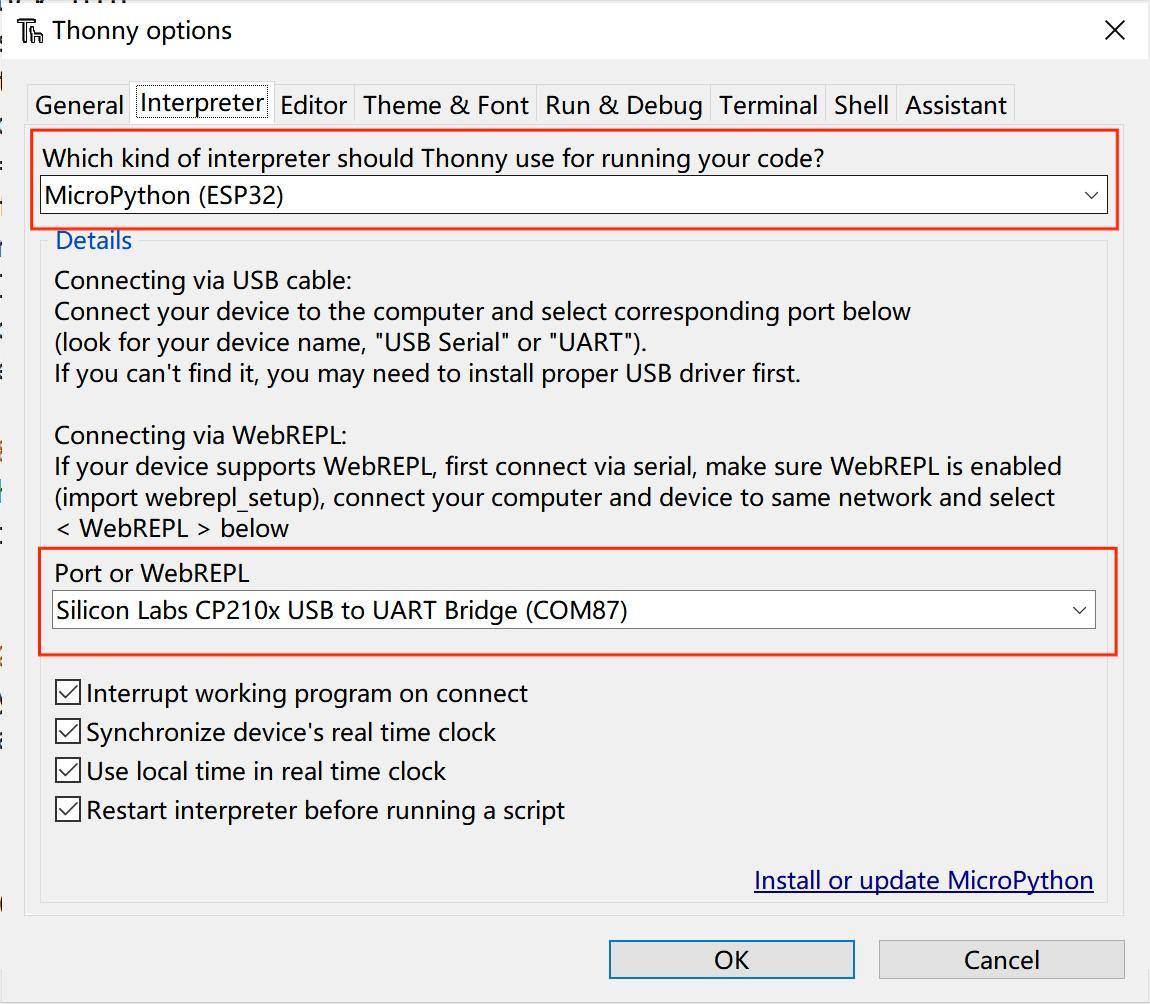
- Click the Tools>>option>>interpreter, choose the interpreter and serial port, and click the STOP button.
- Go to View > Files

- Go to the path where you downloaded the file, upload the code in MicroPython device
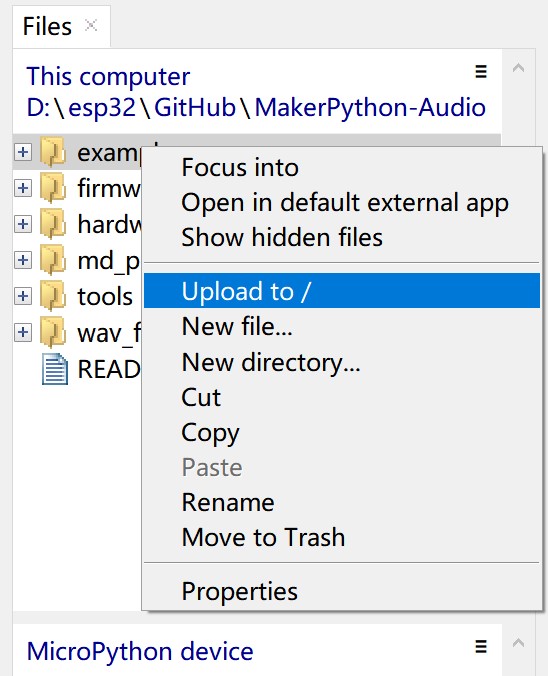
- Click the tts-test.py, and Press the green running button to run current script.
Use the earphone to connect the MaESP Audio, you can hear the "the temperature is twenty six degree."
Project_2: Play Sounds from micro SD card
1.Open the wav file, Copy the file named taunt-16k-16bits-mono-12db.wav to the microSD card then insert to MaESP Audio.
2.Open the play-mono-wav-from-sdcard.py file and run it like previous. The MaESP Audio will make sound.
**Note that microPython firmware only support several formatted wav file. If you play your wav file without success, try a format transfer tool to 16k-16bits-mono.
Or use MaESP Audio it in Arduino, here is the example.**
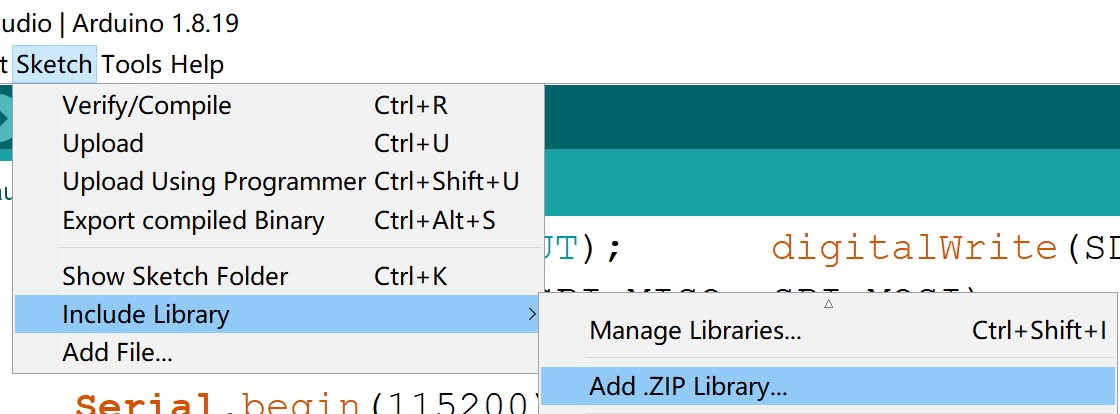
- learn to install the ESP32 board software development kit in your Arduino IDE in this instructions.
- Download the ESP32-adinoI2S library in GitHub, and add the library to the Arduino library.
-
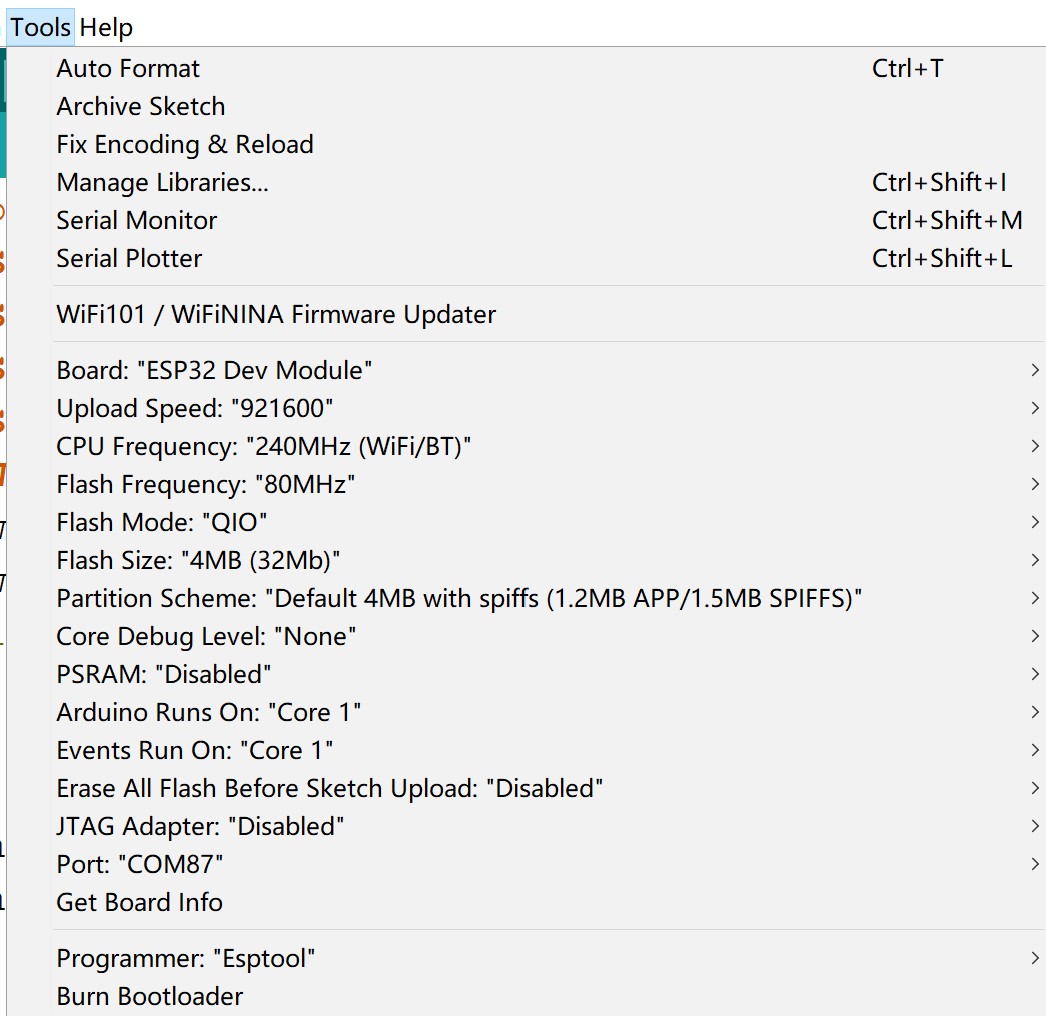
open the music_player, verify and upload the music_player.ino.
-
Before uploading the sketch, select and set the parameter in the Tools menu, as picture:
Prepare Music
- Add some music(.mp3 or .wav) to sd card.Of course, name must be English.
- Insert a Micro SD card into MakePython Audio.
- Plug the stereo or earphone into a 3.5mm audio jack.
How to use MusicPlayer
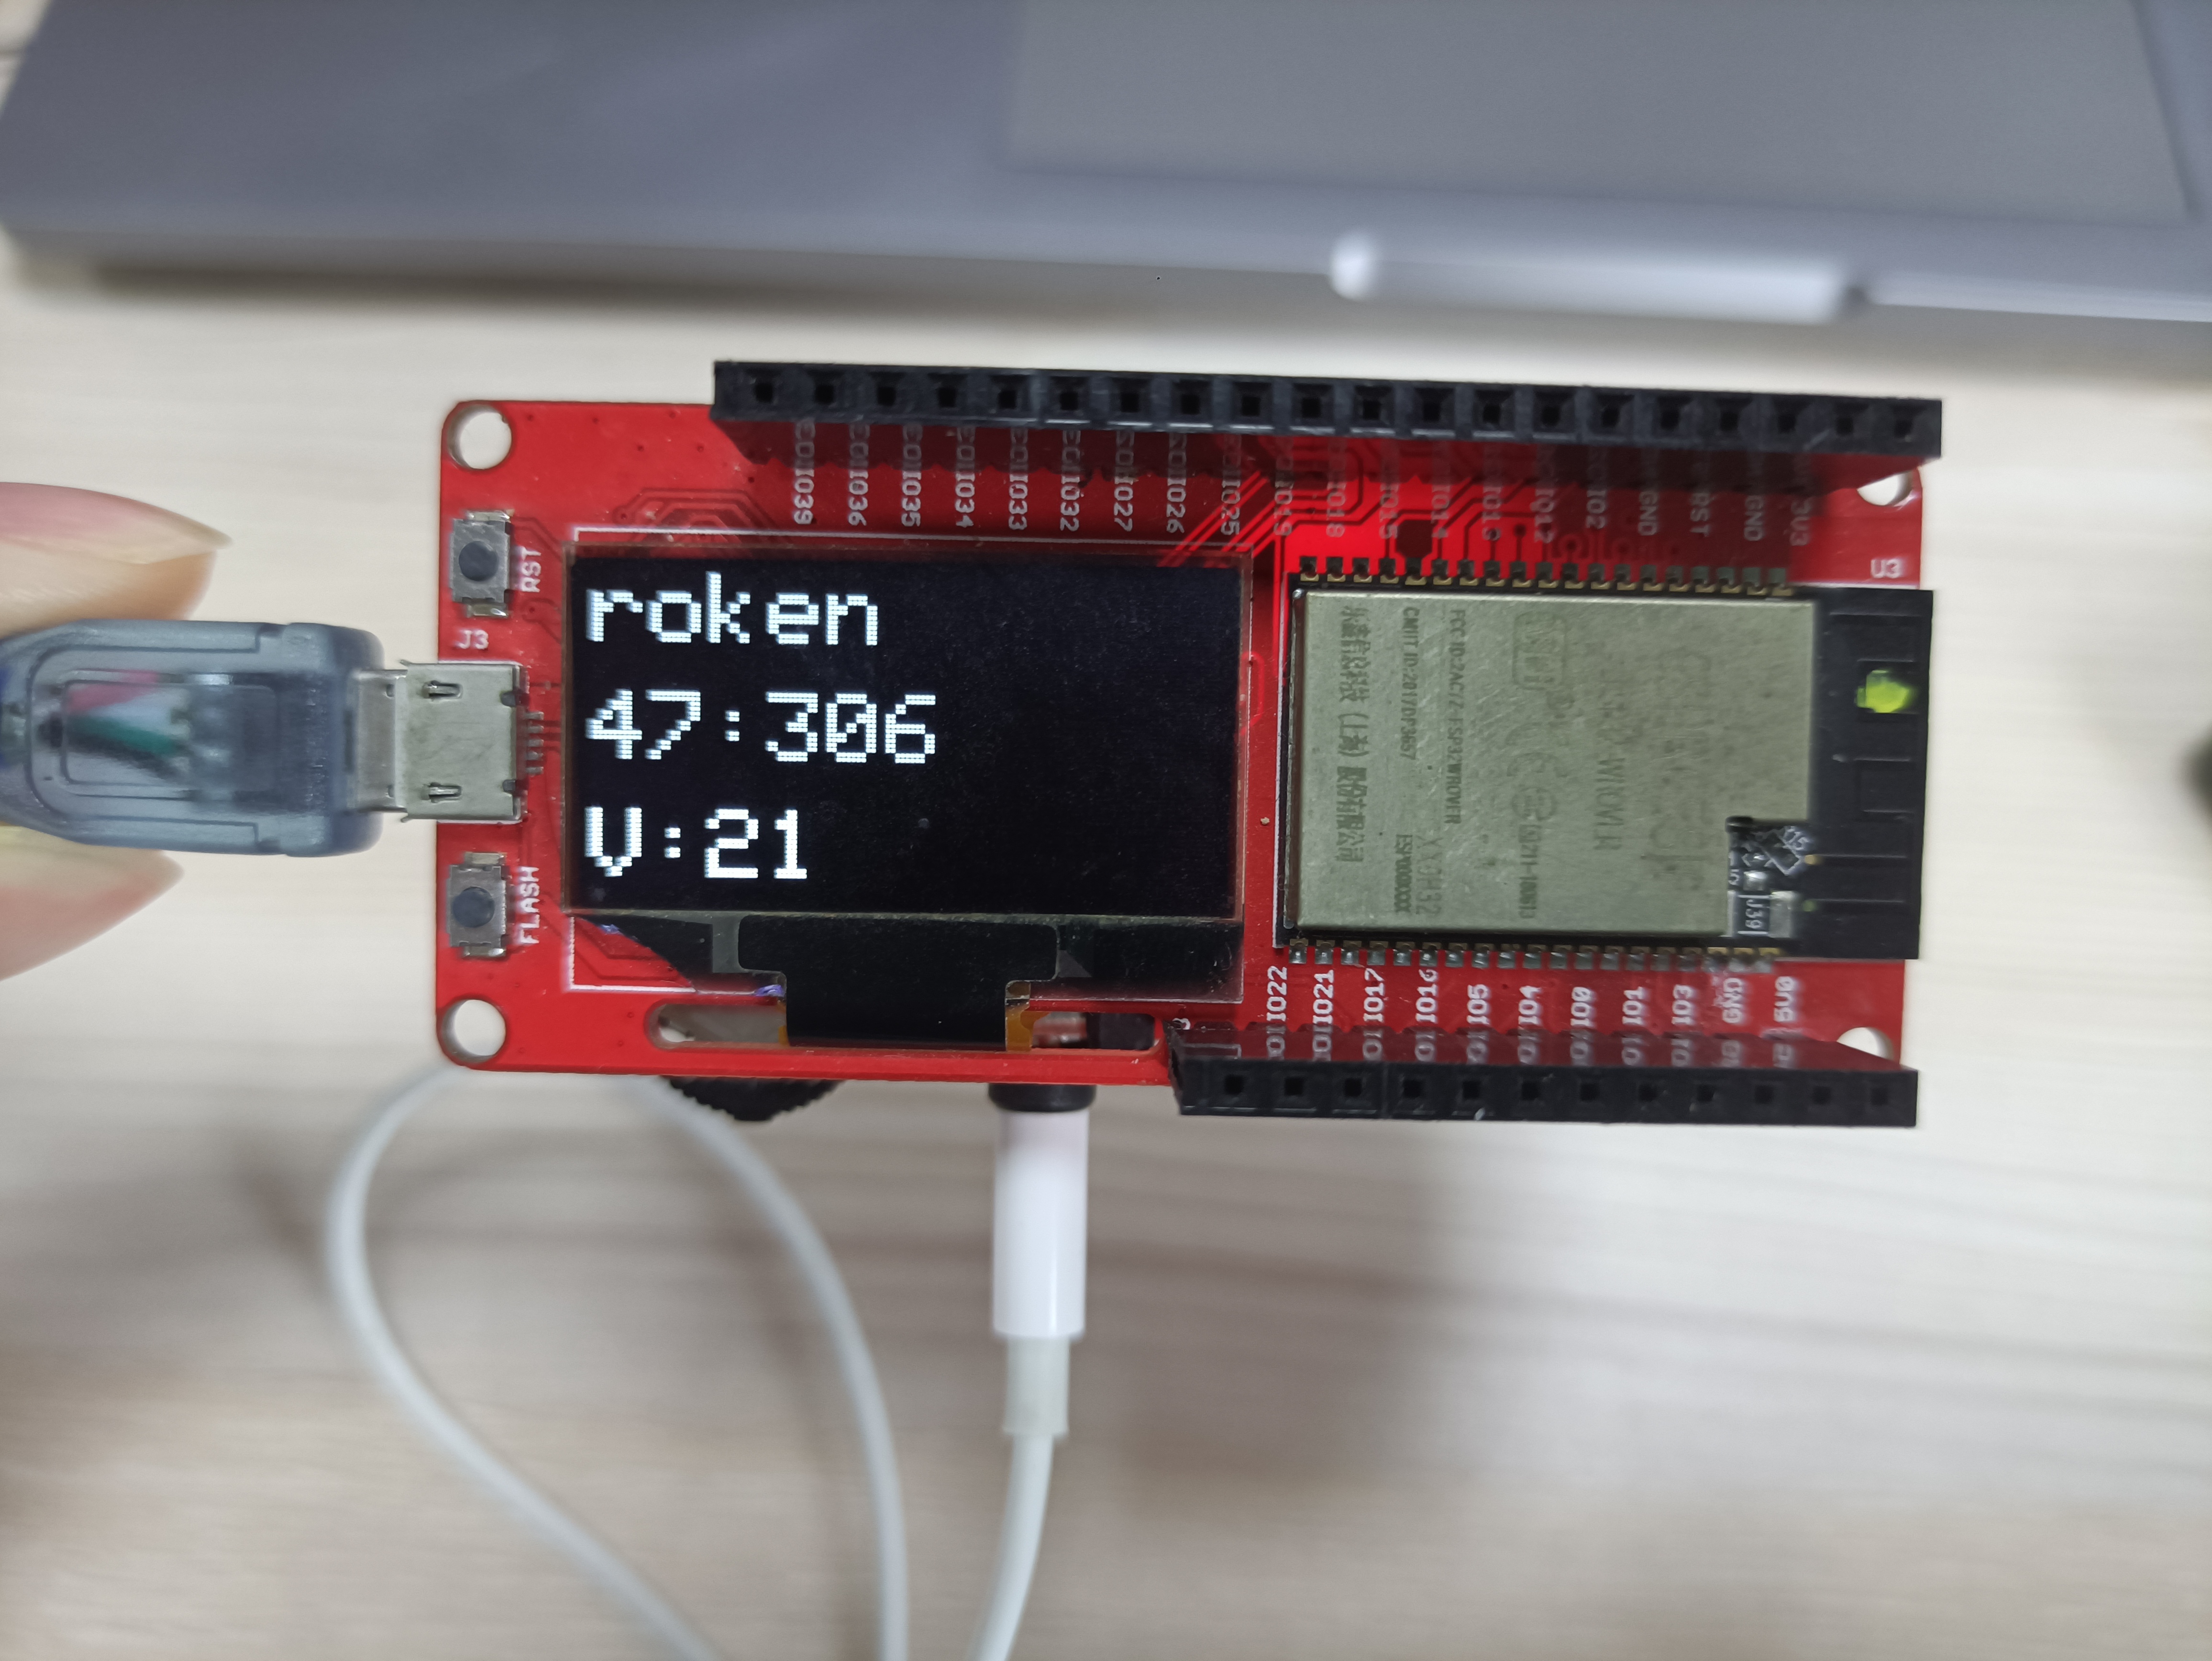
- Power the ESP32 via Micro USB and the LCD screen displays the basic information of the song.
- Such as The name of the song, the time played, the length of the song.
- Lower side switch, left and right for next song, Previous. Press inward to pause.
- The switch on the left, volume up and down.Press in to mute.
Result: The screen shows the currently playing music and volume.
More detial you can cheak youtube.
FAQ
You can list your question here or contact techsupport@makerfabs.com for technology support. Detailed descriptions of your question will be helped to solve your question.