SenseLora 4G gateway
1. Introduction
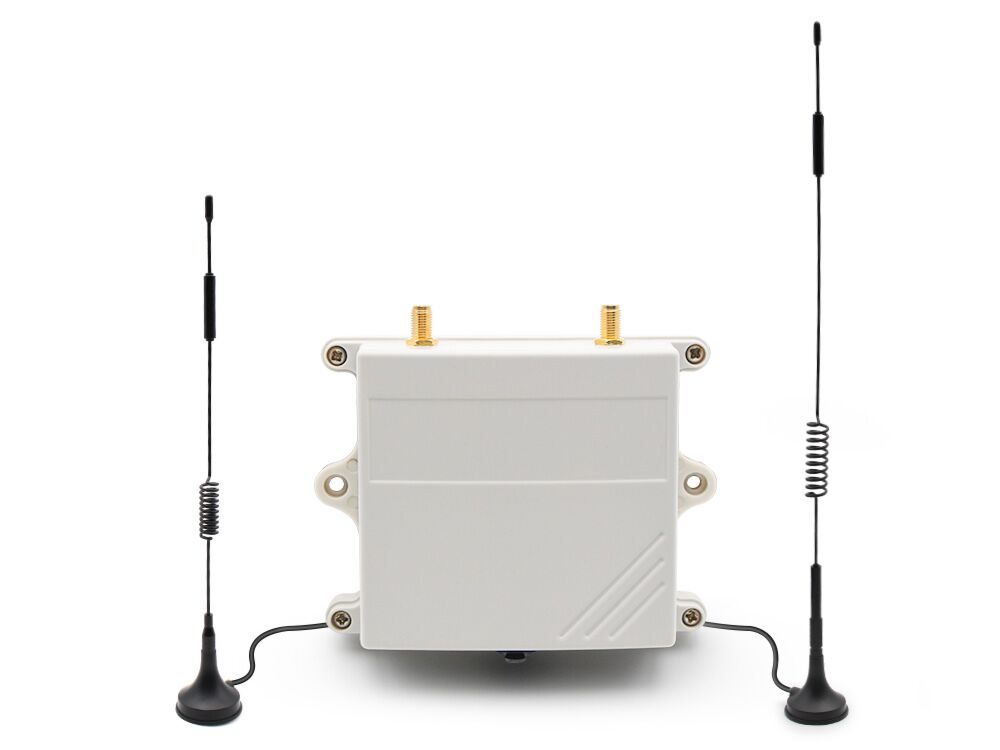
If you want the data to be transferred via 4G, either to a remote server or a simple SMS, select the SenseLoRa_4G Gateway please. This Gateway is based on ESP32-S3, it has on-board LoRa receiver and a 4G module, so it get the LoRa data and then transmit the data via 4G to cloud server such as TTN, or the monitors phone with SMS.
Model:SL4GGY
2. Features
- IP68 Waterpoof
- ESP32S3 controller, 16M flash/8M PSRAM
- High performance LoRa/4G antenna
- Power: DC 5V/3.7V battery
3. Arduino IDE
- Install the Arduino IDE V1.8.10/V1.8.19 If you haven’t installed the ESP32 Board SDK yet, follow the steps in this guide to get started quickly.
For the ESP32-S3 Development board version, we recommend using versions that have been verified, such as 2.0.8, which is more stable, and less prone to errors.
Note: Different computers may have different port numbers when connecting to a development board. Please select the correct port number based on the development board you are connecting to.
4. Transmit Air Monitor data to Datacake
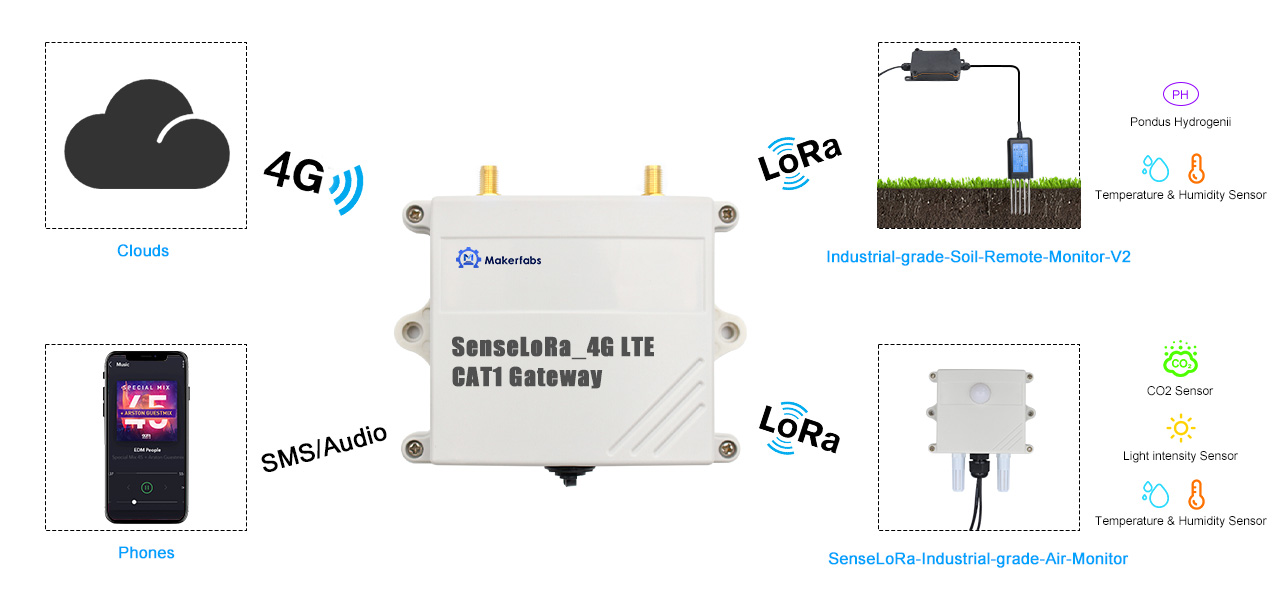
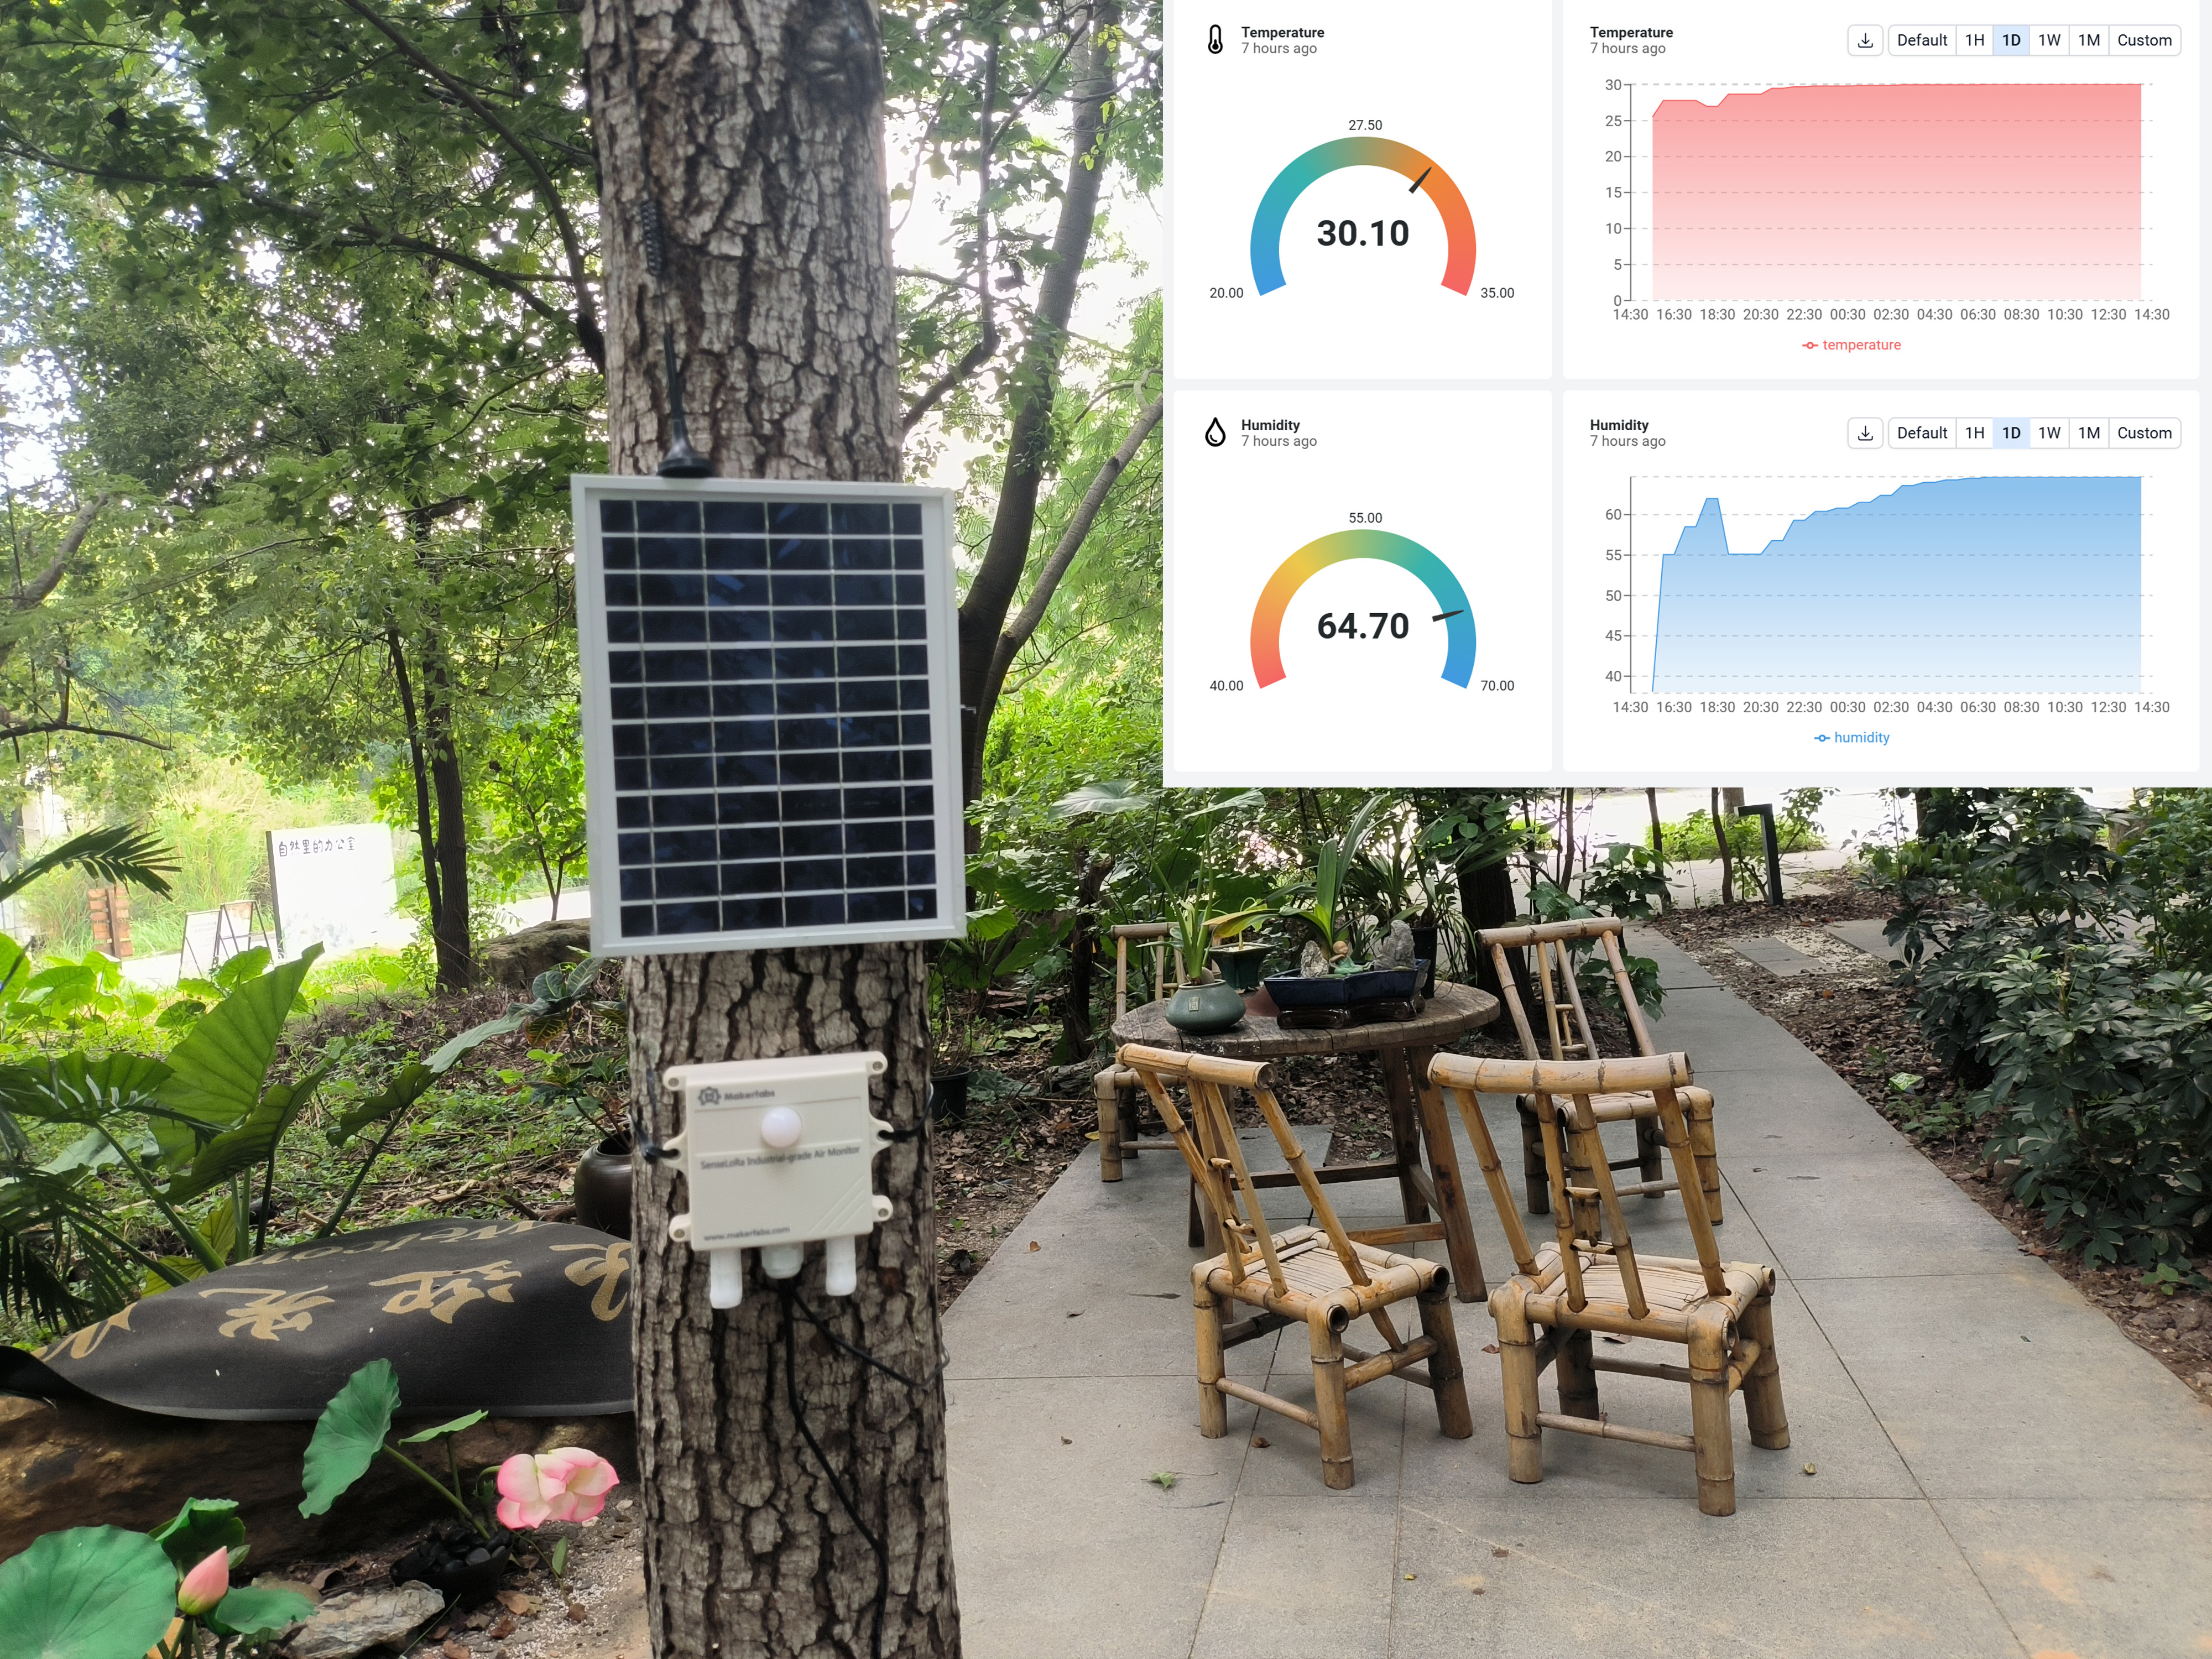
If you are a plant lover, have a well-tended backyard garden, or run a small, self-sufficient farm, an efficient and accurate air monitor is an indispensable companion. While pursuing a green lifestyle, you must also pay attention to energy saving and economic considerations. LoRa technology, with its excellent low power consumption and low cost, fits your needs perfectly. The Makerfabs Senserlora is based on lora technology for small-scale farming. Makerfabs Senserlora currently consists of two monitors (Air monitor and Soil monitor) and two receivers (Receiver and 4G gateway). Now, I will show you the combination of Air monitor and 4G gateway and upload data to Datacake via 4G.
Datacake is a versatile low-code IoT platform. It's easy to add some charts to the dashboard to make your data more visual.
4.1 Hardware
This project consists of three parts, firstly the lora sender, which is our air monitor, it will monitor the temperature and humidity data sent to the 4G gateway; Secondly the lora receiver, which is our 4G gateway, it will receive the data uploaded to datacake; And finally the data visualisation in datacake. In datacake we can display the data in a variety of forms that can be analysed.
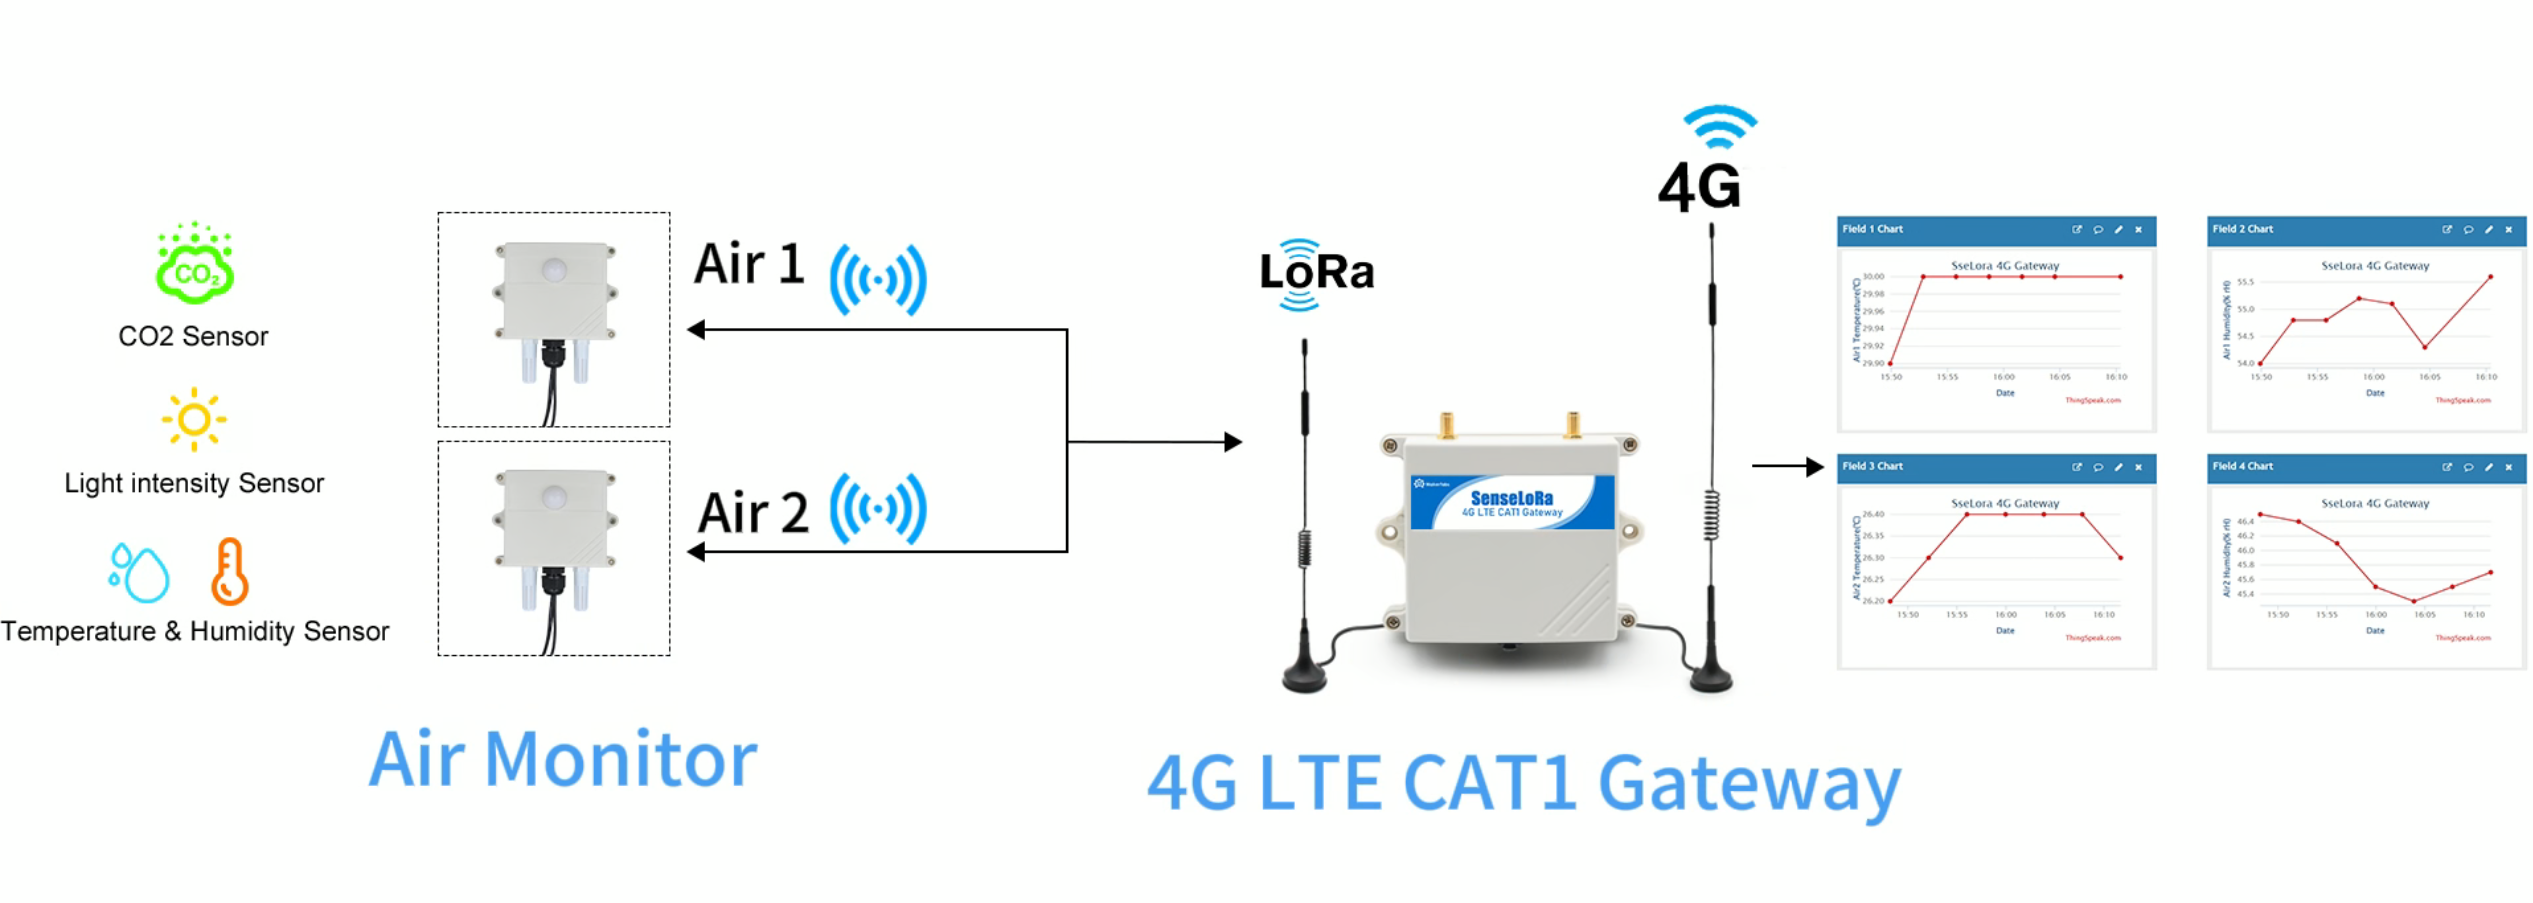
SenseLoRa_Industrial-grade Air Monitor supports the LoRa protocol, which achieves low power consumption, long distance and security. It will monitor the data every hour (of course, you can change the monitoring interval yourself via wifi) and all the sensor data periodically via LoRa P2P, this LoRa signal can be received by SenseLoRa_4G LTE CAT1 Gateway, and thus to display/record/analyze on PC.

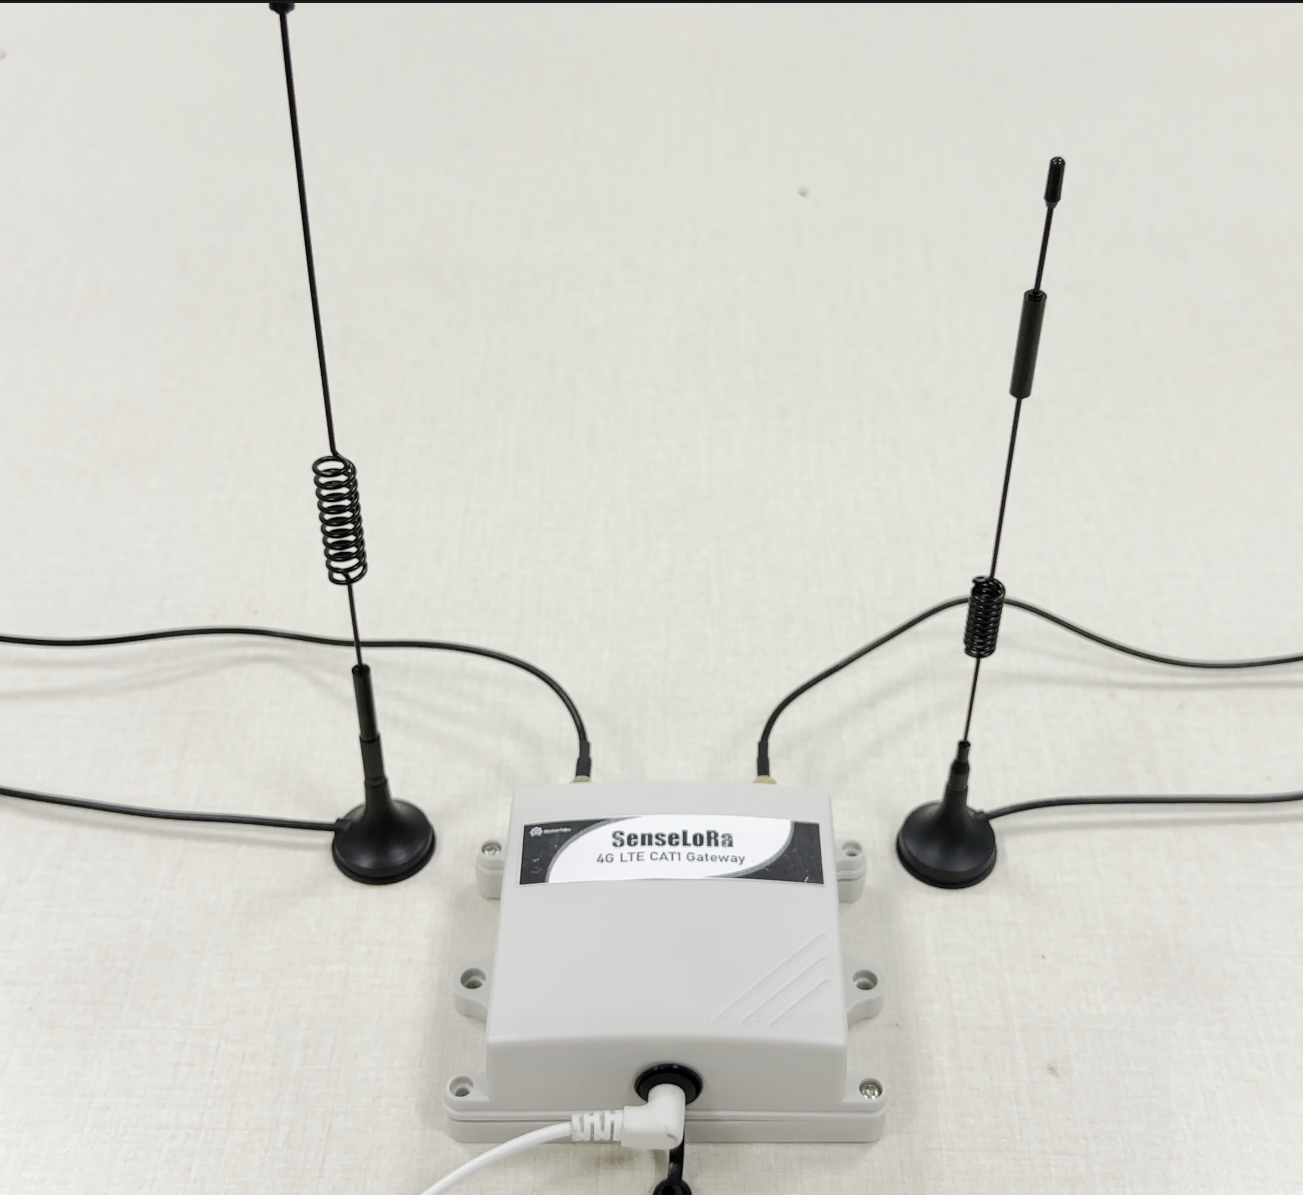
The SenseLoRa_4G LTE CAT1 Gateway has an on-board LoRa receiver and a 4G module, so it receives the LoRa data and then transmits the data via 4G to cloud server such as Datacake, or to the monitor's phone via SMS.
4.2 Datacake Setting
-
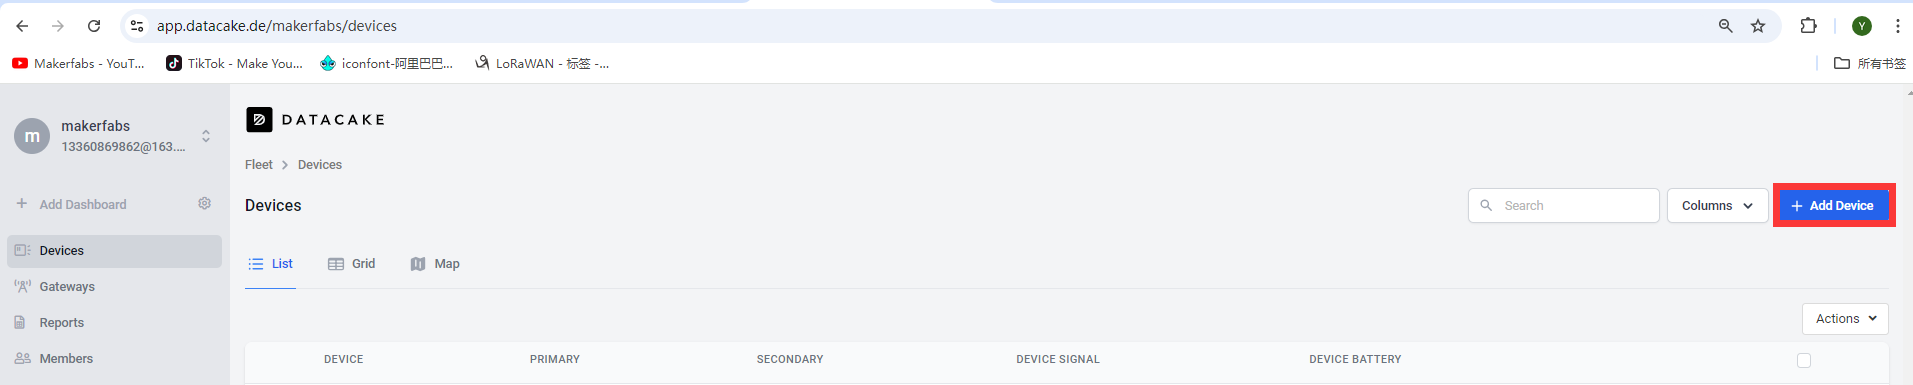
Login datacake or Create Account.
-
Click “Add Device”.
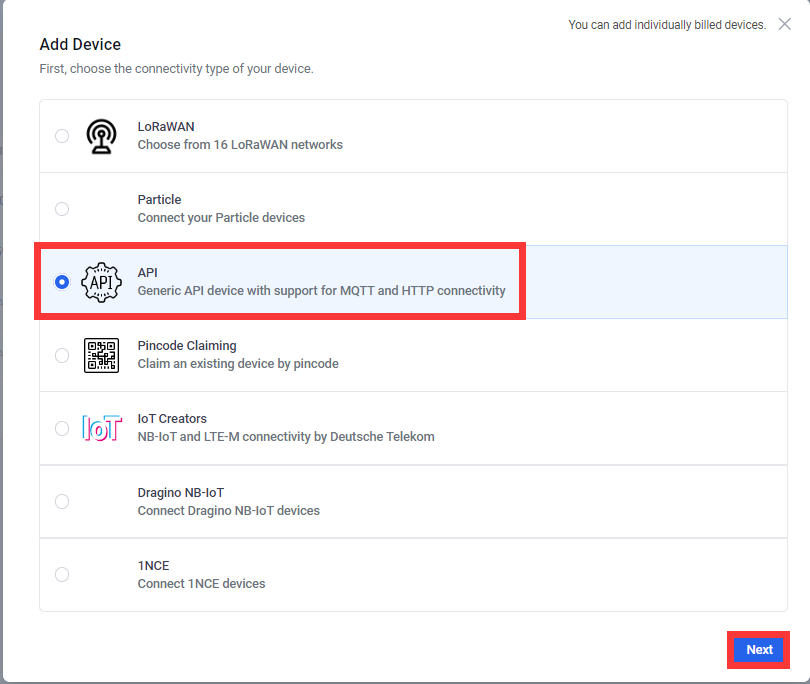
- Select API and click “Next”.
- Select a Product based on your needs, take "Create new empty product" as an example.
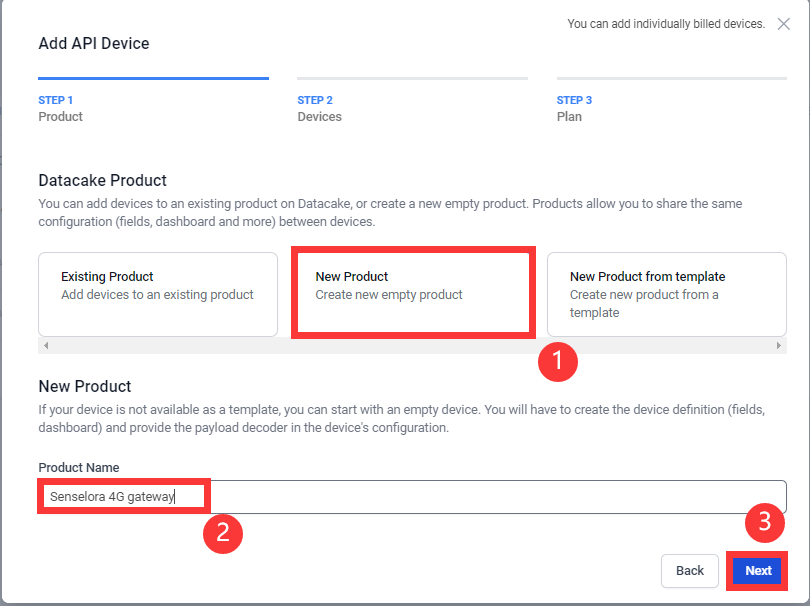
- Leave the default in “Add API Device” and click “Next”.

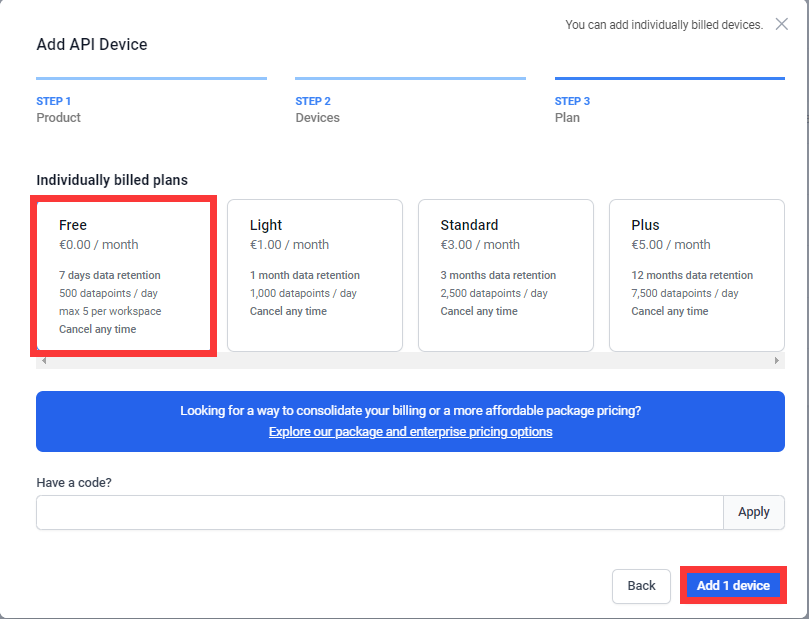
- Choose the type according to your needs, and click “Add 1 device”.
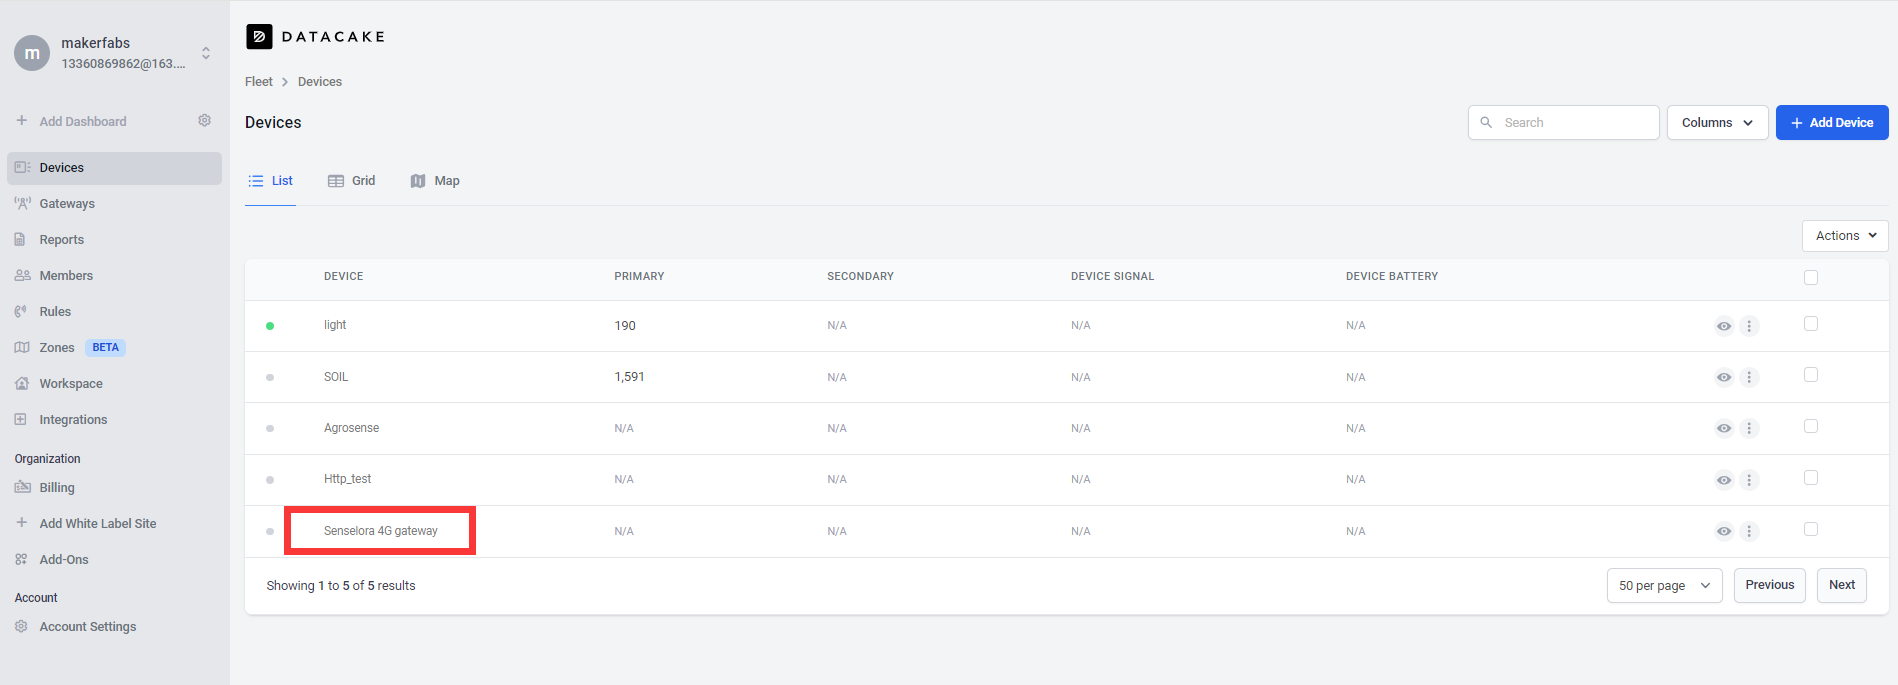
- Click to go to the device you just added.
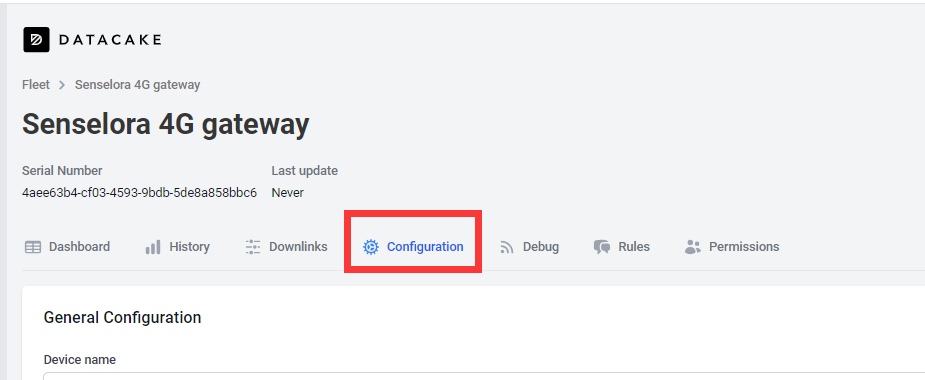
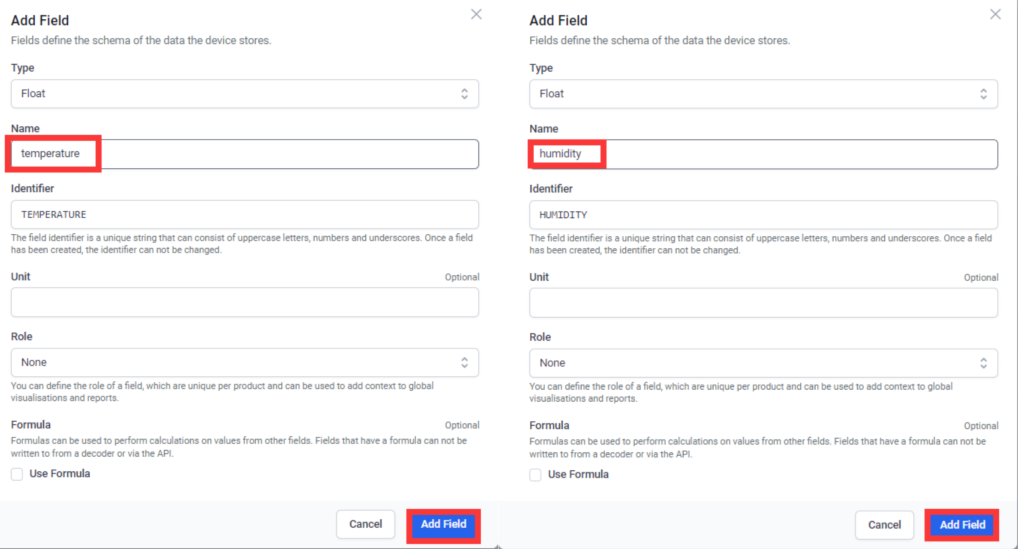
- Click “Configuration”, follow the steps to add a field.
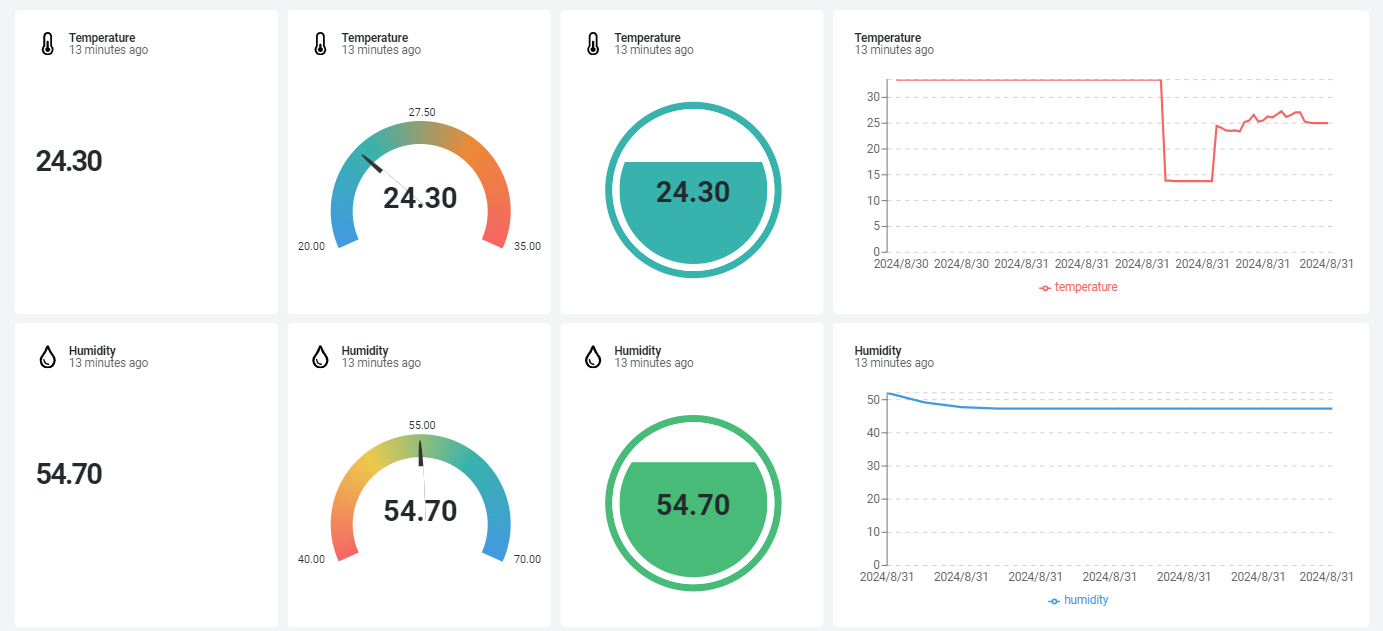
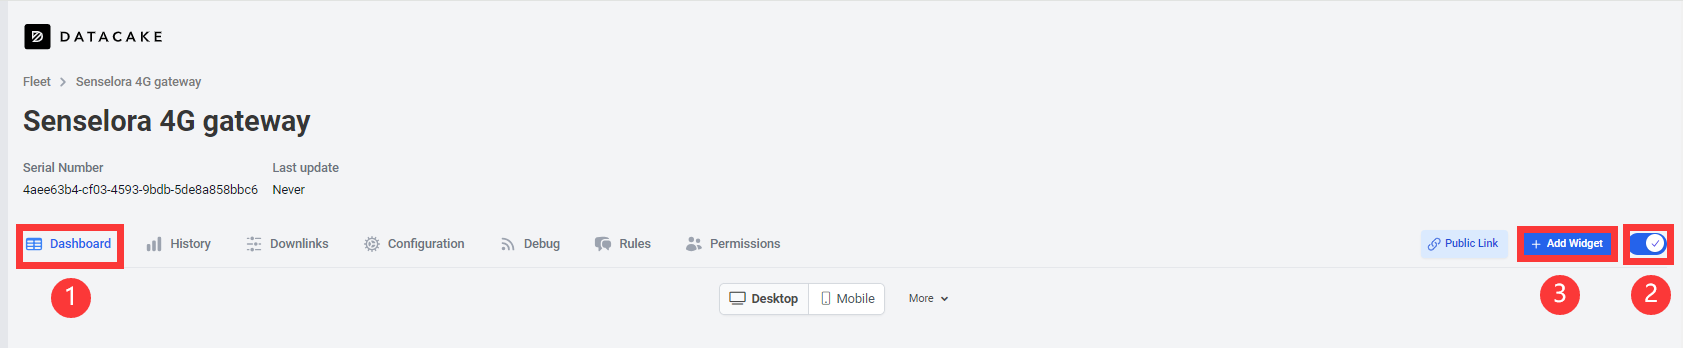
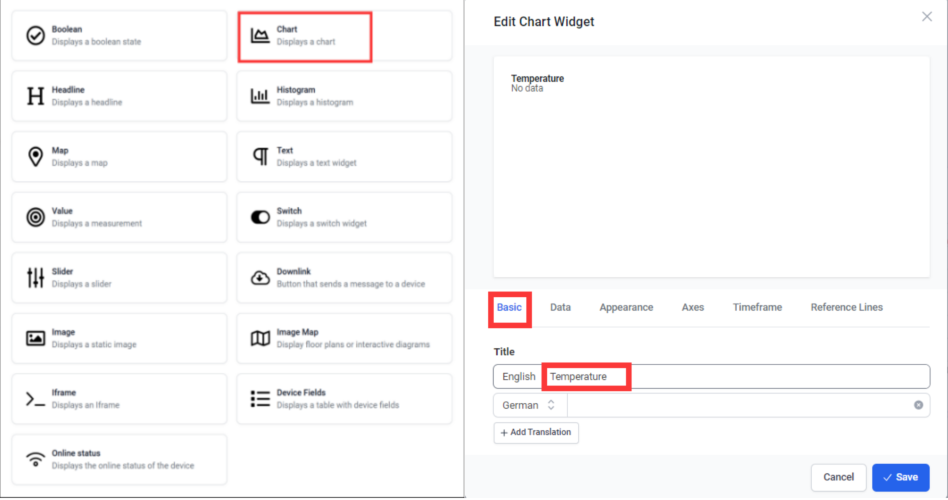
- To get a better look at the data, we can add widget.Click “Dashboard-->switch-->+ Add Widget”.
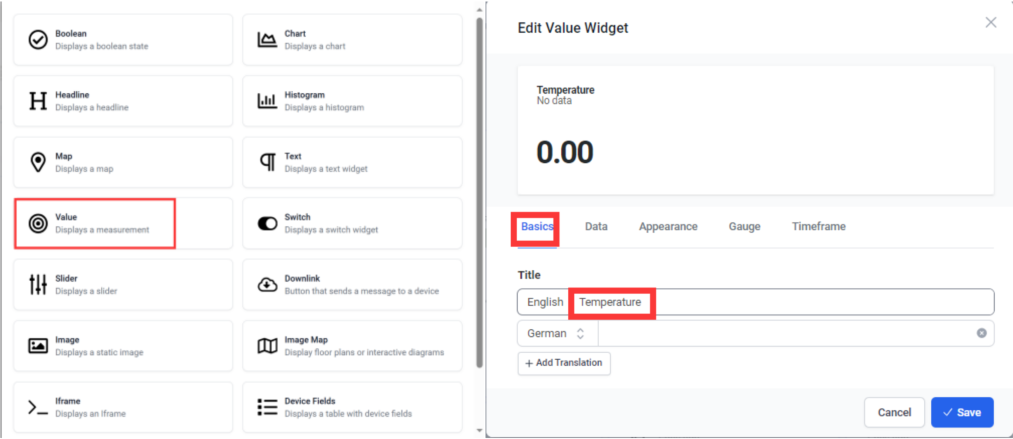
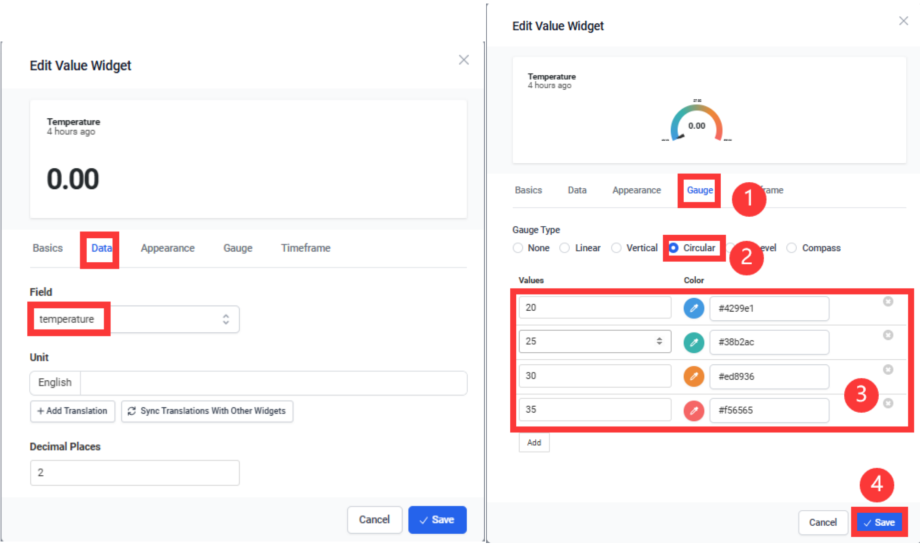
- Select “Value” and set Title, Field and presentation form as well as the interval color.
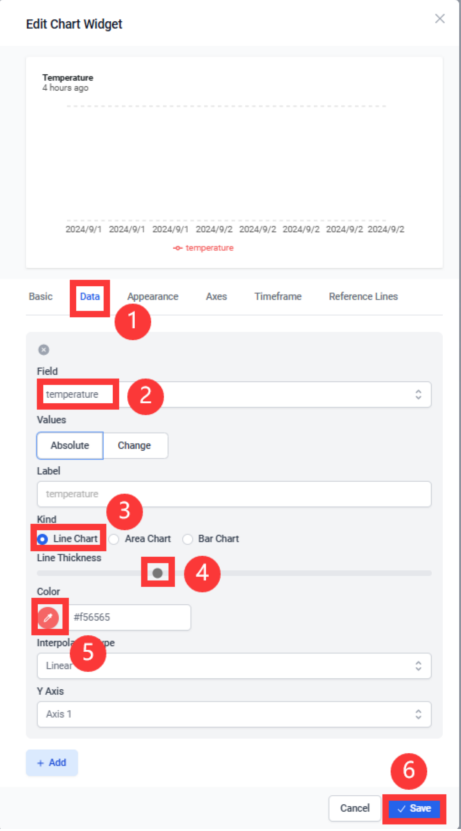
- Select Chart and set Title, Field, Kind, Line Thickness and click “save”.
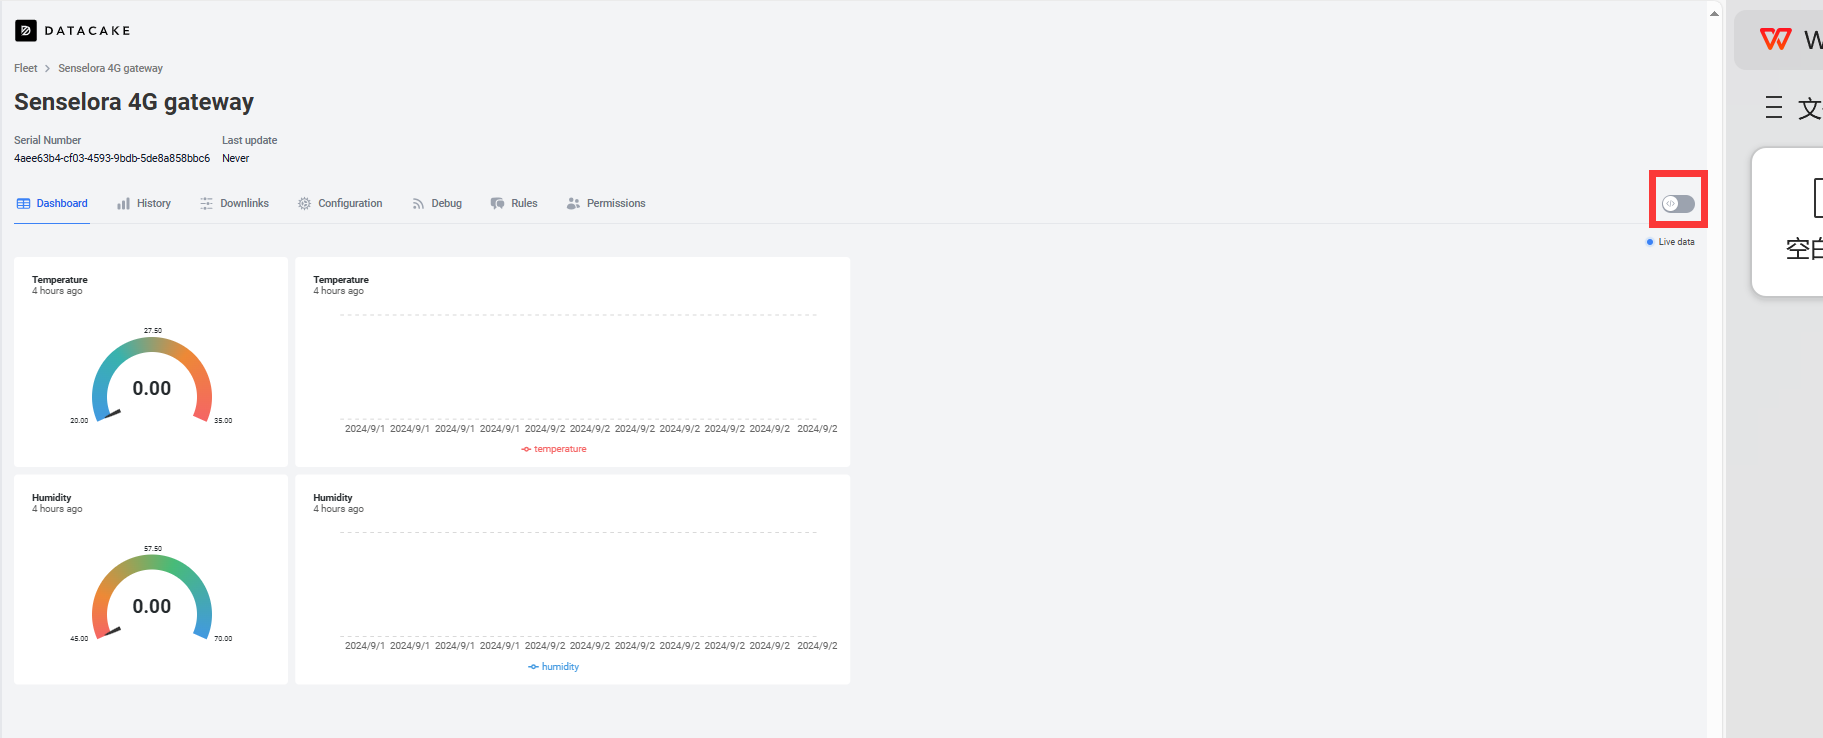
- Humidity is the same step as temperature.
- Click the switch to save.
4.3 Arduino
While the Air monitor is a ready-to-use product and the 4G gateway requires us to program it to work.Please follow the steps below to complete the upload of the 4G gateway code.
- Open the send_lora_data_to_datacake by Arduino.
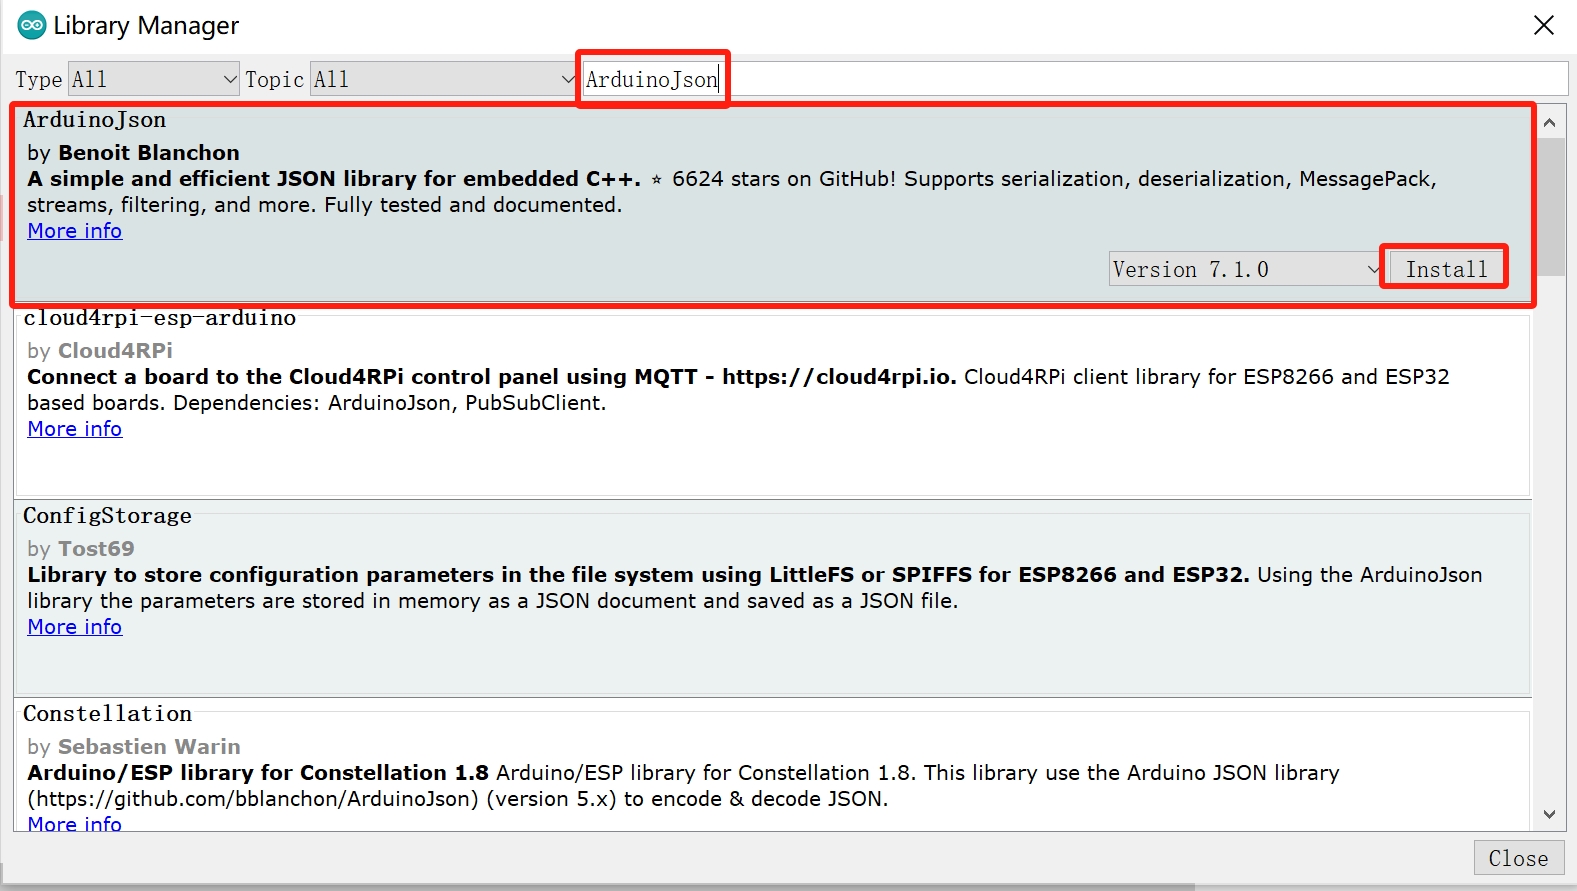
Install "RadioLib" and "ArduinoJson" library.
- Select "Tools-->Manage Libraries..."
- Search "RadioLib", select Version 4.6.0 and click Install.
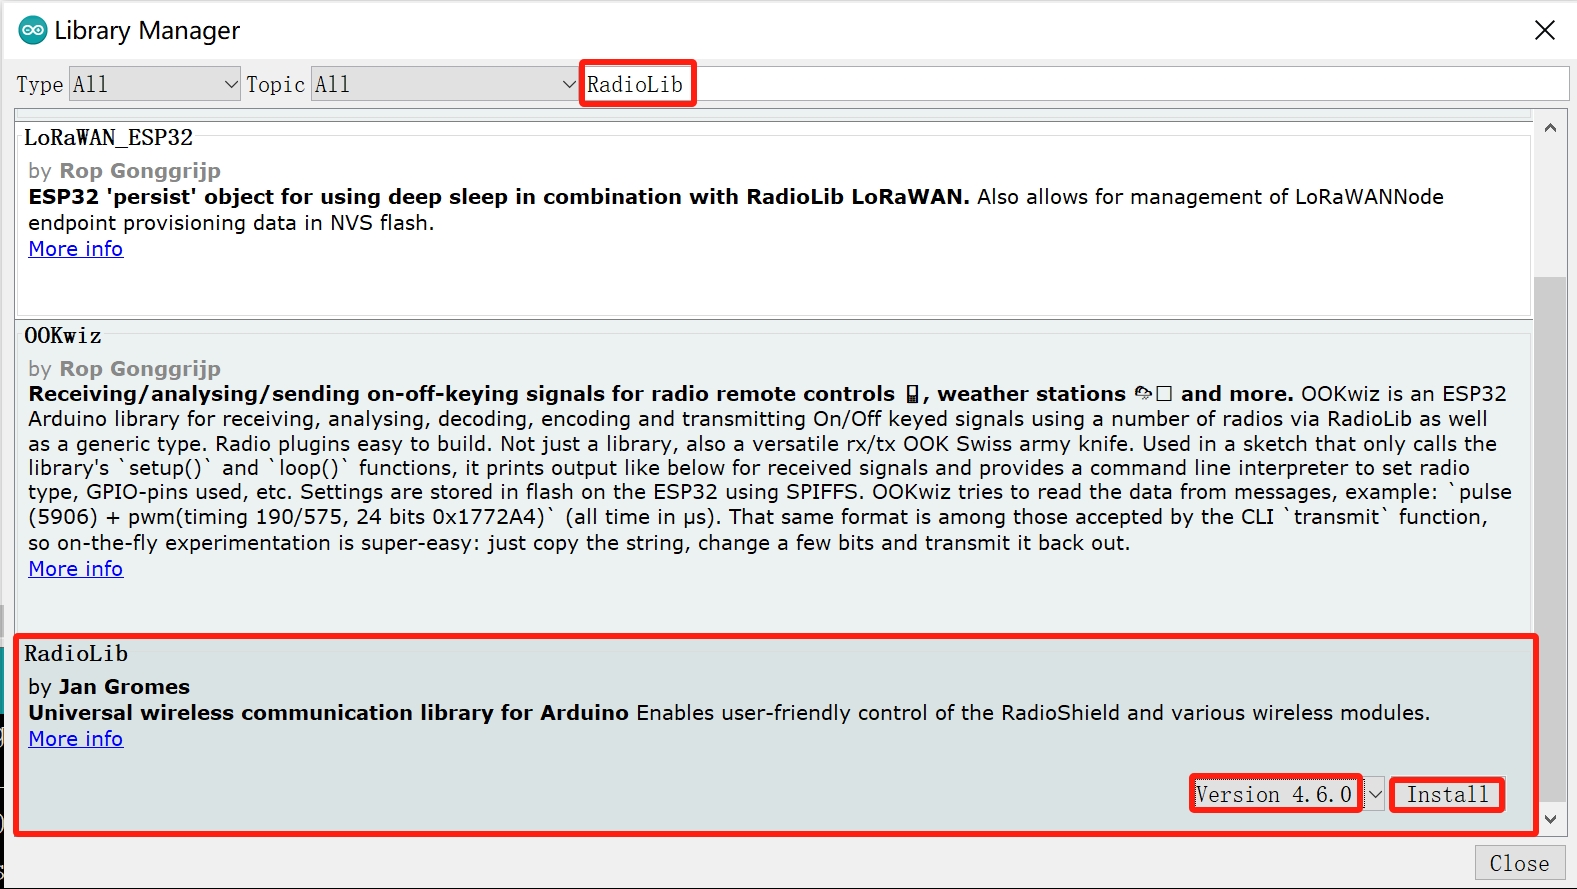
Note: It is recommended to use version 4.6.0, using the latest version may cause compilation failure.
- Search "ArduinoJson" and click Install.
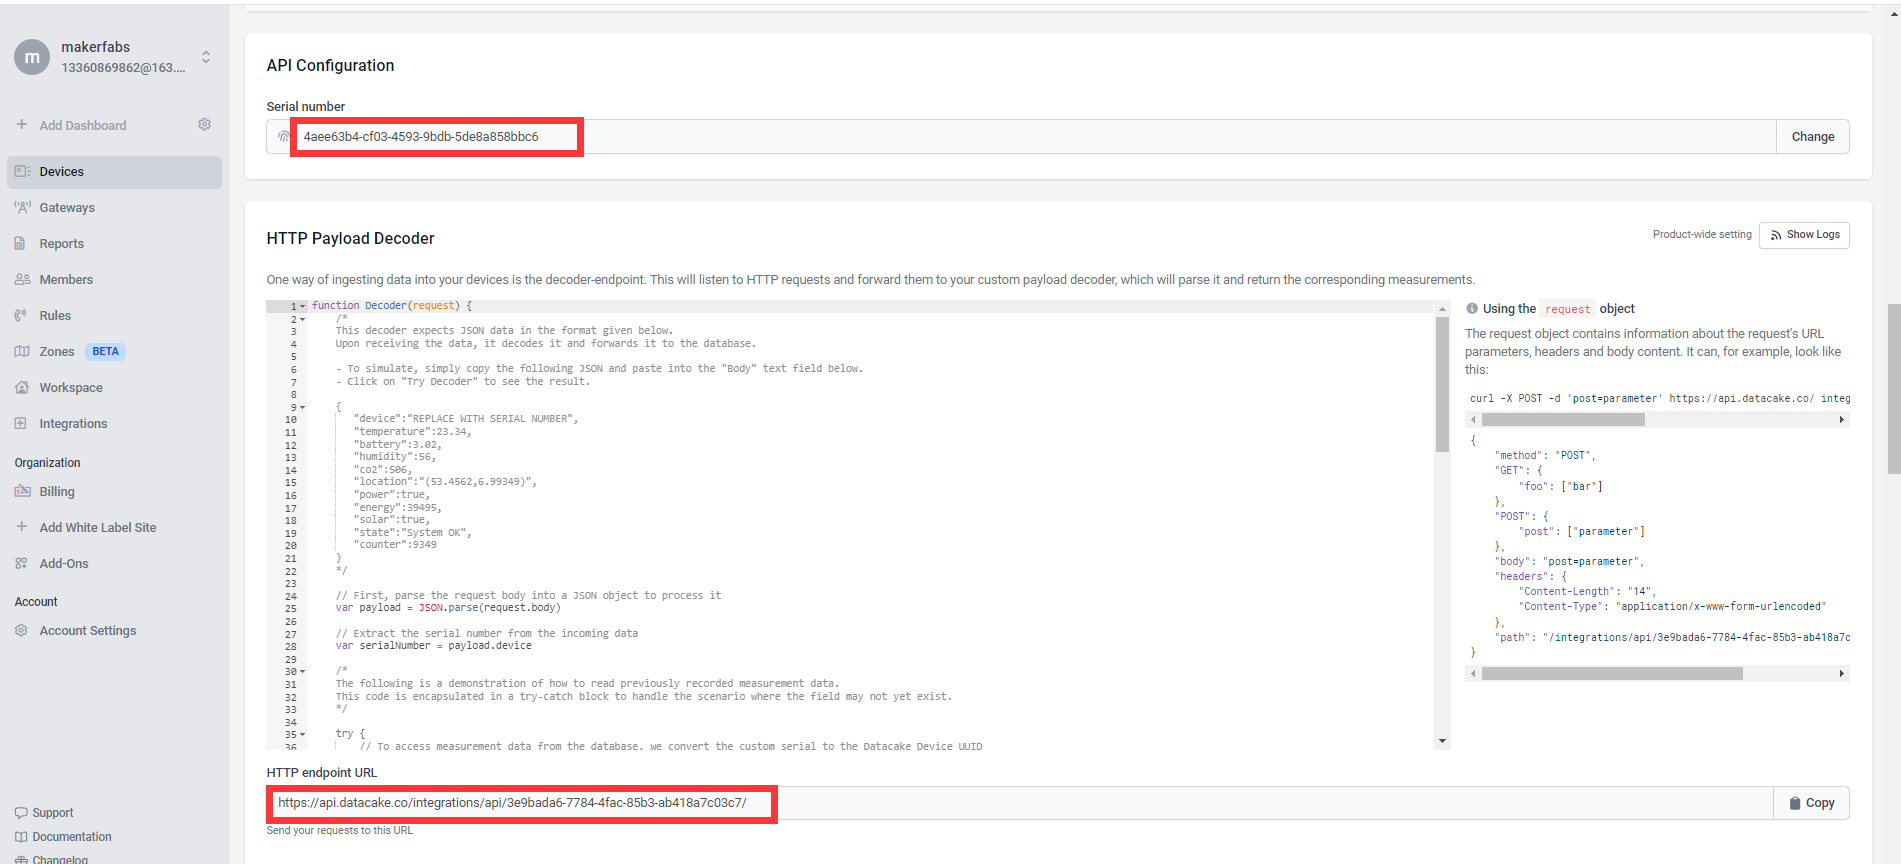
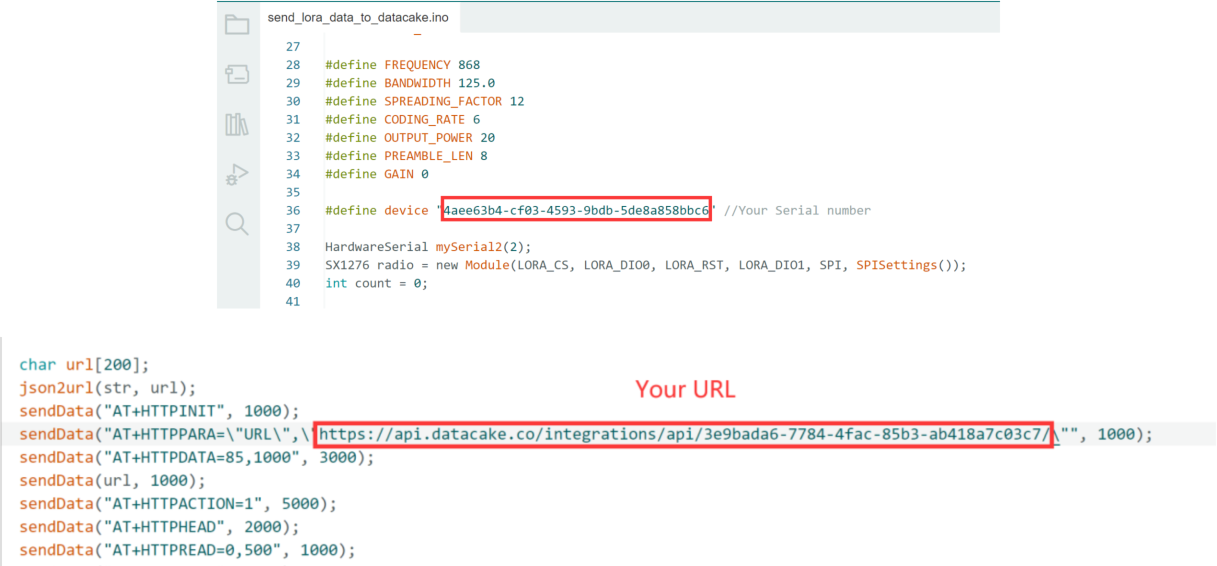
- Go back to datacake, click “Configuration”, copy the “Serial number” and “HTTP endpoint URL” into the code respectively.

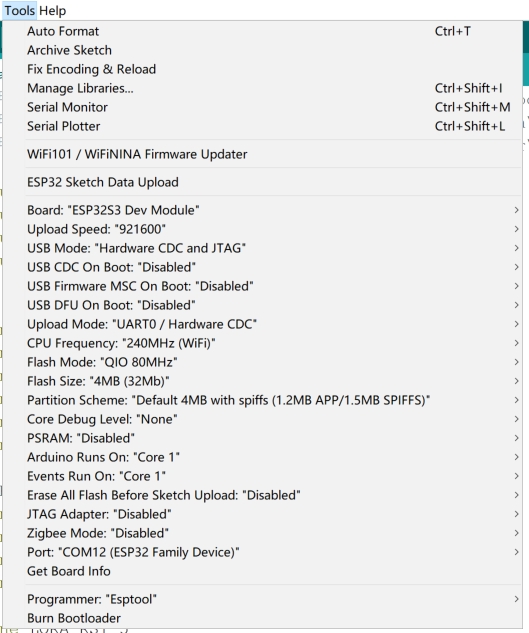
- Plug the SIM card into the Senselora 4G gateway. Turning on the switch and use Type-C USB cable to connect the board and PC, and select the development board "ESP32S3 Dev Module" and the port and upload the code.
4.4 Result
- Power on the SenseLora_Industrial-grade Air Monitor.
- Press the Senselora 4G gateway reset button and wait a few minutes to receive a message in Datacake.
5. Transmit Air Monitor data to Thingspeak
This demo will show you use this device to transmit the temperature and humidity to Thingspeak that the T&H CAN be checked everywhere.
The user needs a Lora transmitter to transmit the corresponding signal to receive the temperature and humidity information. Let's take the example of a SenseLora_Industrial-grade Air Monitor as a transmitter.
5.1 Hardware
1.SenseLoRa_Industrial-grade Air Monitor
2.SenseLoRa_4G LTE CAT1 Gateway
5.2 Thingspeak
To transmit the data to your Thingspeak channel, it has to create a new channel and get the APIKEY information. Then replace the APIKEY in the code with yours.
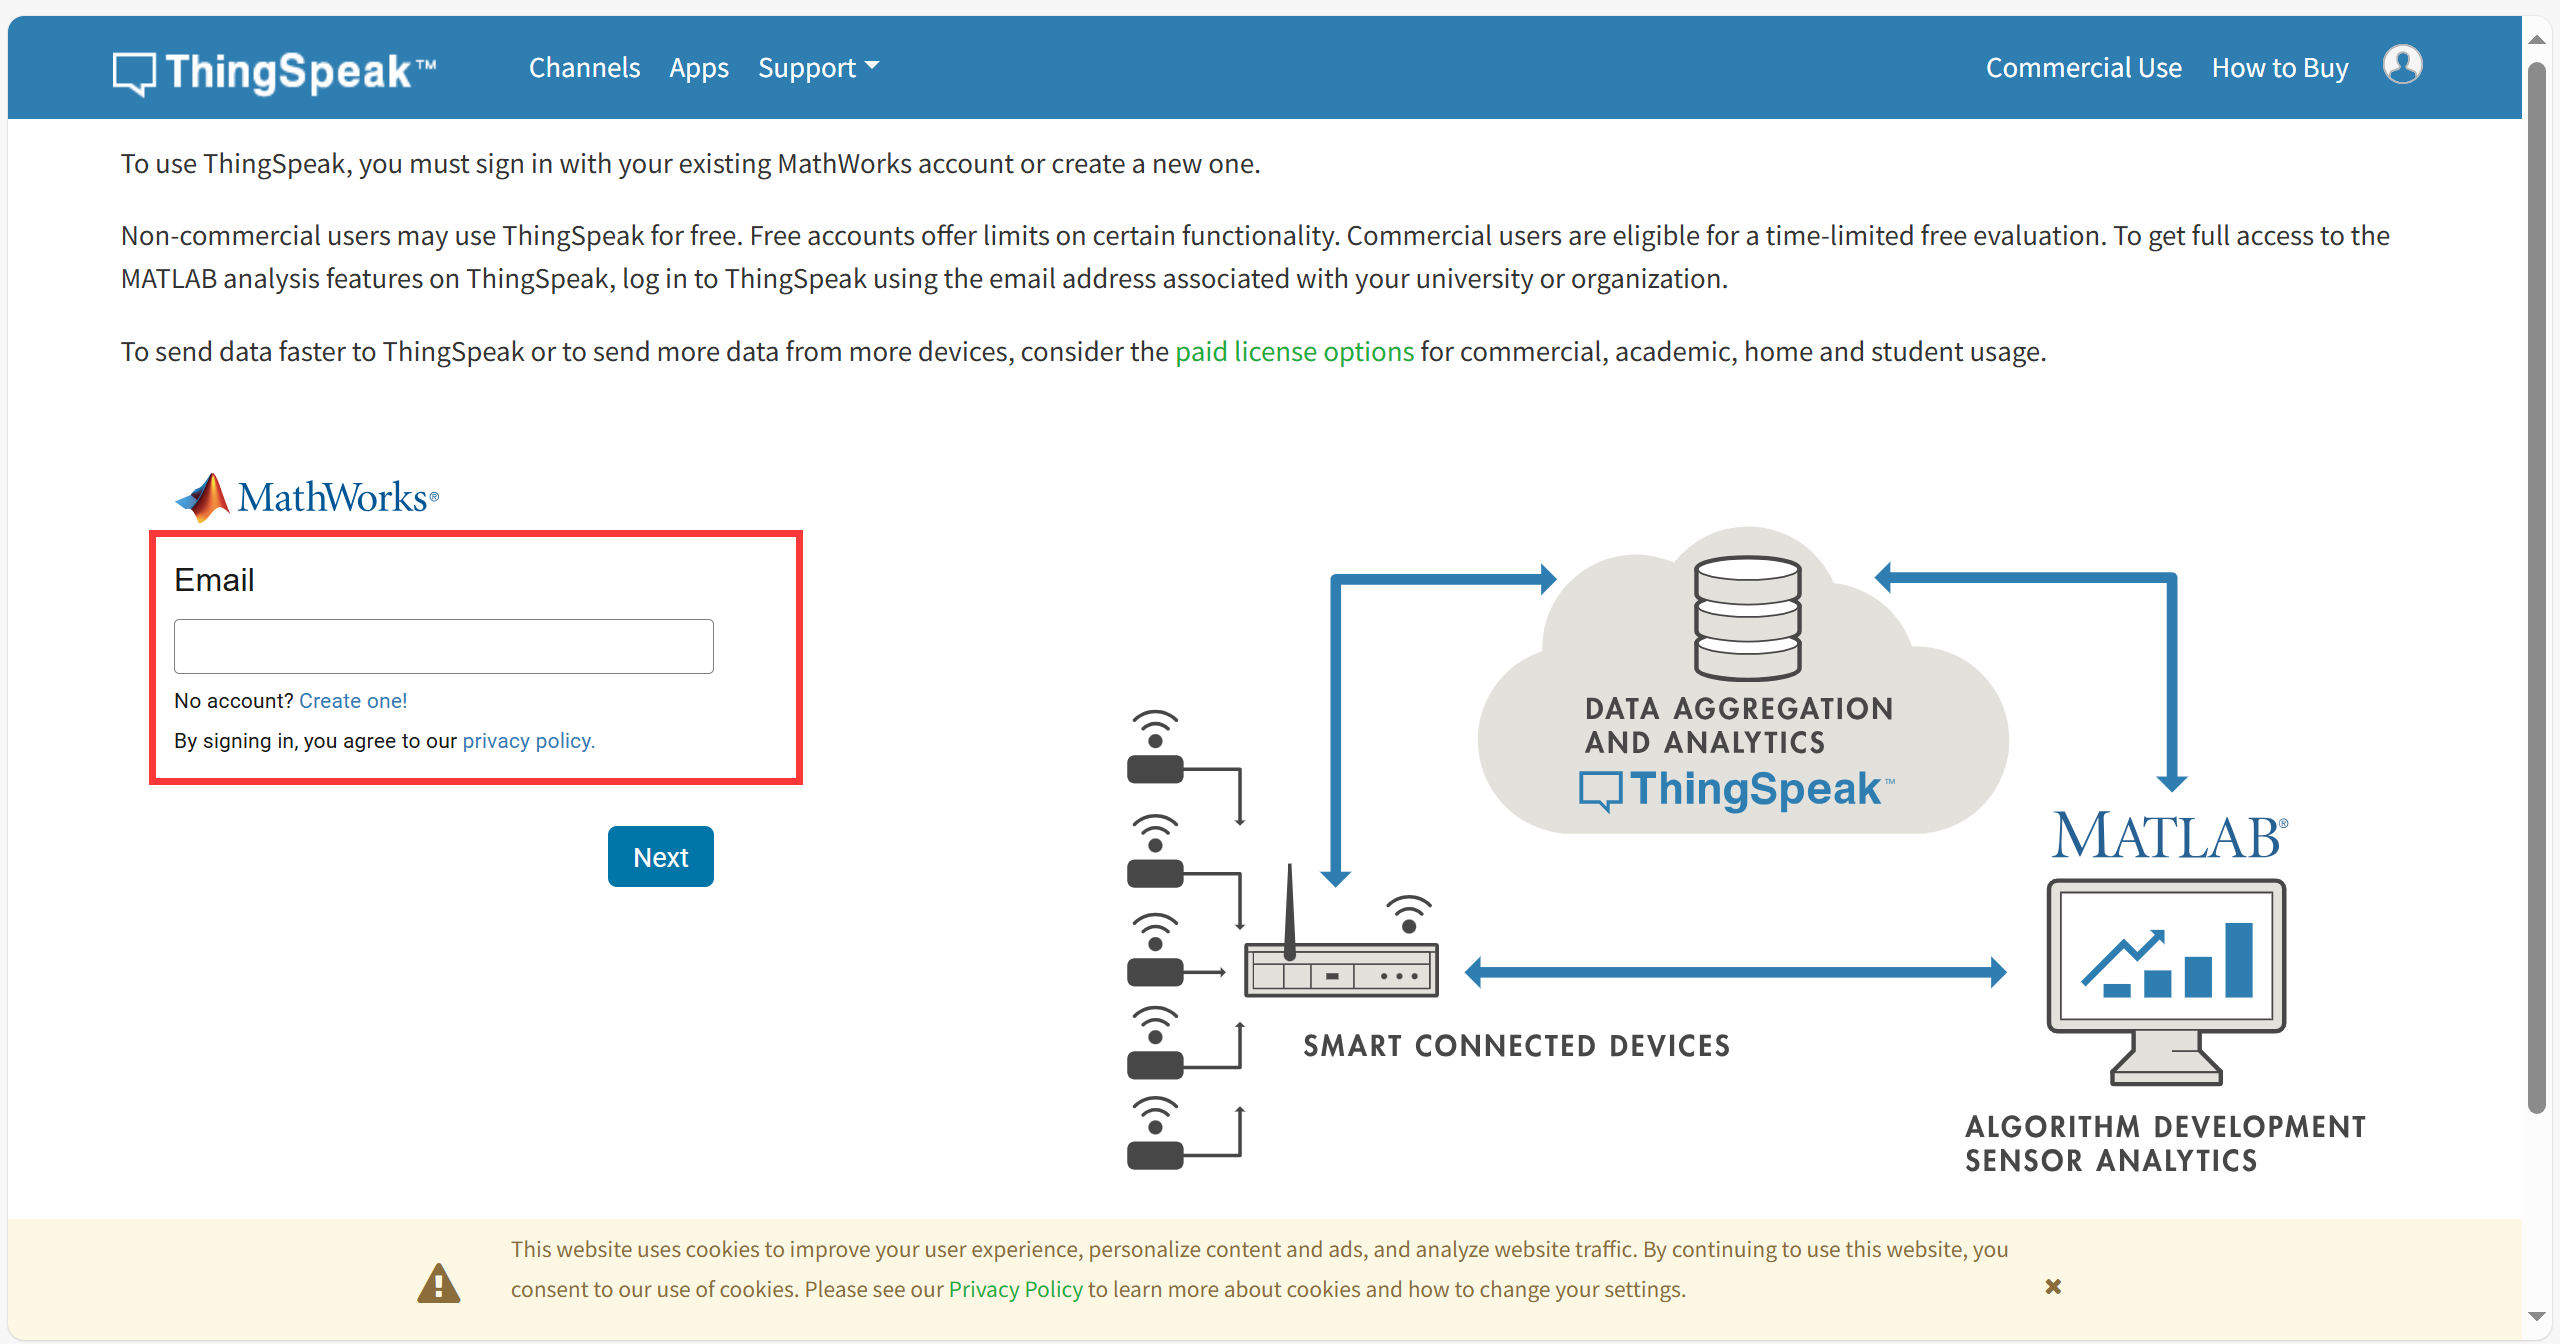
- sign in or sign up for ThingSpeak
If you already have an account, log in and enter the password, otherwise click Create one to register.
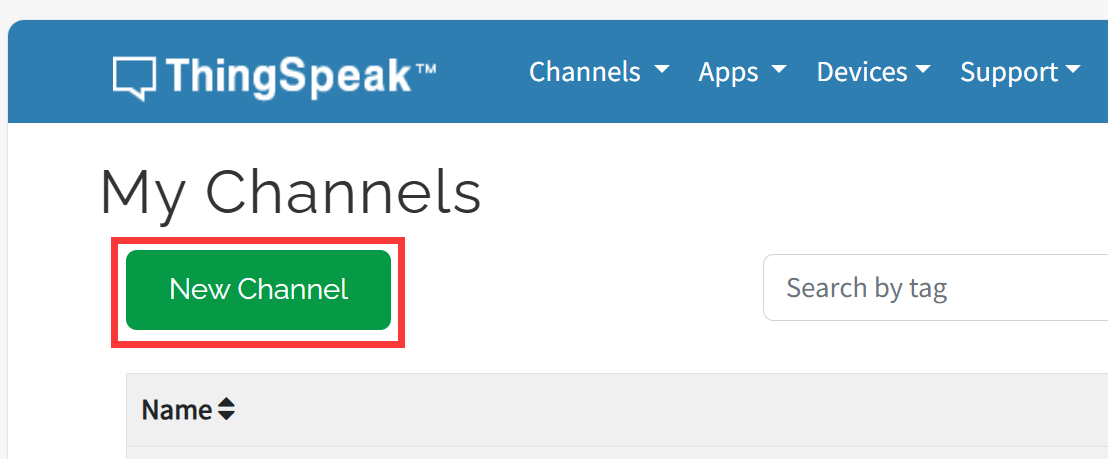
- Create new channel
Select "Channel --> My Channels".

click "New Channel".
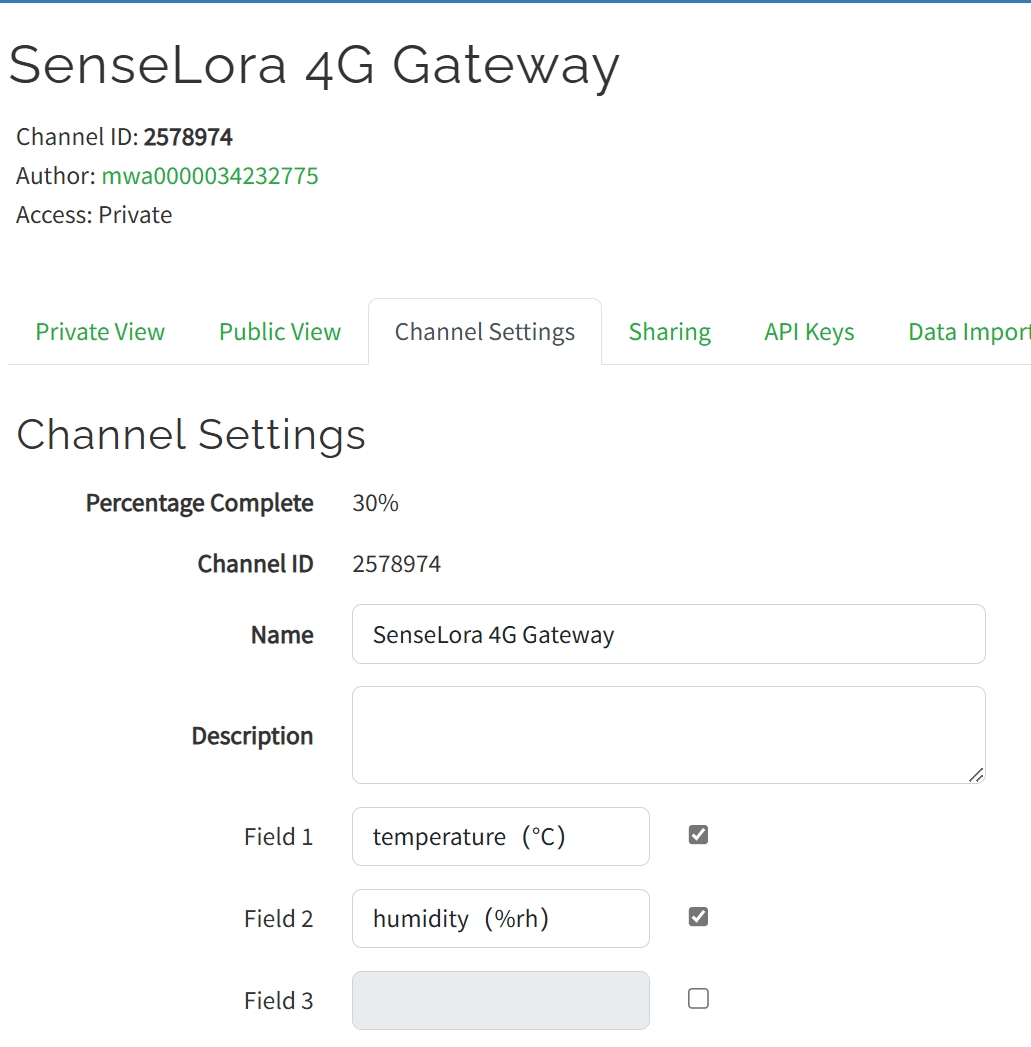
Write the name and field information and click Save Channel to create successfully.
5.3 Arduino
While the Air monitor is a ready-to-use product and the 4G gateway requires us to program it to work.Please follow the steps below to complete the upload of the 4G gateway code.
1.Open the send_lora_data_to_thingspeak by Arduino IDE.
2.Install "RadioLib" and "ArduinoJson" library.
-
Select "Tools-->Manage Libraries..."
-
Search "RadioLib", select Version 4.6.0 and click Install.
Note: It is recommended to use version 4.6.0, using the latest version may cause compilation failure.
- Search "ArduinoJson" and click Install.
3.Change the APIKEY.
In order to view the data in your own channel, you need to modify the APIKEY in the code.
- Click the "API Keys" and copy you Key.
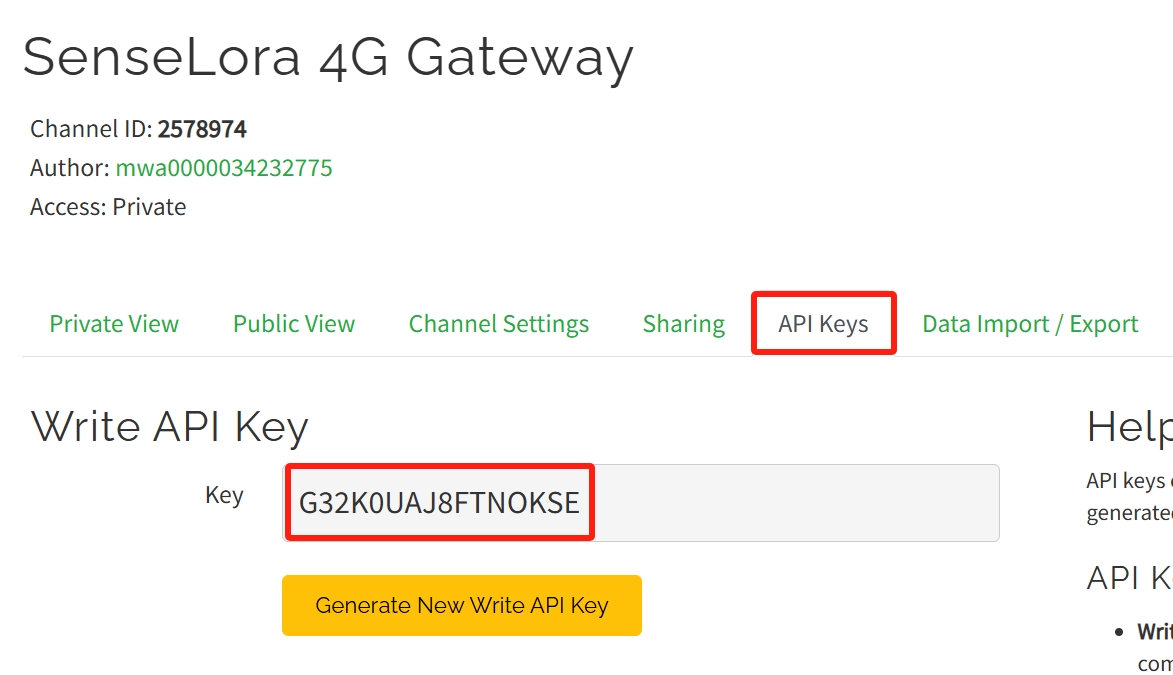
- Modify the APIKEY in the code.

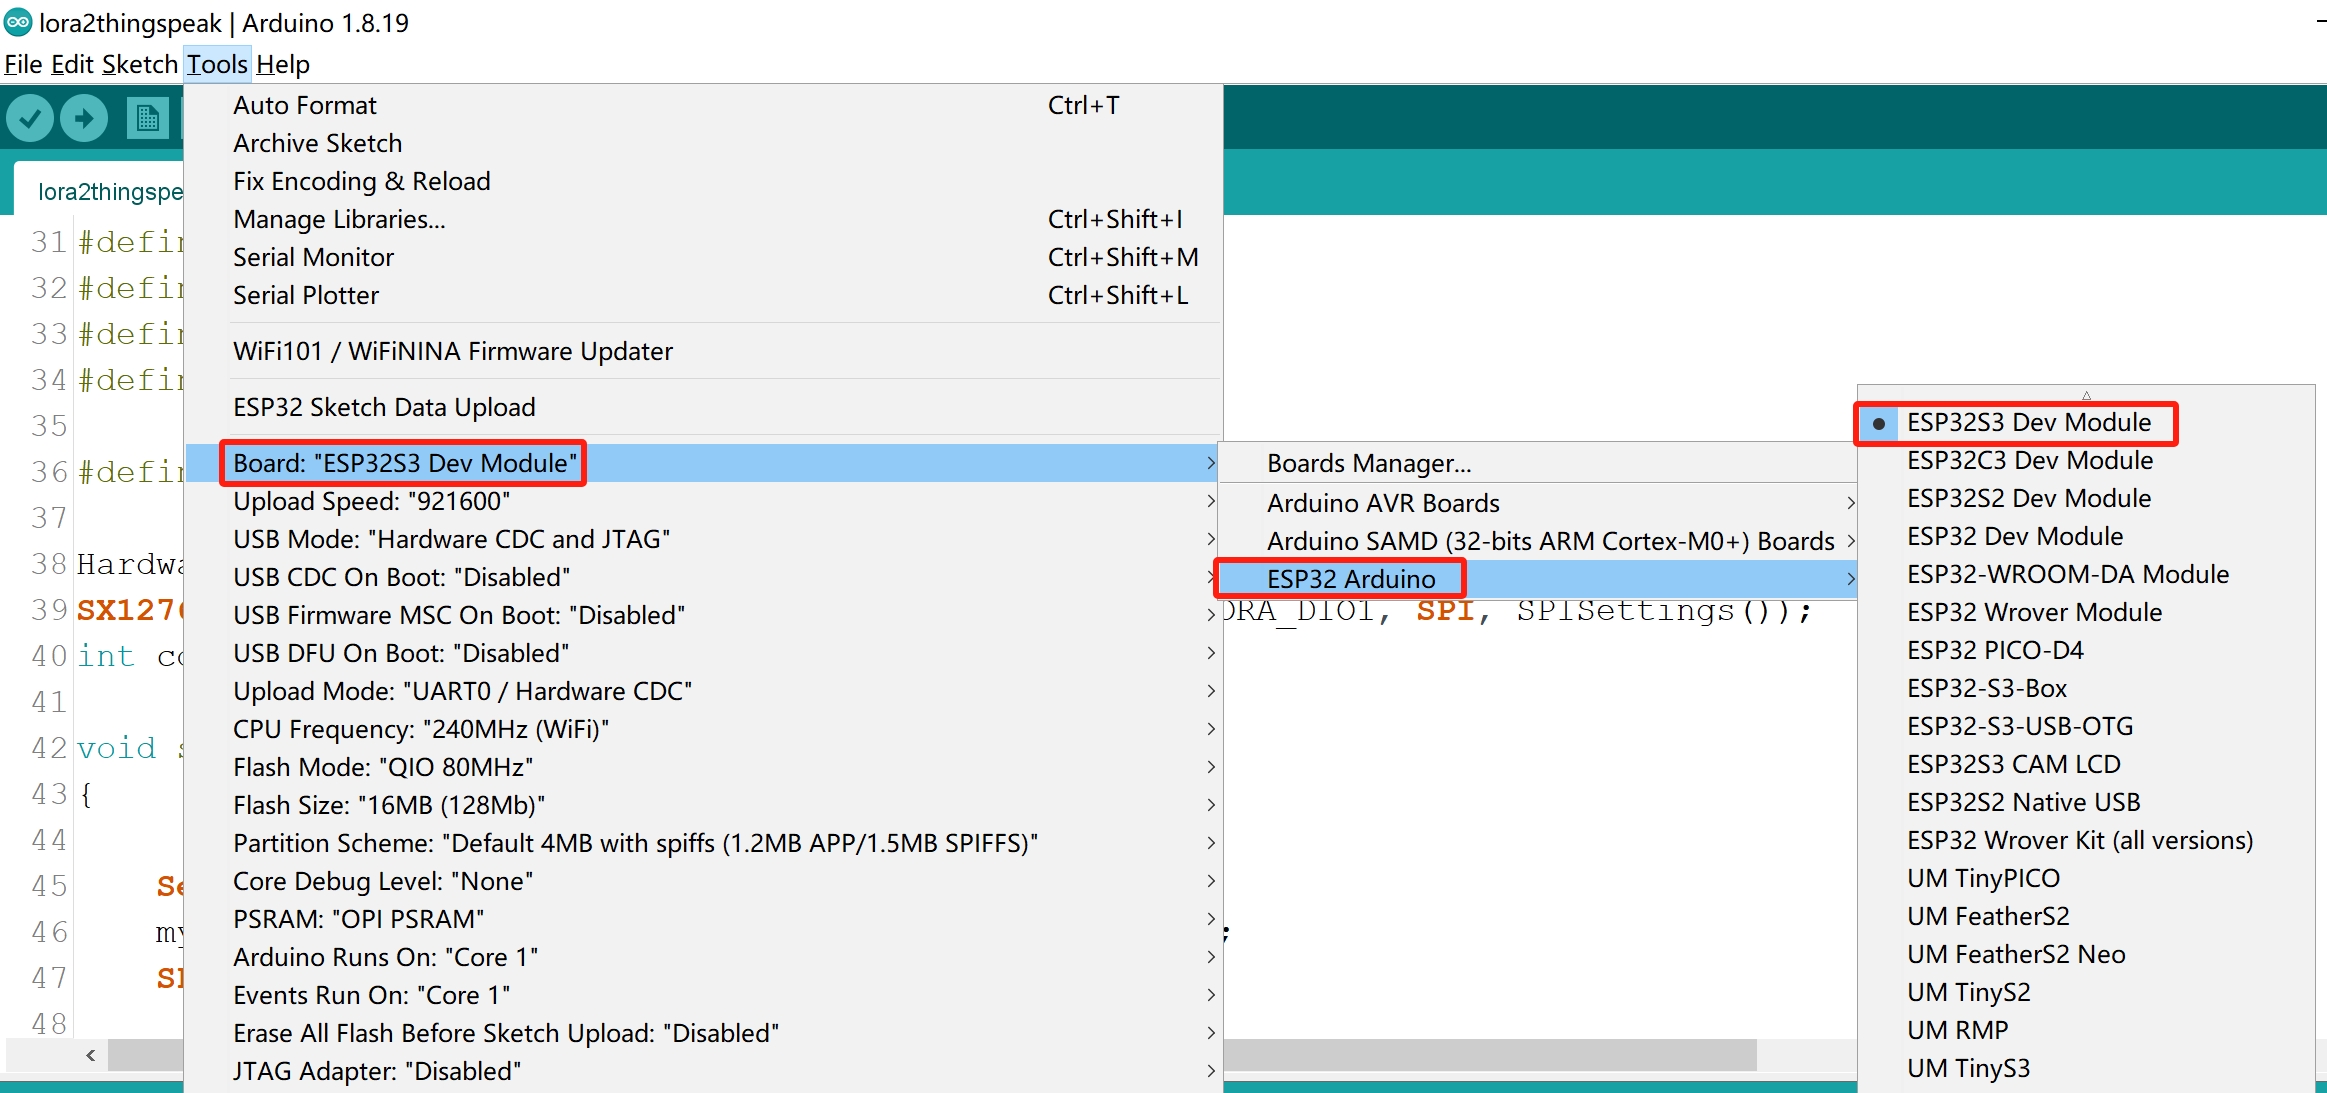
4.Use Type-C USB cable to connect the board and PC, and select the development board "ESP32S3 Dev Module" and the port.
- Select "Tools > board:"xxx" > ESP32 Arduino > ESP32S3 Dev Module".
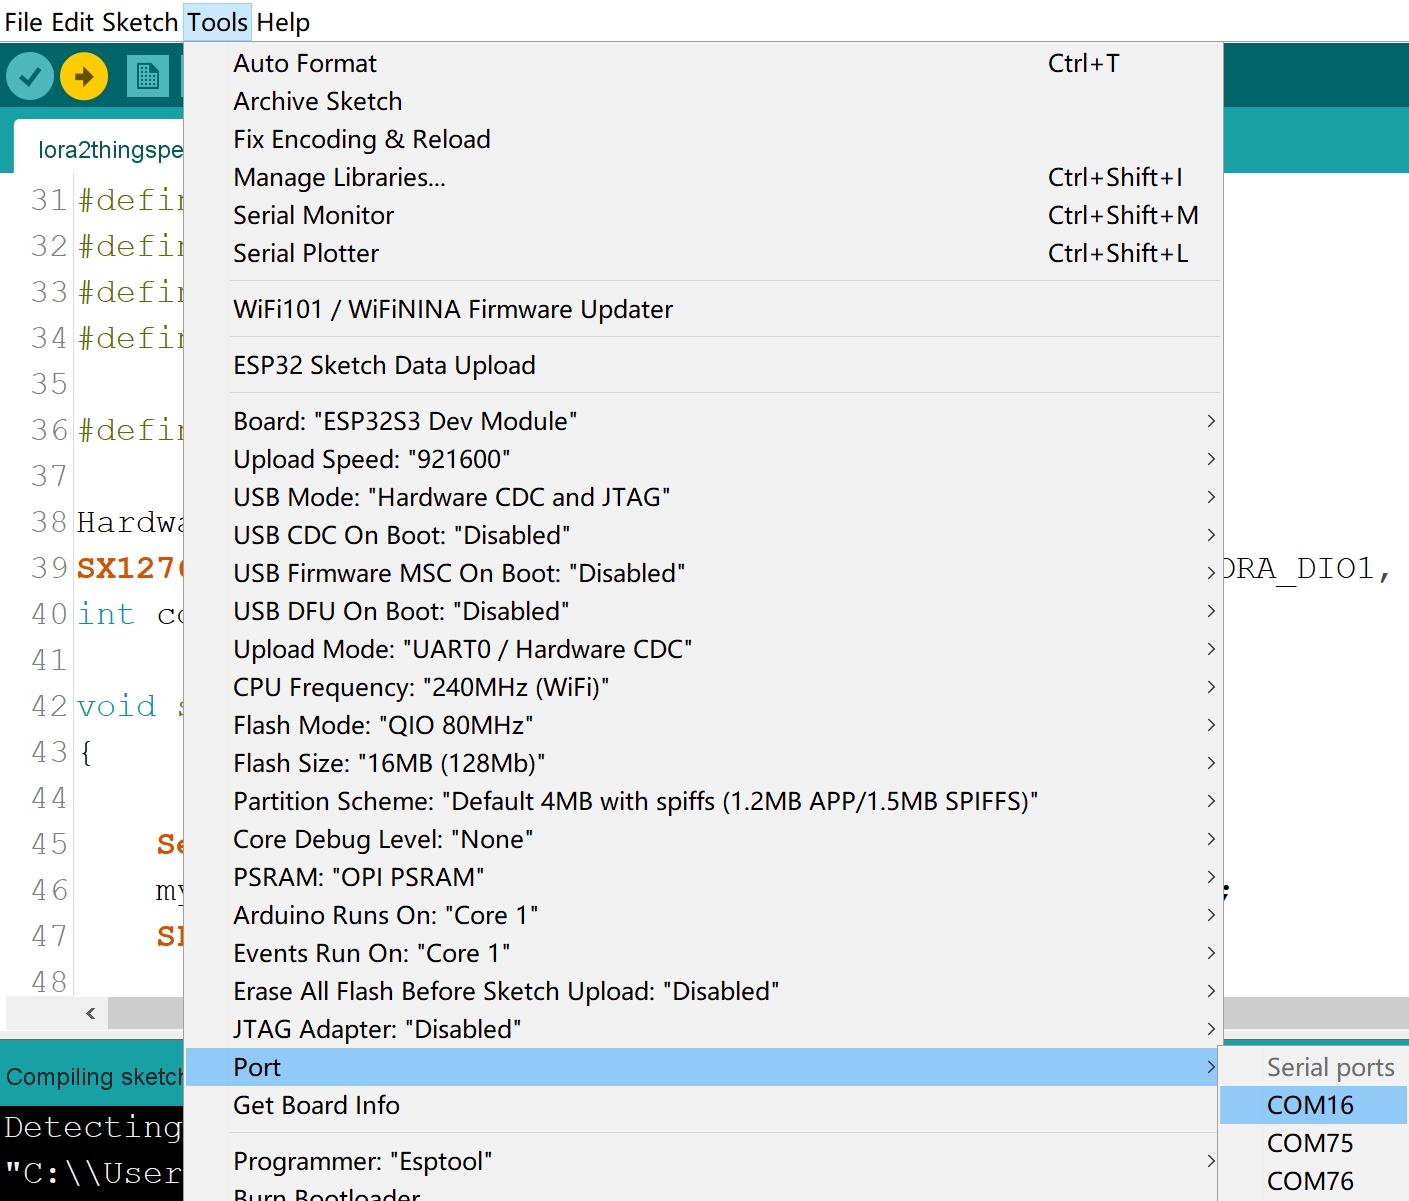
- Select "Tools > Port", Select the port number of the board.
5.Verify the code and upload.
- Click this icon to upload to the board.

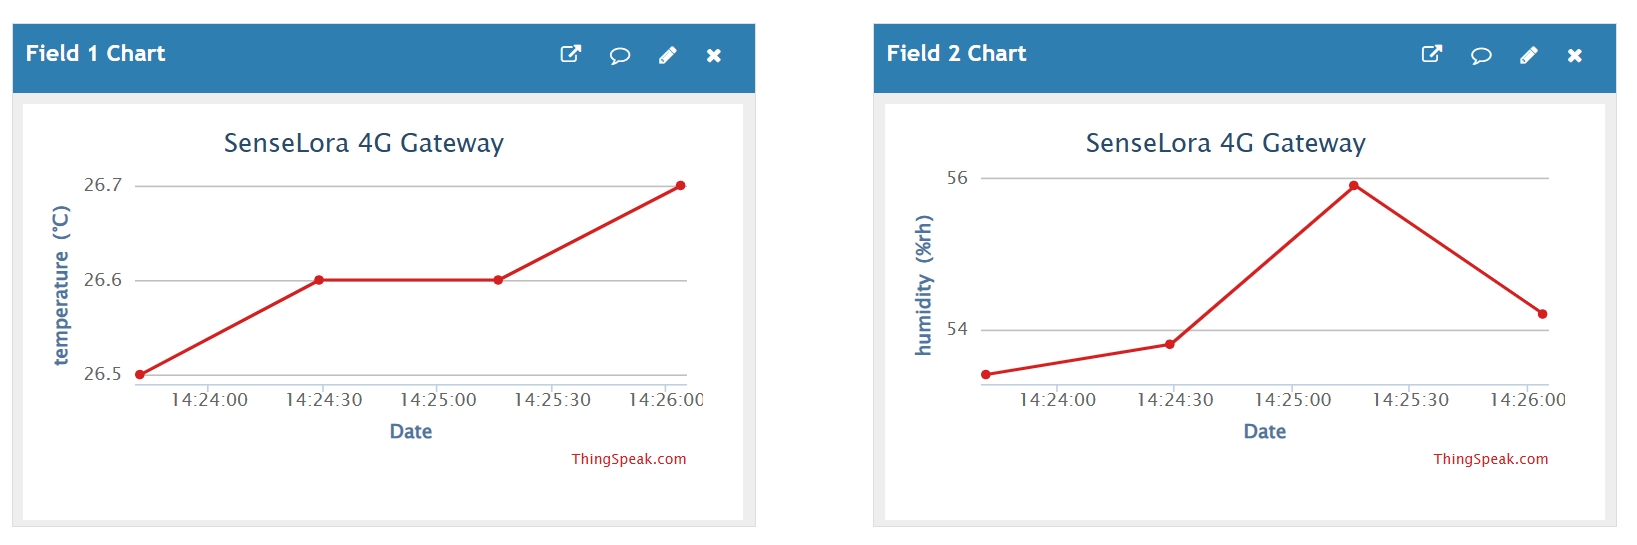
5.4 Result
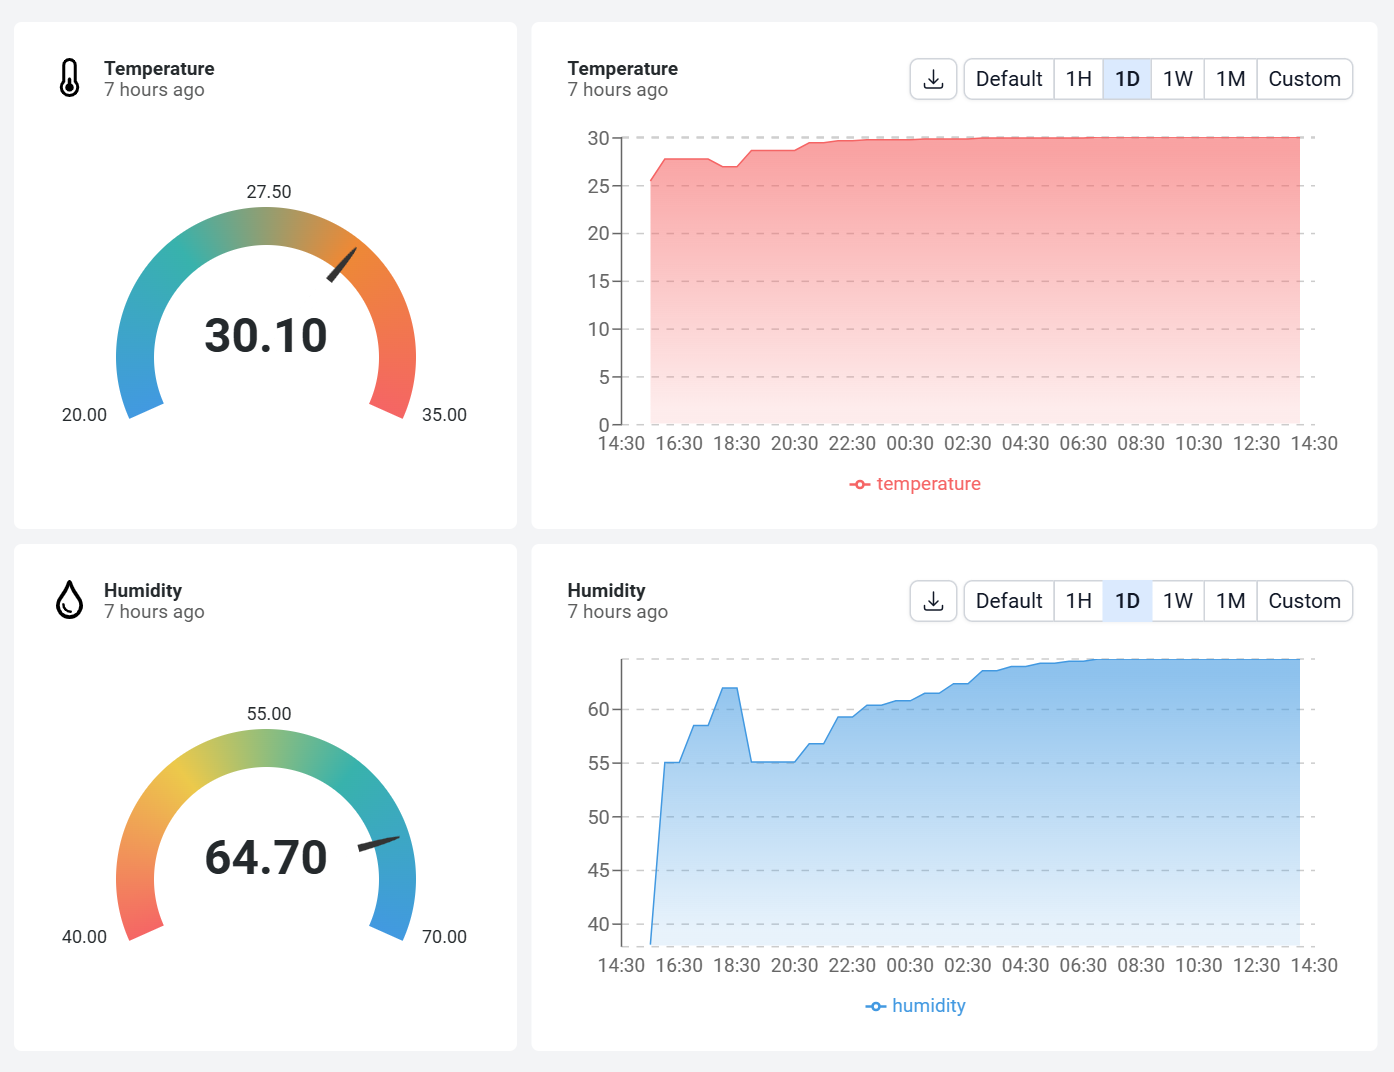
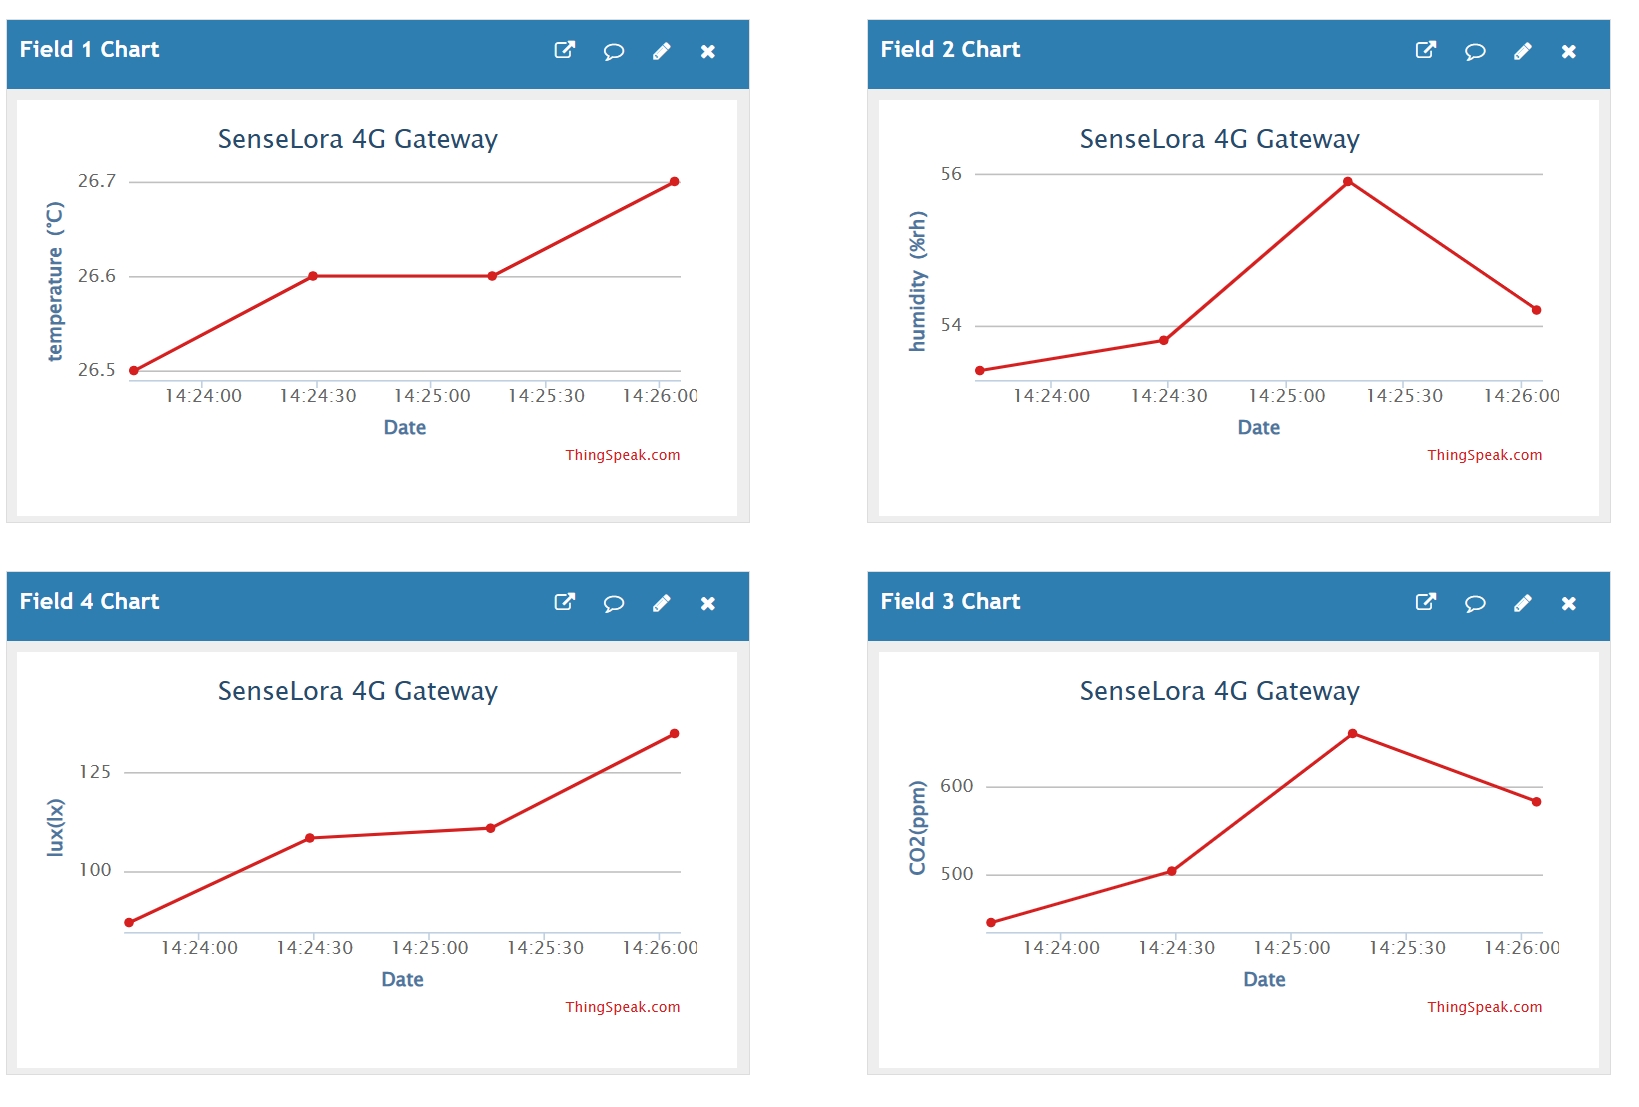
Once the download is complete, power on the SenseLora_Industrial-grade Air Monitor, press the reset button every time and wait about 1 minute to receive a message in Thingspeak.
If you want to receive more information, you can add it yourself in "void json2url(String input, char *url)".
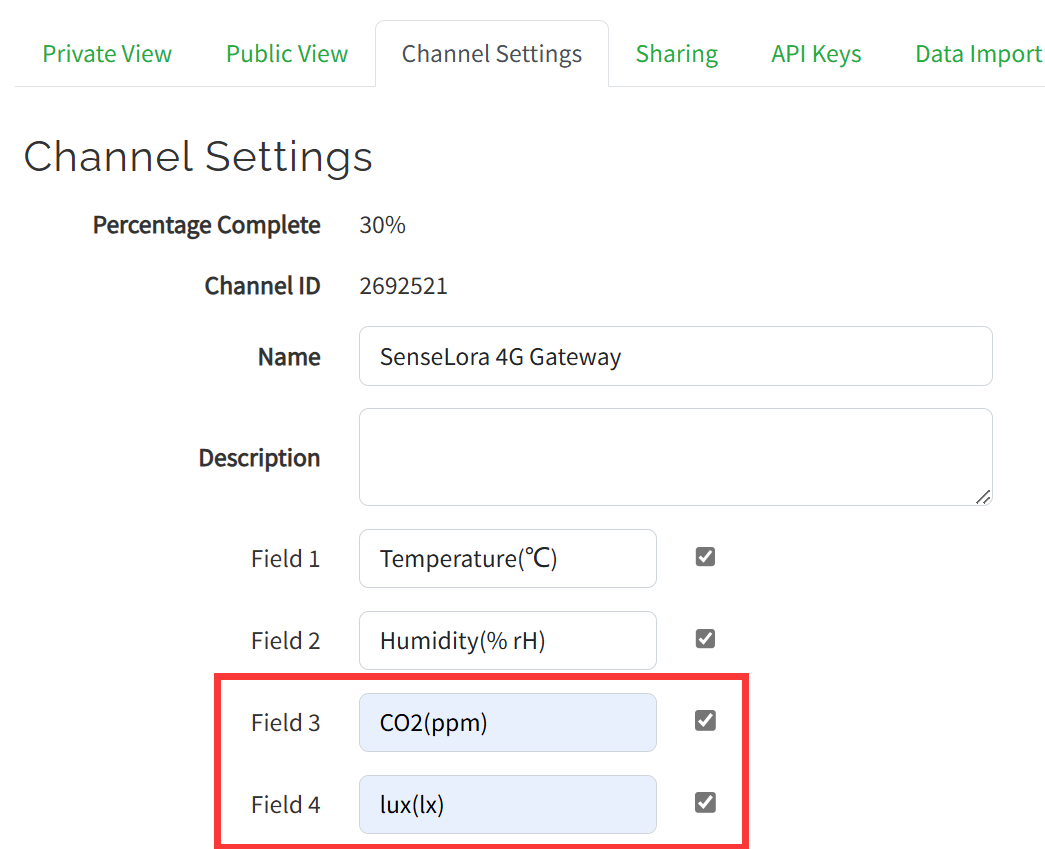
Such as adding information about carbon dioxide and light intensity.
Add and modify code in functions as:
float eco2 = doc["eco2"];
float lux = doc["lux"];
sprintf(url, "AT+HTTPPARA=\"URL\",\"http://api.thingspeak.com/update?api_key=%s&field1=%.1f&field2=%.1f&field3=%.1f&field4=%.1f\"",THINGSPEAK_APIKEY, temp, humi, eco2, lux);
In the void lora_receive_task() funtion, change the char url[200] to char url[600];
char url[600];
Add field in Thingspeak:
Verify the code and upload.Repeat the above steps.
6. Transmit Soil Monitor data to Thingspeak
This demo will show you use this device to transmit the soil temperature and humidity to Thingspeak.
The user needs a Lora transmitter to transmit the corresponding signal to receive the temperature and humidity information. Let's take the example of a SenseLoRa_Industrial-grade Soil Remote Monitor V2 as a transmitter.
6.1 Hardware
1.SenseLoRa_Industrial-grade Soil Remote Monitor V2
2.SenseLoRa_4G LTE CAT1 Gateway
6.2 Thingspeak
To transmit the data to your Thingspeak channel, it has to create a new channel and get the APIKEY information. Then replace the APIKEY in the code with yours.
- sign in or sign up for ThingSpeak
If you already have an account, log in and enter the password, otherwise click Create one to register.
- Create new channel
Select "Channel --> My Channels".
click "New Channel".
Write the name and field information and click Save Channel to create successfully.
6.3 Arduino
While the Soil monitor is a ready-to-use product and the 4G gateway requires us to program it to work.Please follow the steps below to complete the upload of the 4G gateway code.
1.Open the send_lora_data_to_thingspeak by Arduino IDE.
2.Install "RadioLib" and "ArduinoJson" library.
-
Select "Tools-->Manage Libraries..."
-
Search "RadioLib", select Version 4.6.0 and click Install.
Note: It is recommended to use version 4.6.0, using the latest version may cause compilation failure.
- Search "ArduinoJson" and click Install.
3.Change the APIKEY.
In order to view the data in your own channel, you need to modify the APIKEY in the code.
- Click the "API Keys" and copy you Key.
- Modify the APIKEY in the code.
4.Use Type-C USB cable to connect the board and PC, and select the development board "ESP32S3 Dev Module" and the port.
- Select "Tools > board:"xxx" > ESP32 Arduino > ESP32S3 Dev Module".
- Select "Tools > Port", Select the port number of the board.
5.Verify the code and upload.
- Click this icon to upload to the board.
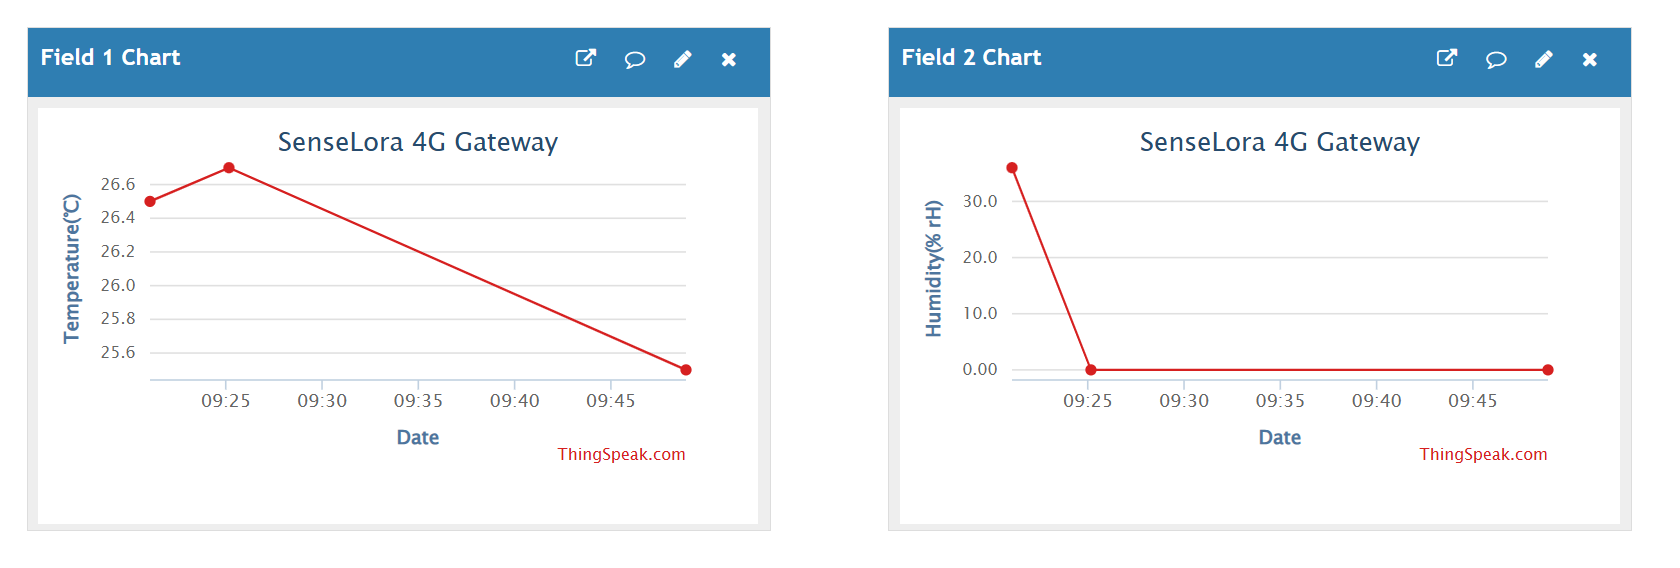
6.4 Result
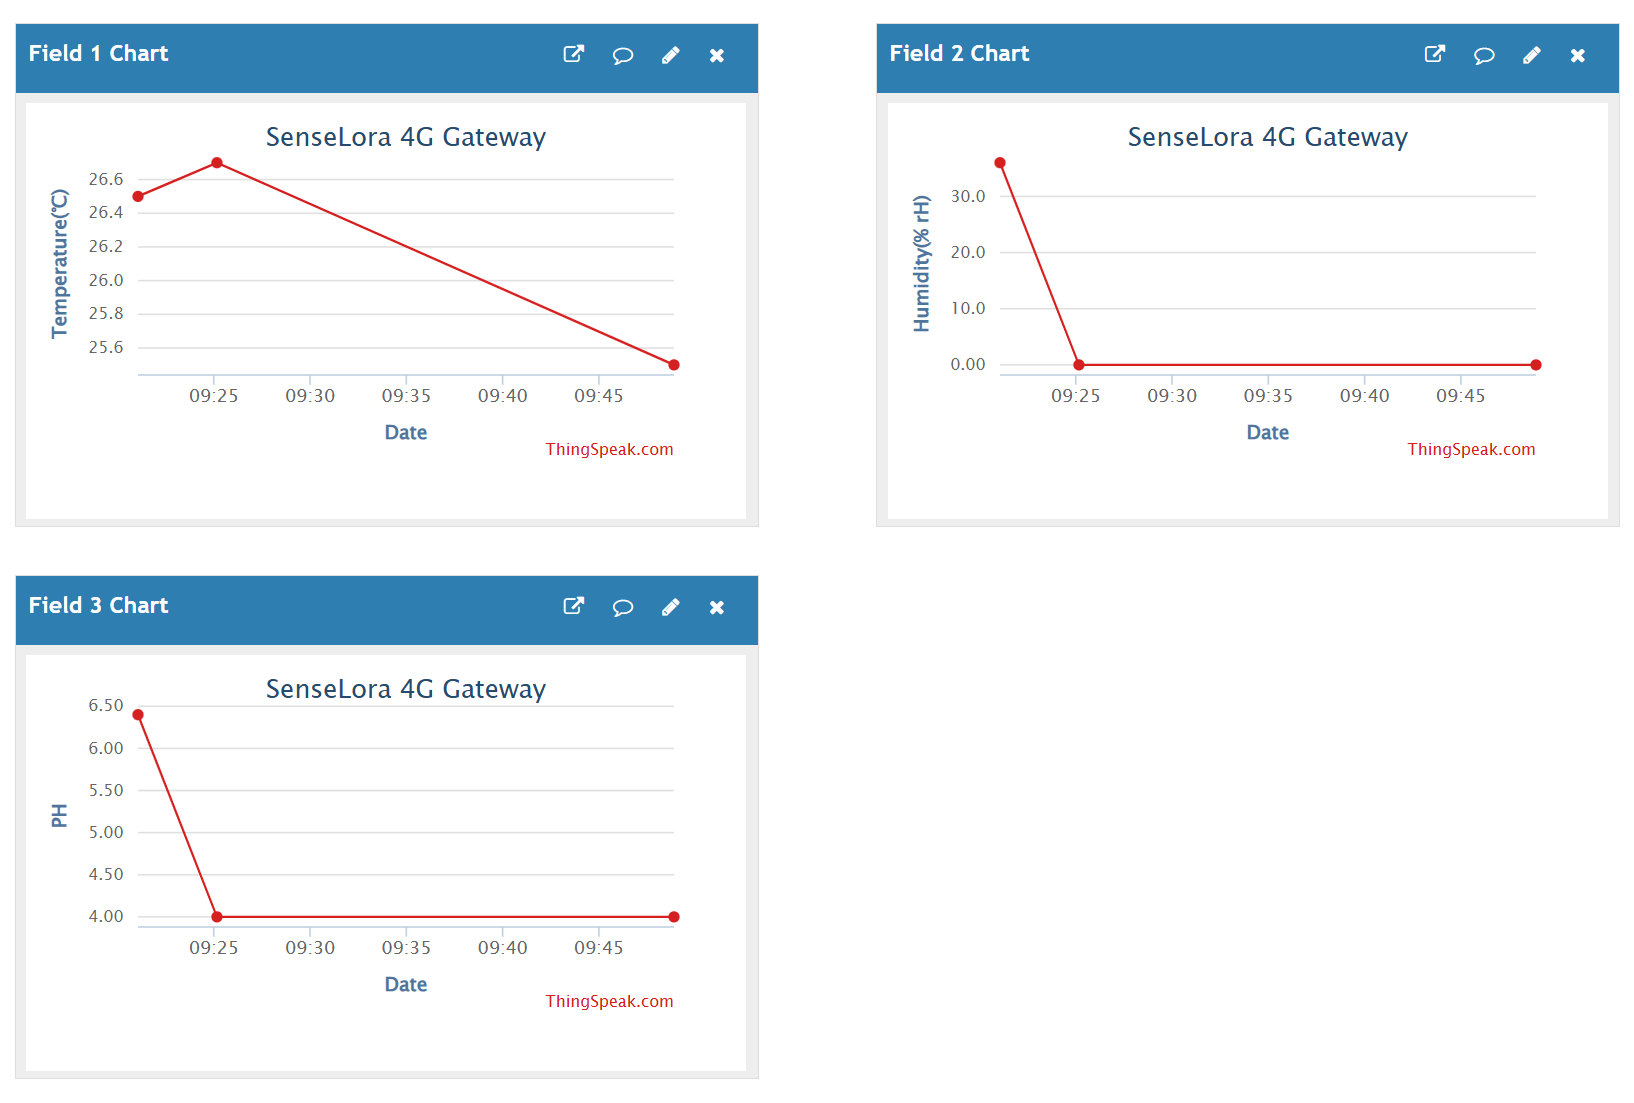
Once the download is complete, power on the SenseLoRa_Industrial-grade Soil Remote Monitor V2, press the reset button every time and wait about 1 minute to receive a message in Thingspeak.
If you want to receive more information, you can add it yourself in "void json2url(String input, char *url)".
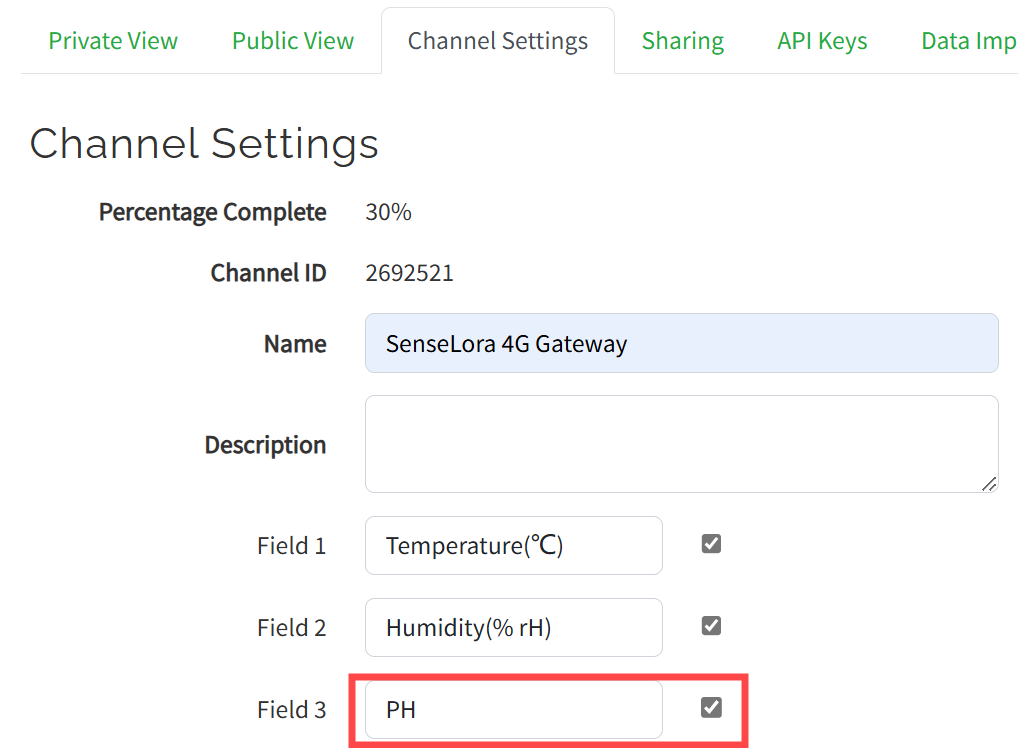
Such as adding information about soil PH.
Add and modify code in functions as:
float PH = doc["PH"];
sprintf(url, "AT+HTTPPARA=\"URL\",\"http://api.thingspeak.com/update?api_key=%s&field1=%.1f&field2=%.1f&field3=%.1f\"",THINGSPEAK_APIKEY, temp, humi, PH);
Add field in Thingspeak:
Verify the code and upload.Repeat the above steps.
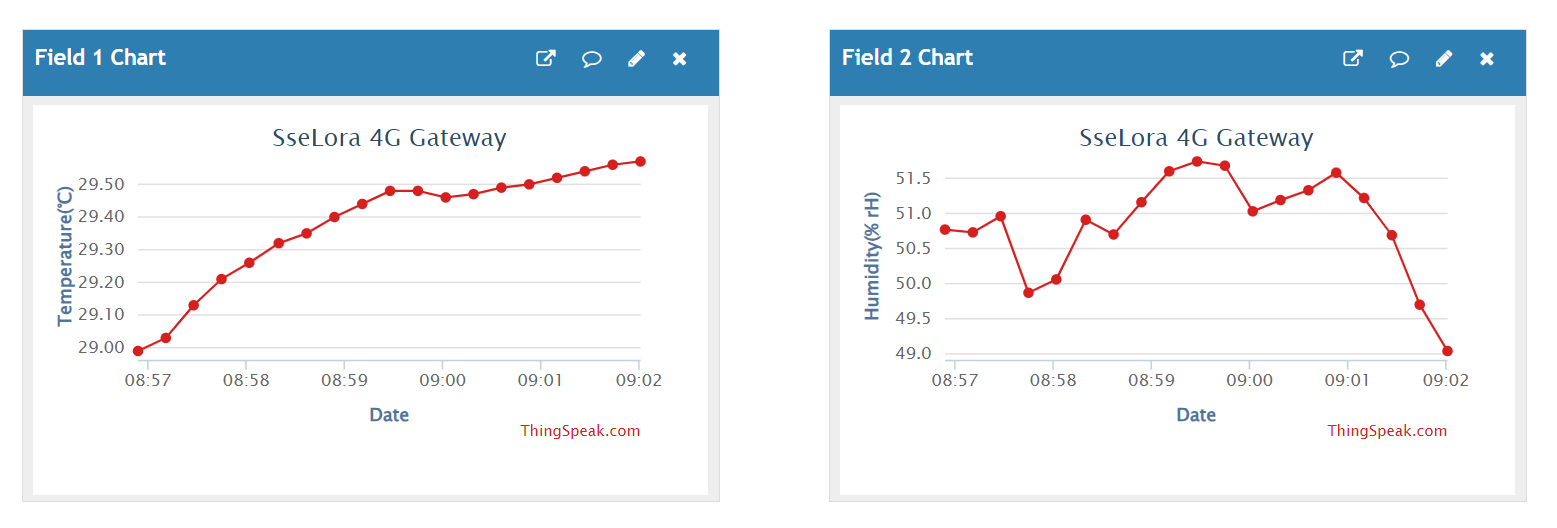
7. Transmit 4G gateway itself T&H data to Thingspeak
The 4G gateway itself has a built-in temperature and humidity sensor. Users can easily obtain the current environment status of the 4G gateway, this ensures the stability and reliability of data transmission and facilitates device maintenance and management.
7.1 By way of 4G
This Demo reads the temperature and humidity of the Senselora 4G gateway itself and transmits the temperature and humidity data to ThingSpeak via 4G.
1.Open the 4Gthingspeak by Arduino IDE.
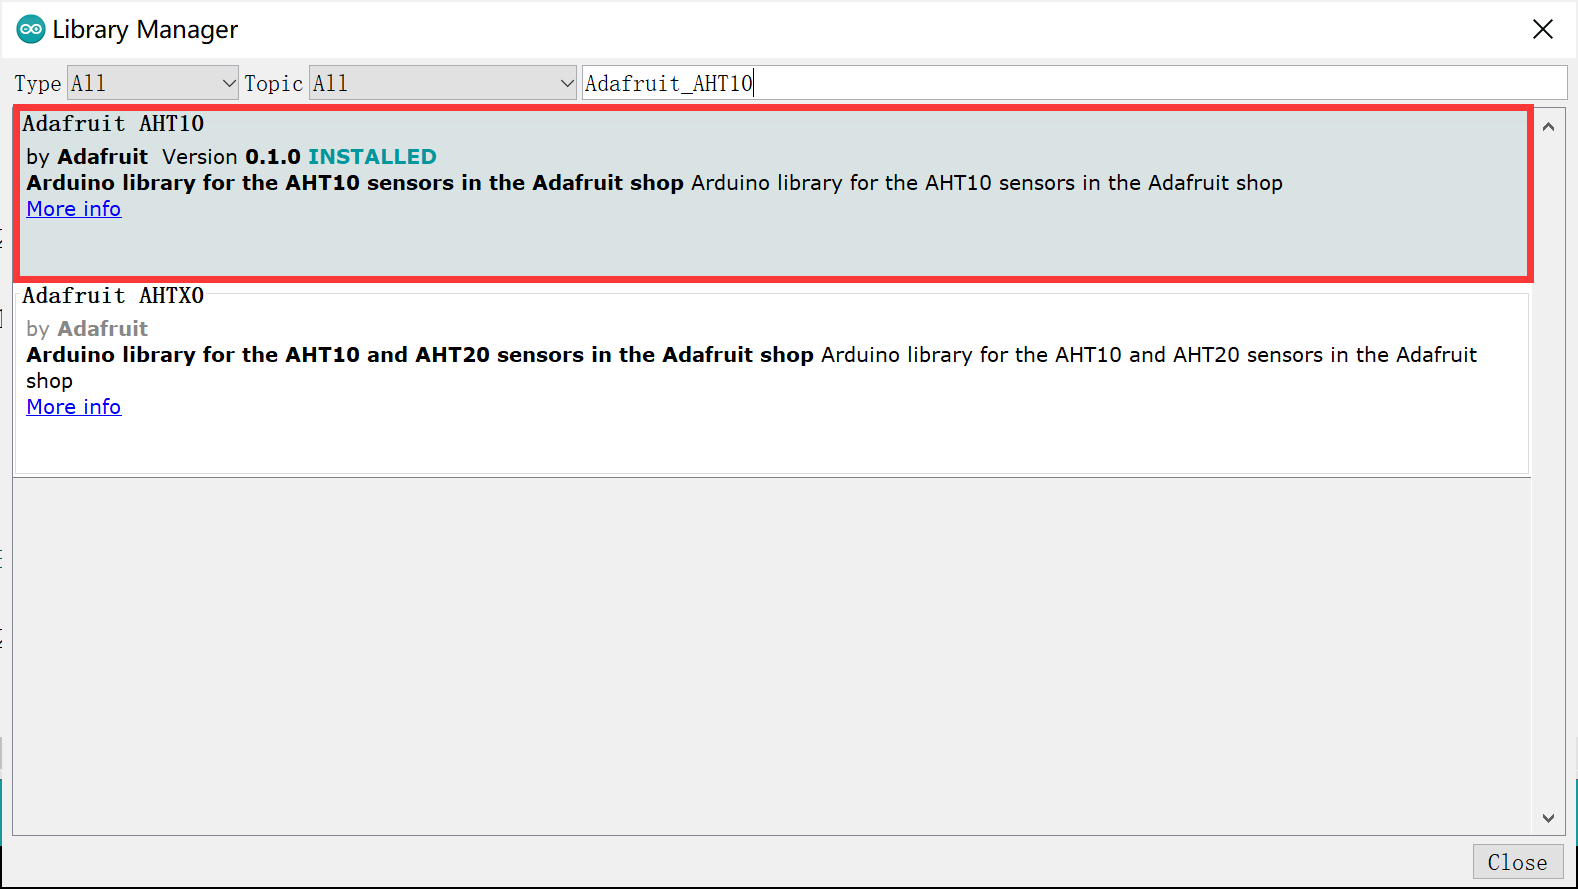
2.Install "Adafruit_AHT10" library.
- Select "Tools-->Manage Libraries..."
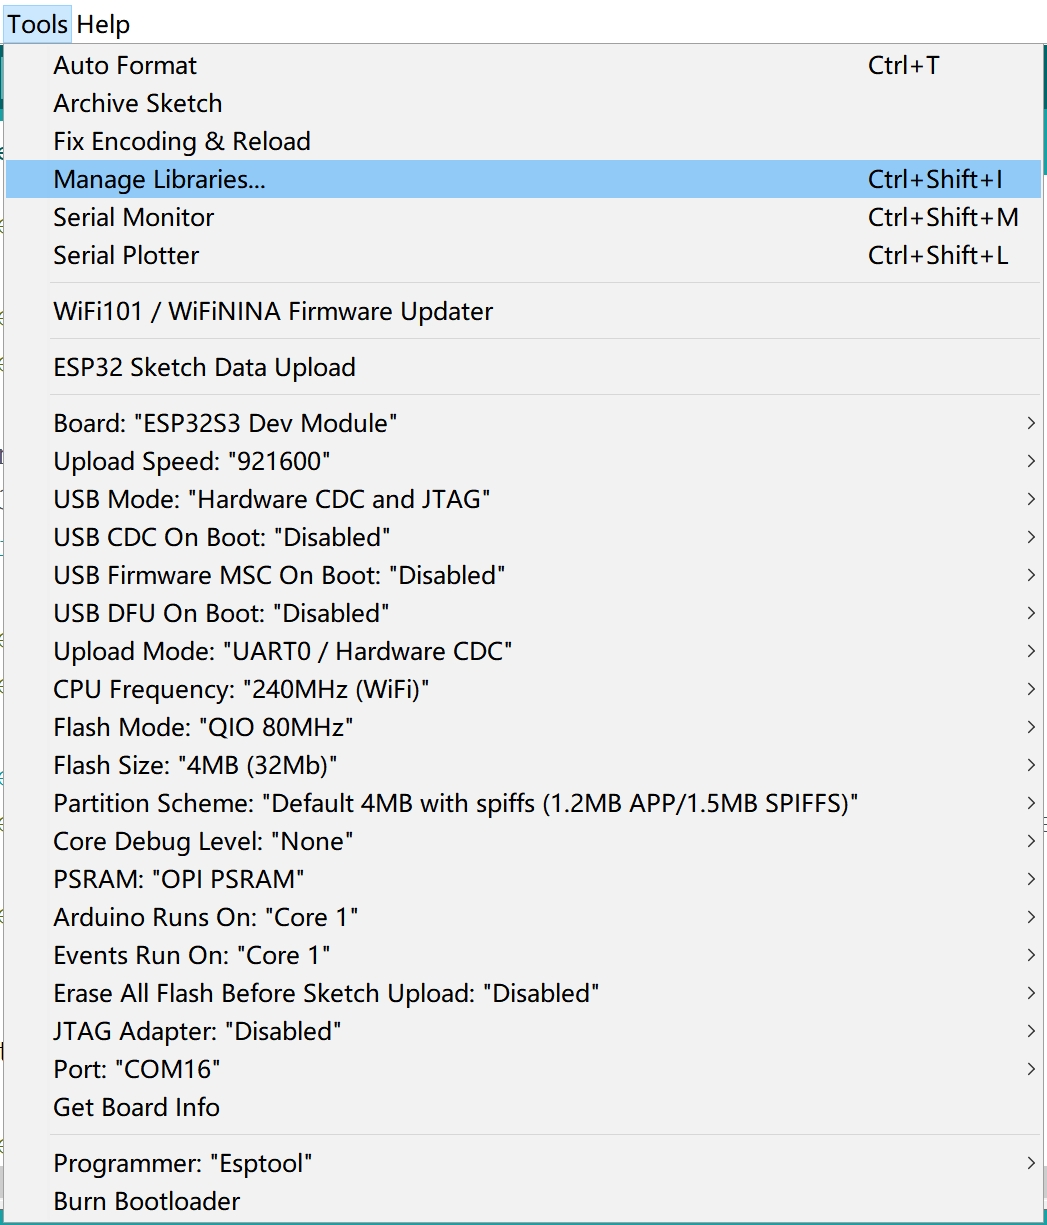
- Search "Adafruit_AHT10" and click Install.
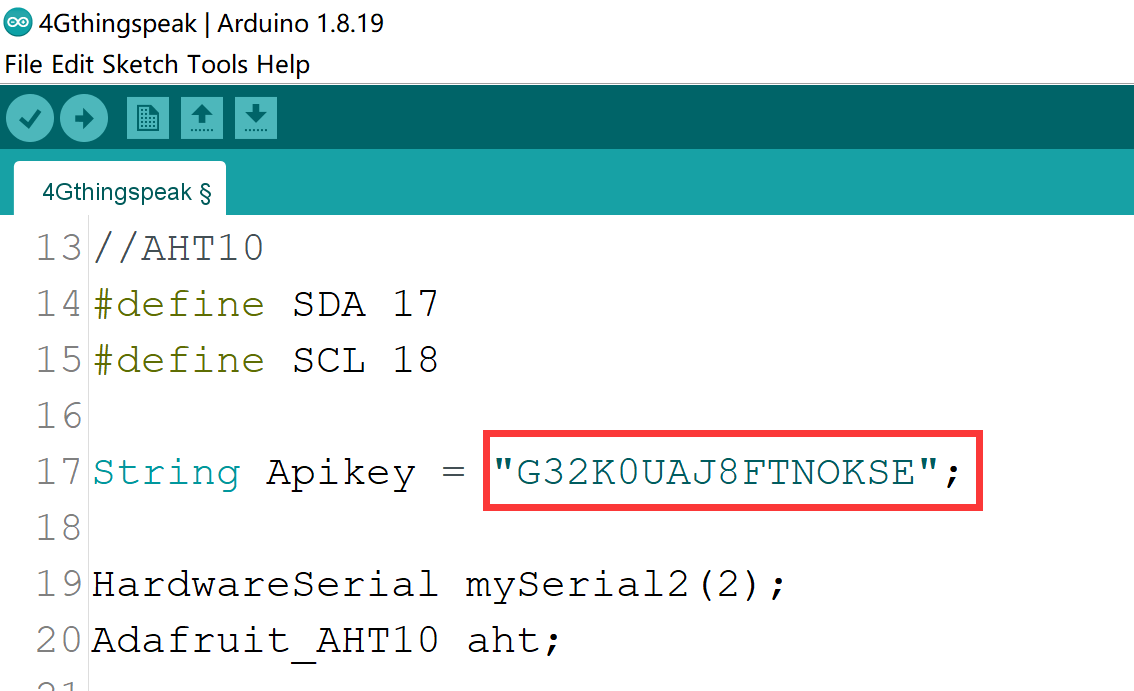
3.Change the APIKEY.
In order to view the data in your own channel, you need to modify the APIKEY in the code.
-
Click the "API Keys" and copy you Key.
-
Modify the APIKEY in the code.
4.Use Type-C USB cable to connect the board and PC, and select the development board "ESP32S3 Dev Module" and the port.
-
Select "Tools > board:"xxx" > ESP32 Arduino > ESP32S3 Dev Module".
-
Select "Tools > Port", Select the port number of the board.
5.Verify the code and upload.
- Click this icon to upload to the board.

Once the download is complete, wait a while to receive a message in Thingspeak.
7.2 By way of WIFI
This Demo reads the temperature and humidity of the Senselora 4G gateway itself and transmits the temperature and humidity data to ThingSpeak via WIFI.
1.Open the WIFIthingspeak by Arduino IDE.
2.Install "Adafruit_AHT10" library.
-
Select "Tools-->Manage Libraries..."
-
Search "Adafruit_AHT10" and click Install.
3.Change the WIFI ssid, password and APIKEY.
-
Change your WIFI ssid and password.
-
Click the "API Keys" and copy you Key.
-
Modify the APIKEY in the code.

4.Use Type-C USB cable to connect the board and PC, and select the development board "ESP32S3 Dev Module" and the port.
-
Select "Tools > board:"xxx" > ESP32 Arduino > ESP32S3 Dev Module".
-
Select "Tools > Port", Select the port number of the board.
5.Verify the code and upload.
Once the download is complete, wait a while to receive a message in Thingspeak.

8. Transmit Soil Moisture data to Datacake
9. Transmit Soil Moisture data to Thingspeak
10. FAQ
You can list your question here or contact techsupport@makerfabs.com for technology support. Detailed descriptions of your question will be helped to solve your question.