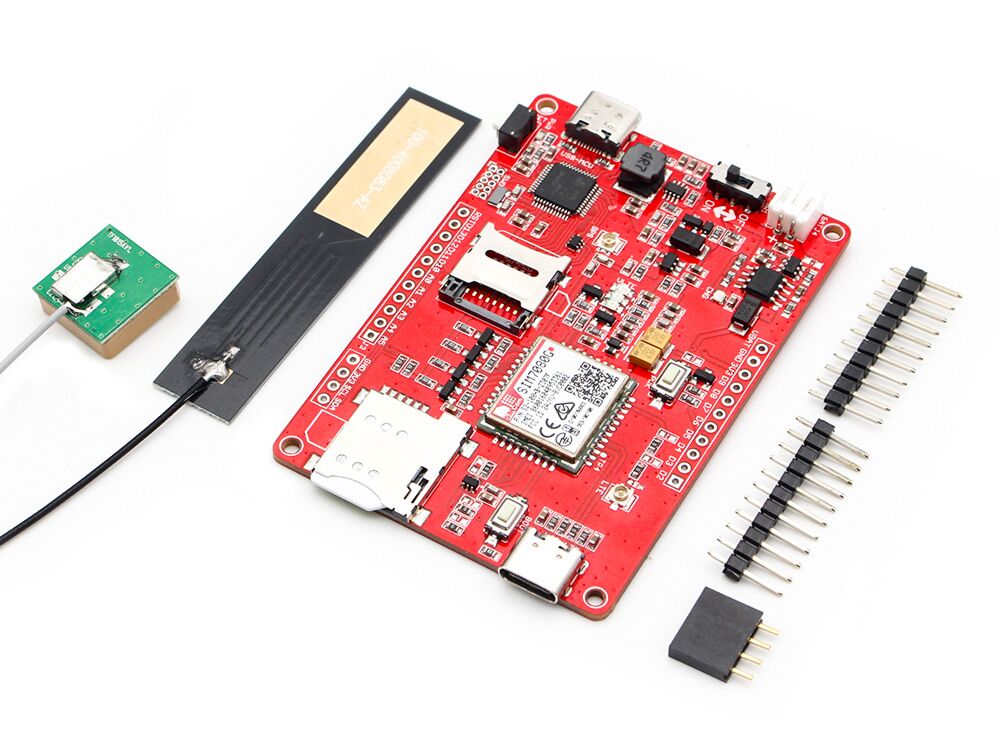
Maduino Zero NB-IoT SIM7080G
1. Introduction
Our Maduino zero NB-IoT is equipped with the SIM7080G module, based on controller ATSAMD21G18, which is Arduino Zero compatible, it has strong extension capability with rich interfaces including I2C/SPI/UART/18*GPIO etc. The Maduino zero NB-IoT is suitable for IoT applications that need low latency and low throughput data communication in various radio propagation conditions, such as smart-home, metering, asset tracking, remote monitoring, E-health etc.
This board support NB-IoT (NarrowBand-Internet of Things), Cat-M (aka eMTC, enhanced Machine Type Communication), and GNSS (Global Navigation Satellite System) modules, it can be used with standard Arduino IDE, It supports multiple NB-IoT frequency band and supports communication protocols like HTTP/MQTT/LWM2M/COAP, etc.
Model:MANBI7080G
2. Communications Specifications
| NB-IoT | CAT-M | |
|---|---|---|
| Band | NB-IoT: B1/B2/B3/B4/B5/B8/B12/B13/B18/B19/B20/B25/B26/B28/B66/B71/B85 | CAT-M:B1/B2/B3/B4/B5/B8/B12/B13/B14/B18/B19/B20/B25/B26 /B27/B28/B66/B85 |
| Emitting power | Class 5 (0.125W@LTE) | Class 5 (0.125W@LTE) |
| Data rate | Uplink≤150kbps / Downlink≤136kbps | Uplink≤1119Kbps / Downlink≤589Kbps |
| Supported SIM Card | NB-IoT card (1.8V SIM card ONLY) | CAT-M card (1.8V SIM card ONLY) |
| Applicable region | Global | Global |
You can find Frequency bands here: wiki
Here is a referenced LTE band list: List of LTE networks
3. Features
- ATSAMD21G18, 32-Bit ARM Cortex M0+
- Interface: I2C/SPI/UART/18*GPIO
- Onboard USB interface, to test AT Commands, get GPS positioning data, and so on
- Supports communication protocols such as TCP/UDP/HTTP/HTTPS/TLS/DTLS/PING/LWM2M/COAP/MQTT.
- Onboard USB interface, to test AT Commands, get GPS positioning data, and so on.
- USB supply voltage range: 4.8~5.5V, 5.0V Typically
- Battery supply voltage range: 3.4~4.2V, 3.7V Typically
- Arduino Zero platform, Arduino IDE compatible
- SD card socket
- Windows and Raspberry Pi support
- Operating temperature: -40°C ~ 85°C
Special Note: SIM7080G GNSS and network cannot be used simultaneously
4. Transferring data to Thingspeak
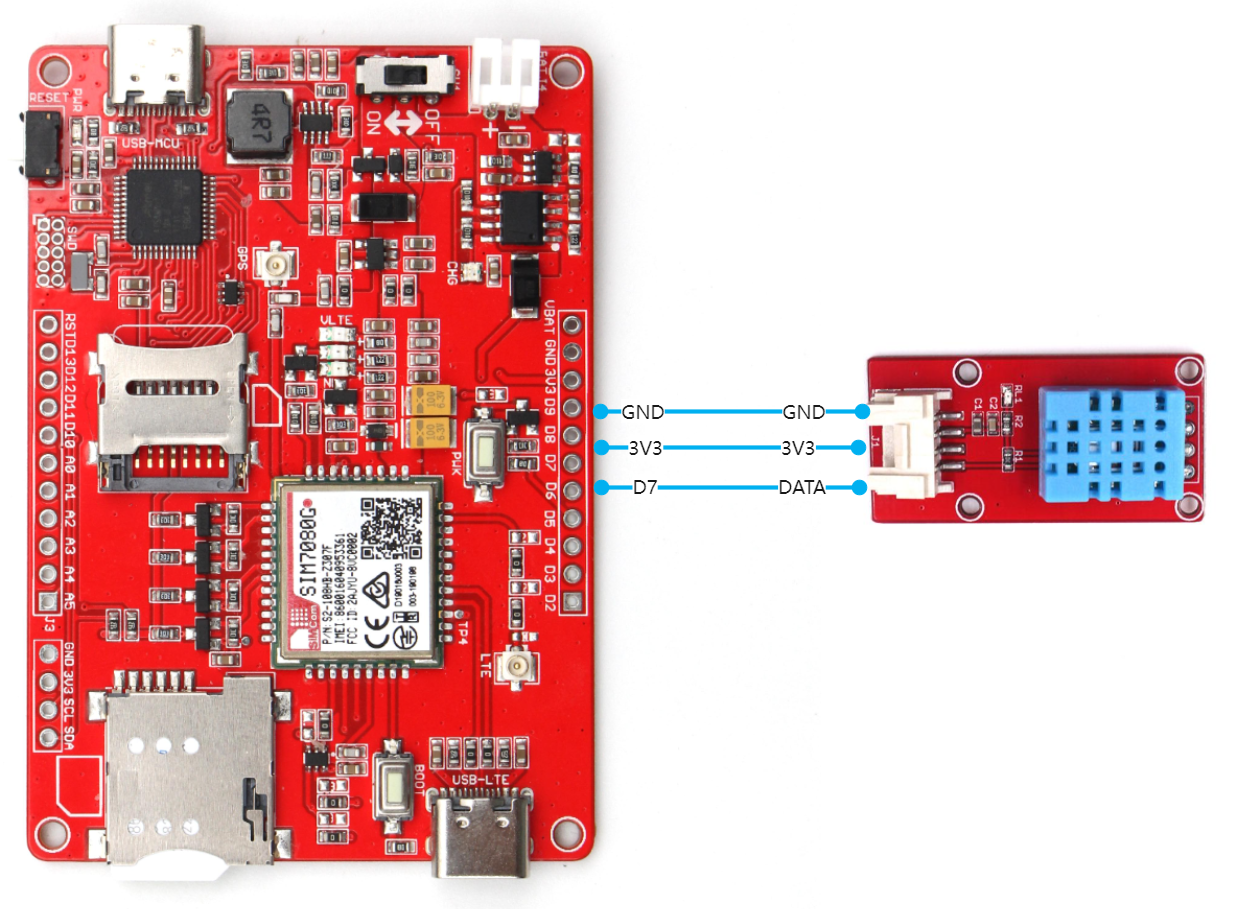
4.1 Hardware
-
Plug the SIM card into the board.
-
Plug the 4G-GSM antennas into the LTE interface.
-
Connect Maduino Zero NB-IoT and DHT11.
4.2 Thingspeak
ThingSpeak Is The Open IoT Platform With MATLAB Analytics.
-
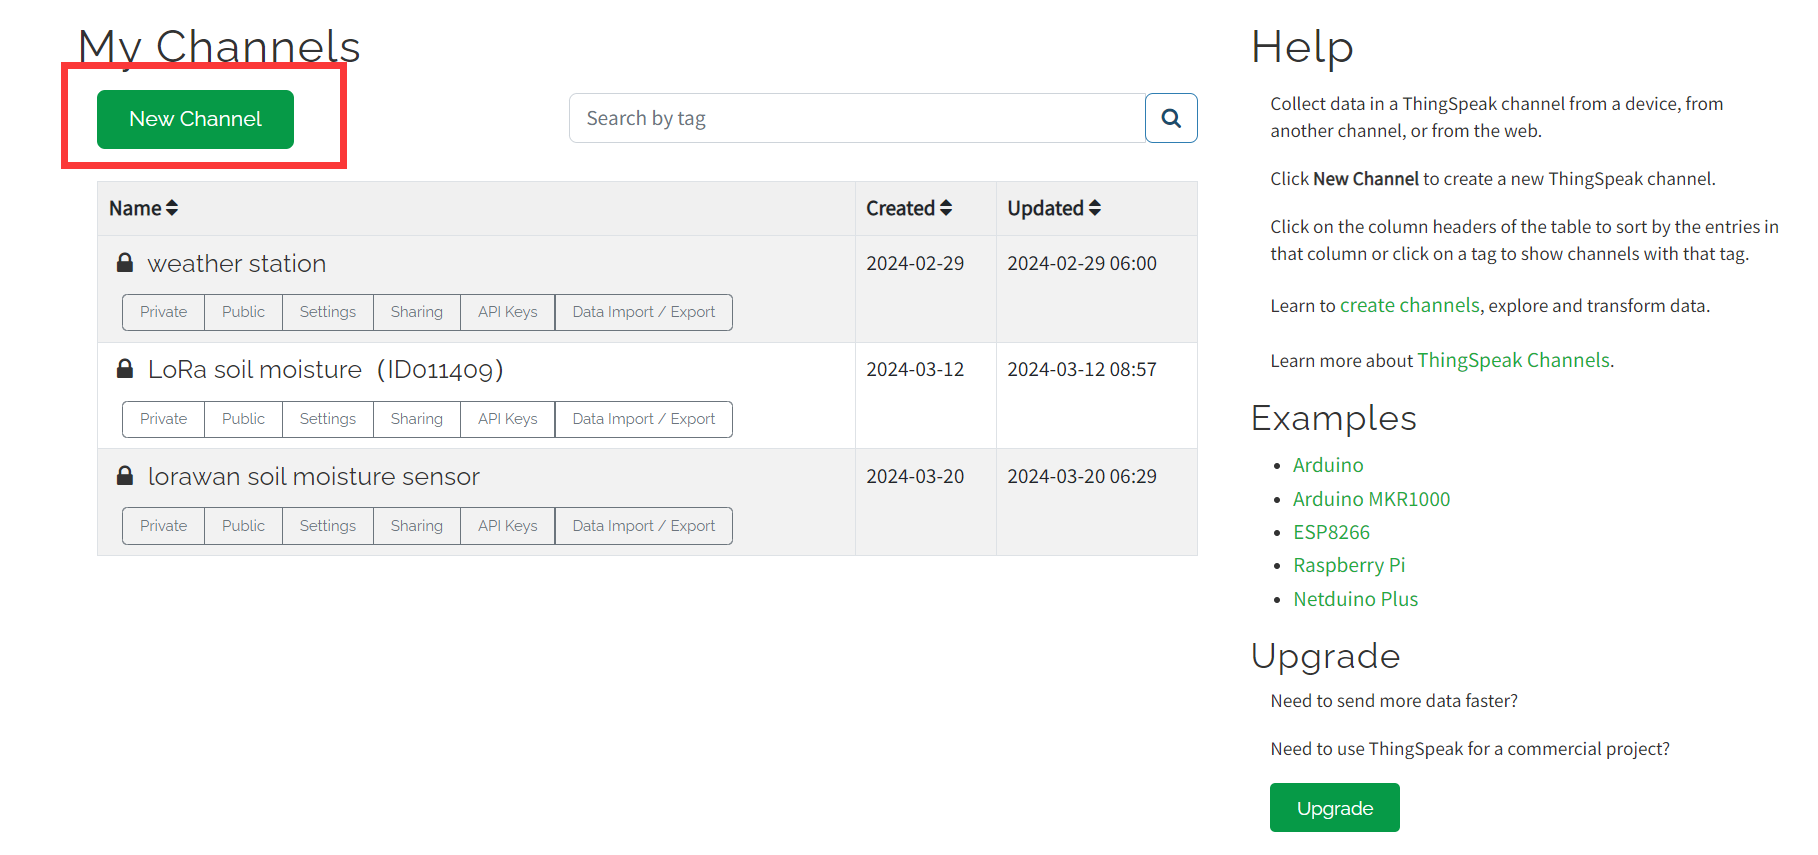
Register and log in to your account

-
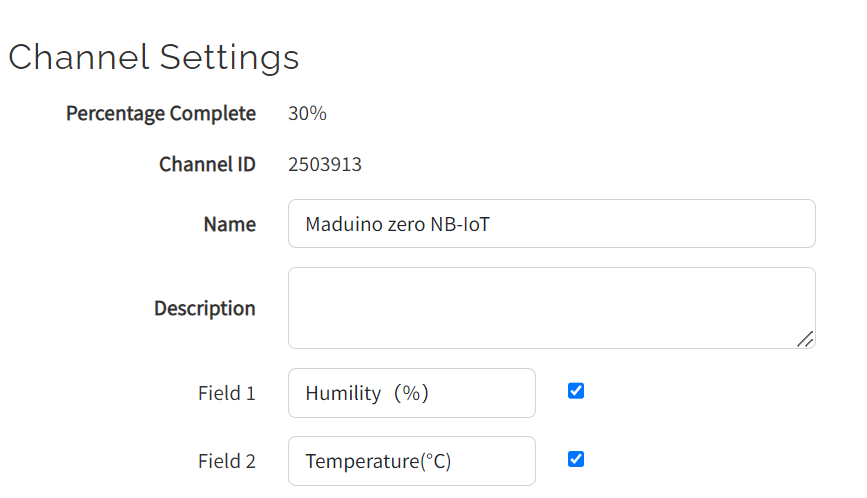
Define the parameter you want in the Channel page and save it
-
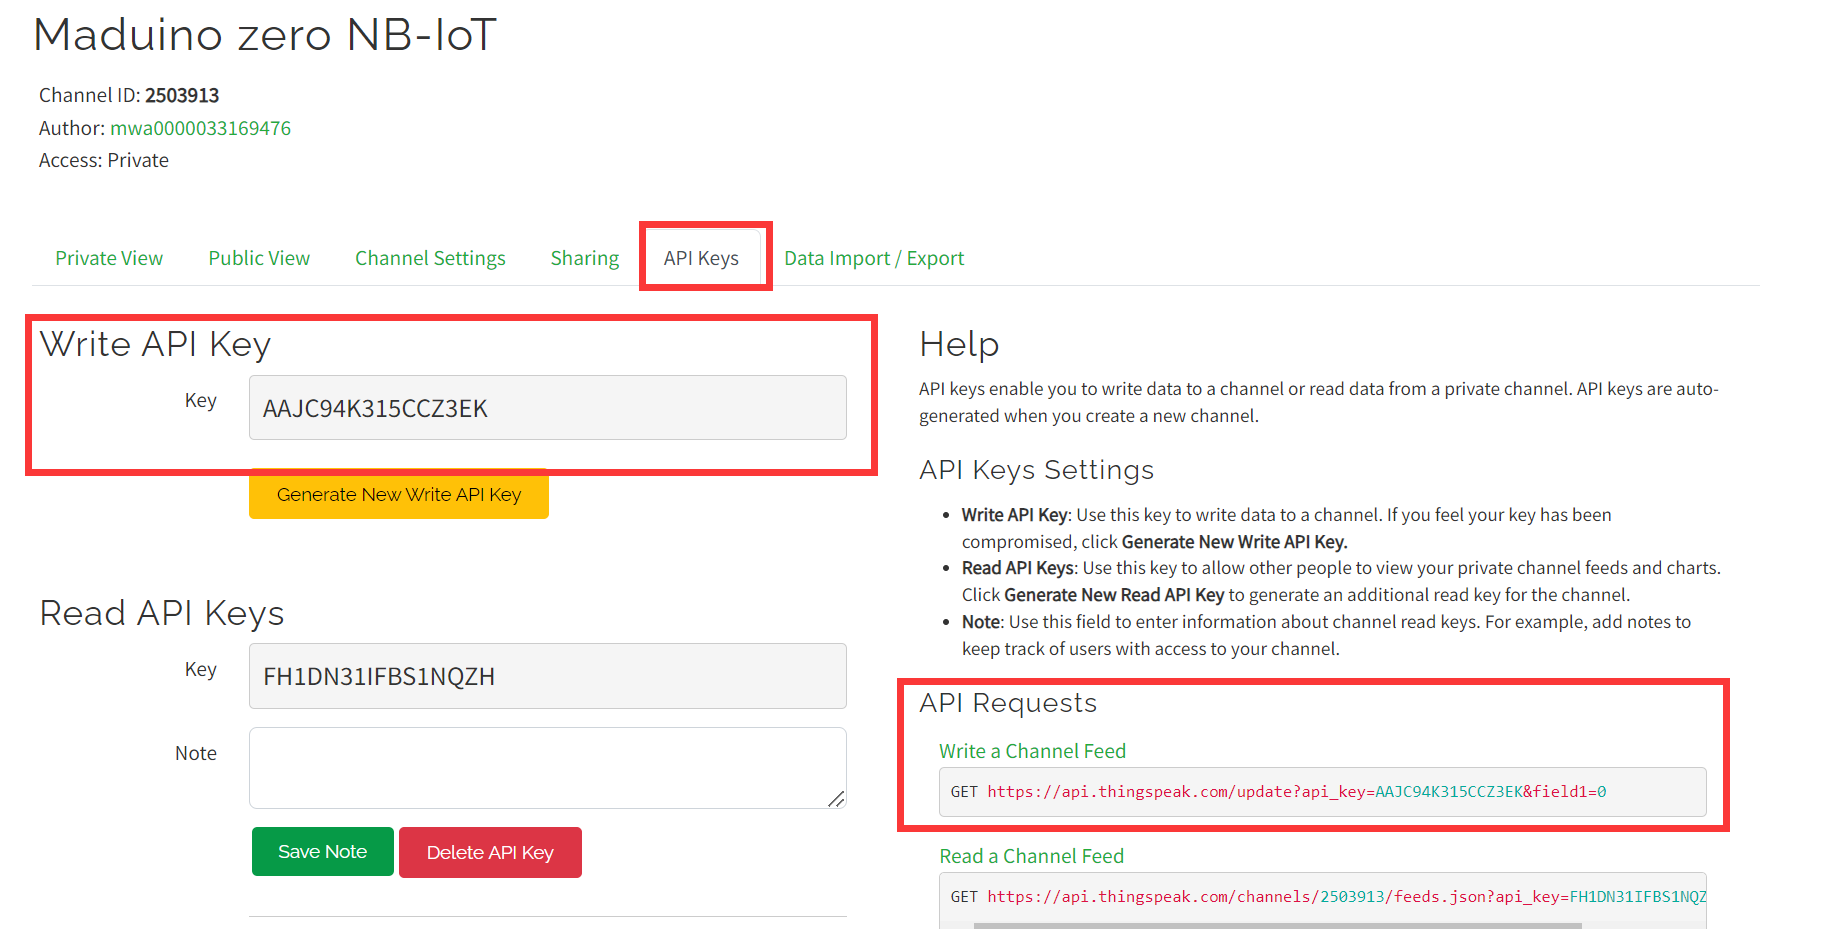
On the API keys page you can find out the API key used to write the data, and you can see an example of an API request on the right.
-
By accessing the URL of the write channel, you can modify the parameters

4.3 Arduino IDE
-
Install the Arduino IDE V1.8.10/V1.8.19
-
Use Type-C USB cable to connect the board and PC, note plug the cable to USB-MCU interface.
-
Open thingspeak_demo.ino
-
Define pins and configure DHT11
#define DEBUG true
#define LTE_RESET_PIN -1
#define LTE_PWRKEY_PIN 5

#define DHTPIN 7      // Digital pin connected to the DHT sensor
#define DHTTYPE DHT11 // DHT 11
DHT dht(DHTPIN, DHTTYPE);
- Initialize devices so that they work properly
SerialUSB.begin(115200);
Serial1.begin(115200);
dht.begin();
delay(1000);

pinMode(LTE_RESET_PIN, OUTPUT);
digitalWrite(LTE_RESET_PIN, LOW);
pinMode(LTE_PWRKEY_PIN, OUTPUT);
digitalWrite(LTE_RESET_PIN, LOW);
delay(100);
digitalWrite(LTE_PWRKEY_PIN, HIGH);
delay(3000);
digitalWrite(LTE_PWRKEY_PIN, LOW);
- AT commands sent to the module and information returned by the module can be checked through the serial port.
void loop()
{
    while (Serial1.available() > 0)
    {
        SerialUSB.write(Serial1.read());
        yield();
    }
    while (SerialUSB.available() > 0)
    {
        Serial1.write(SerialUSB.read());
        yield();
    }
}
- Using the HTTP Get function of SIM7080G
sendData("AT", 1000, DEBUG);
sendData("AT+CPIN?", 1000, DEBUG);
sendData("AT+CCID", 1000, DEBUG);
sendData("AT+CSQ", 1000, DEBUG);
sendData("AT+COPS?", 1000, DEBUG);
sendData("AT+CGATT?", 1000, DEBUG);
sendData("AT+CNACT=0,1", 1000, DEBUG);
sendData("AT+CNACT?", 1000, DEBUG);
sendData("AT+SHCONF=\"URL\",\"http://api.thingspeak.com\"", 1000, DEBUG);
sendData("AT+SHCONF=\"BODYLEN\",1024", 1000, DEBUG);
sendData("AT+SHCONF=\"HEADERLEN\",350", 1000, DEBUG);
sendData("AT+SHCONN", 5000, DEBUG);
// delay(5000);
sendData("AT+SHSTATE?", 1000, DEBUG);
sendData("AT+SHCHEAD", 1000, DEBUG);
sendData("AT+SHAHEAD=\"User-Agent\",\"curl/7.47.0\"", 1000, DEBUG);
sendData("AT+SHAHEAD=\"Cache-control\",\"no-cache\"", 1000, DEBUG);
sendData("AT+SHAHEAD=\"Connection\",\"keep-alive\"", 1000, DEBUG);
sendData("AT+SHAHEAD=\"Accept\",\"*/*\"", 1000, DEBUG);
// sendData("AT+SHREQ=\"/update?api_key=5WOQ0JZURMWBTRF4&field1=123\",1", 1000, DEBUG);
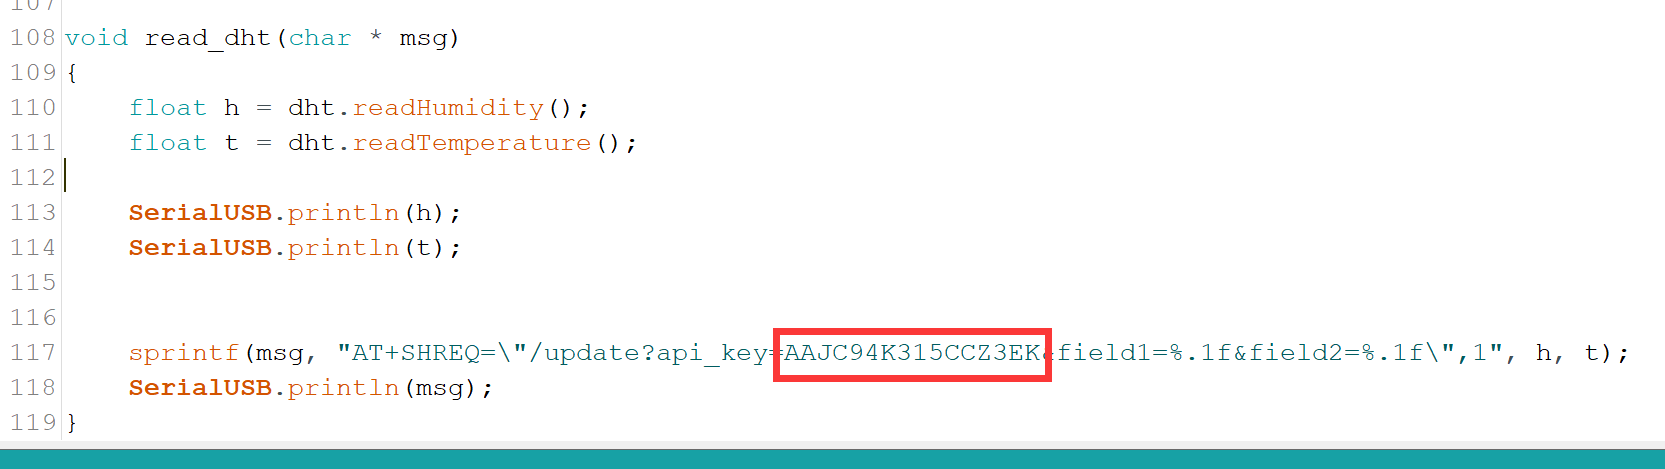
read_dht(msg);
sendData(msg, 1000, DEBUG);
sendData("AT+SHREAD=0,386", 1000, DEBUG);
sendData("AT+SHDISC", 1000, DEBUG);
sendData("AT+CNACT=0,0", 1000, DEBUG);
More detail you can check SIM7070_SIM7080_SIM7090_Series_HTTP(S)_Application_Note_V1.02.pdf
-
Replace this with your own API key
-
Select "Tool --> Board --> Arduino Zero(Native USB Port)" and the port
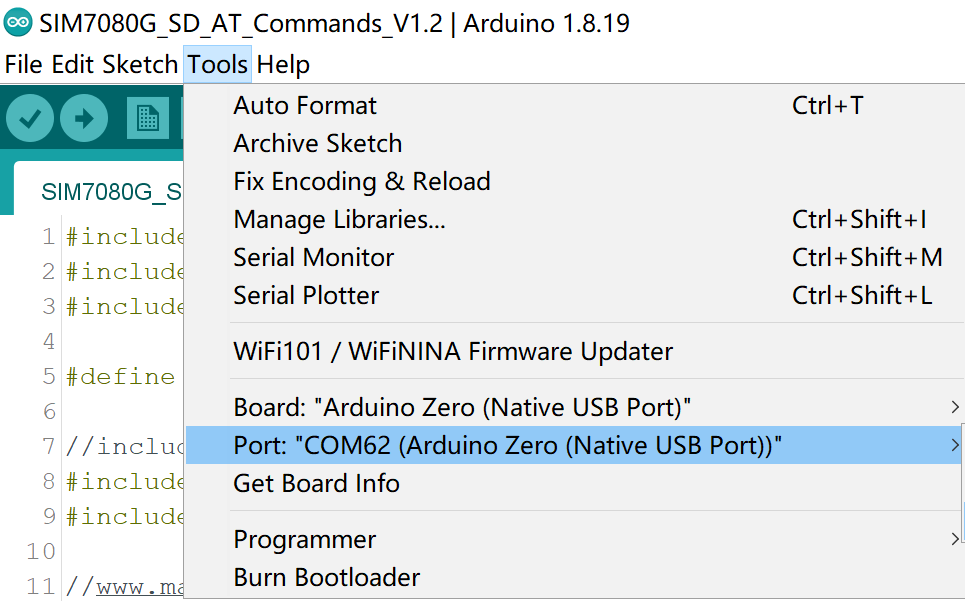
Note: Different computers may have different port numbers when connecting to a development board. Please select the correct port number based on the development board you are connecting to.
-
Verify the code and upload.
-
When the module returns 200,1, it means that the URL was accessed successfully.

-
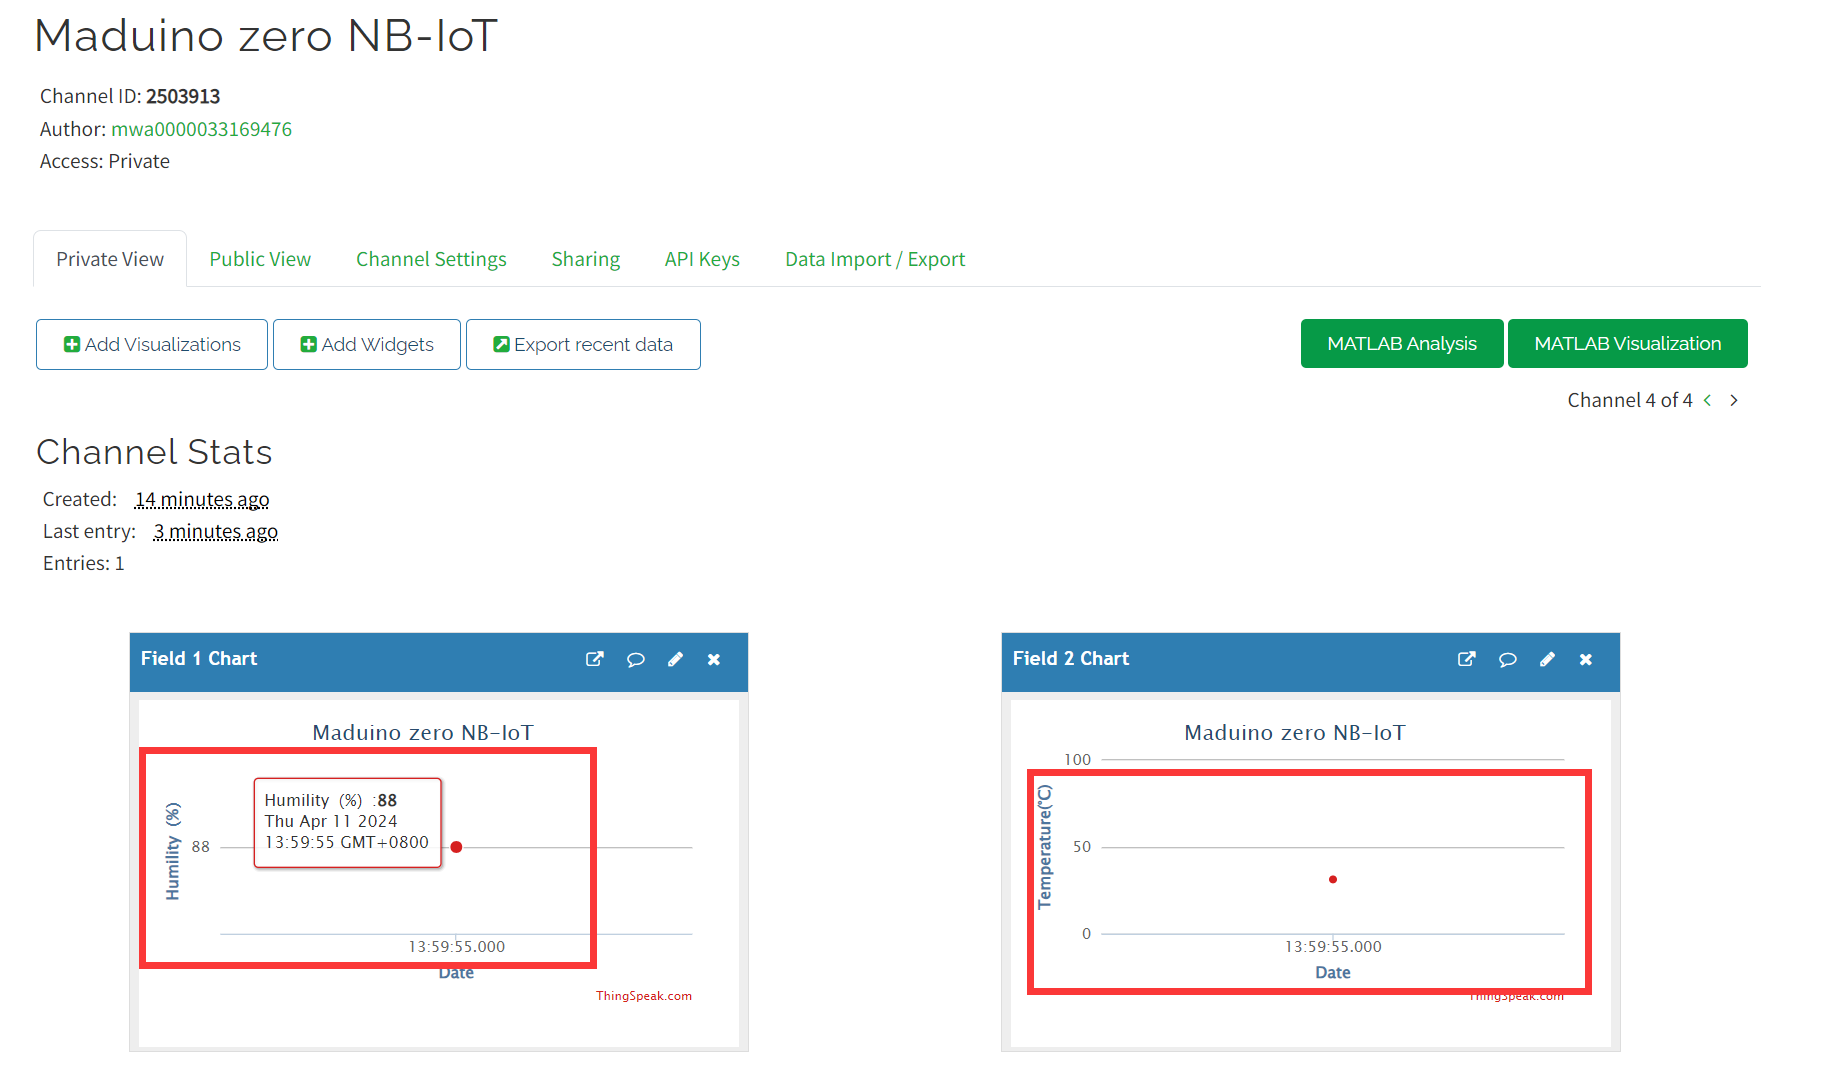
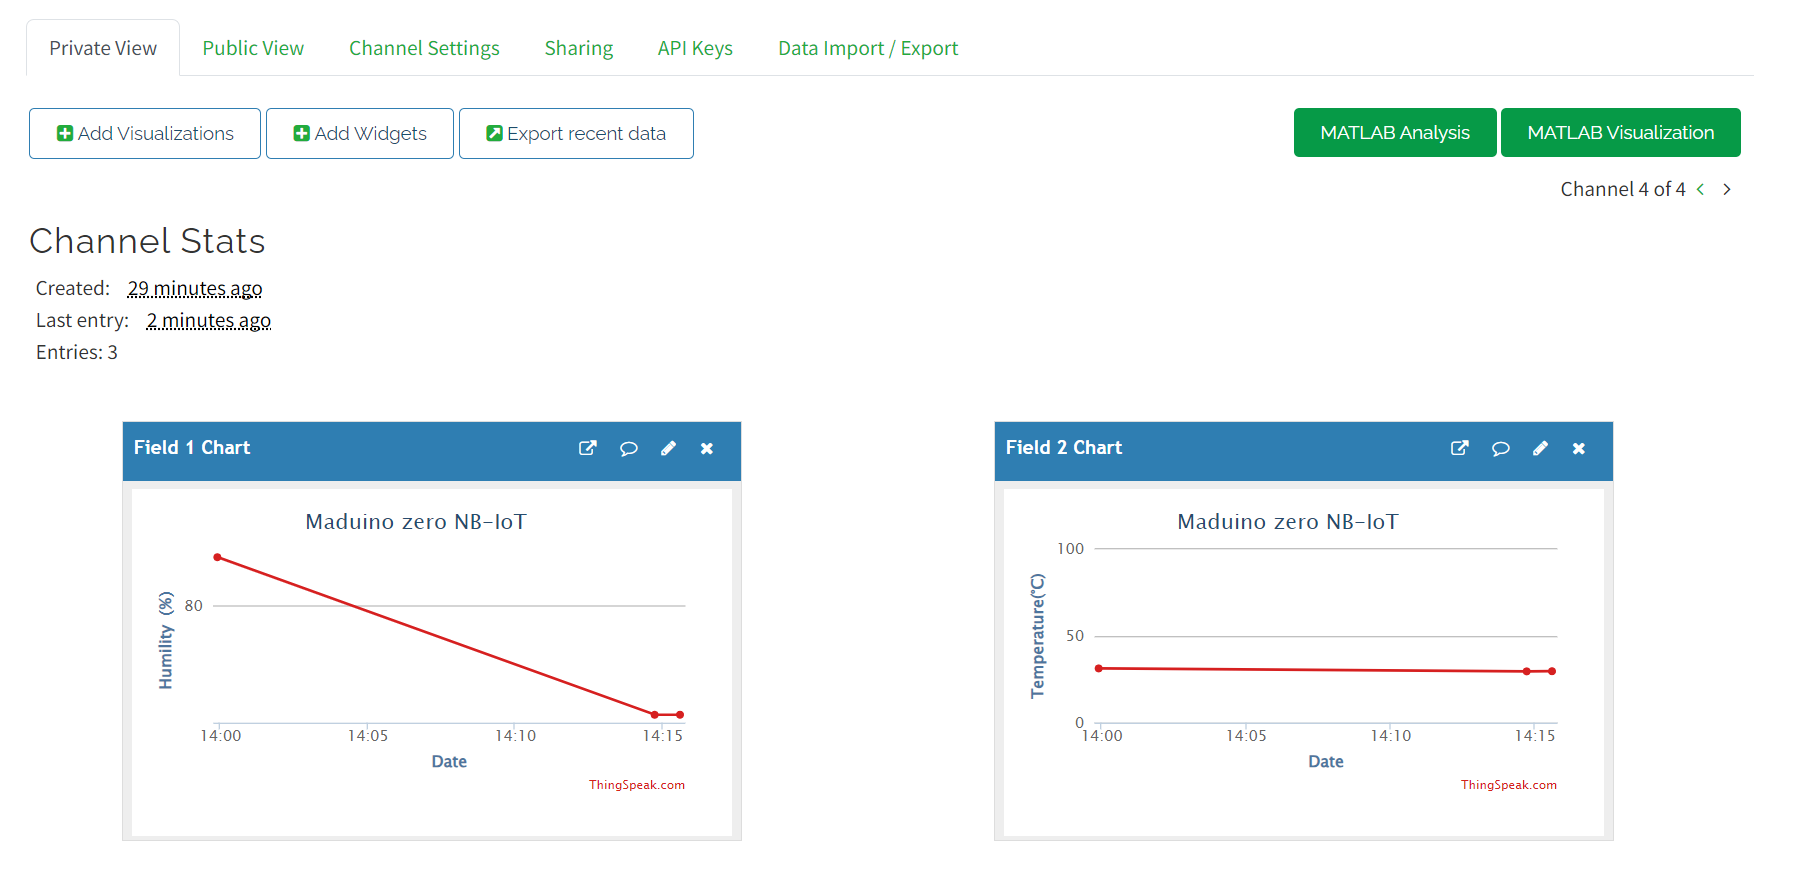
In the Private View screen of Thingspeak you can see the parameter change.
5. FQA
You can list your question here or contact techsupport@makerfabs.com for technology support. Detailed descriptions of your question will be helped to solve your question.