Quick Guidance for AgroSense & Gateway Setting for Cloud Service
This tutorial guides you to connect the AgroSense LoRaWAN® Sensors and M2 Multi Platform Gateways to Cloud Server.

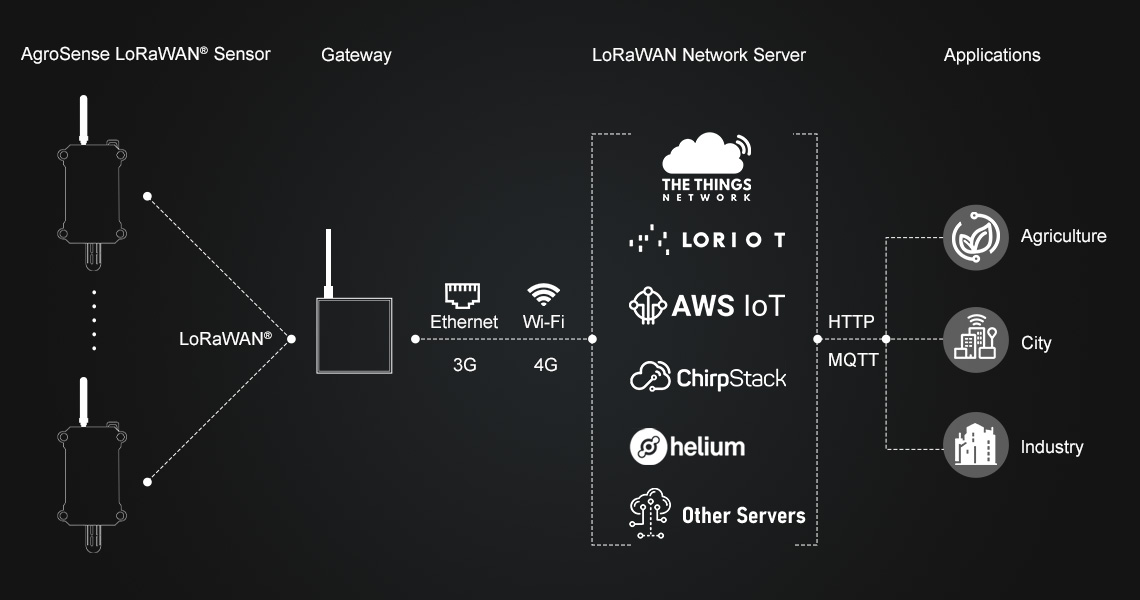
1. Gateway Network Configuration
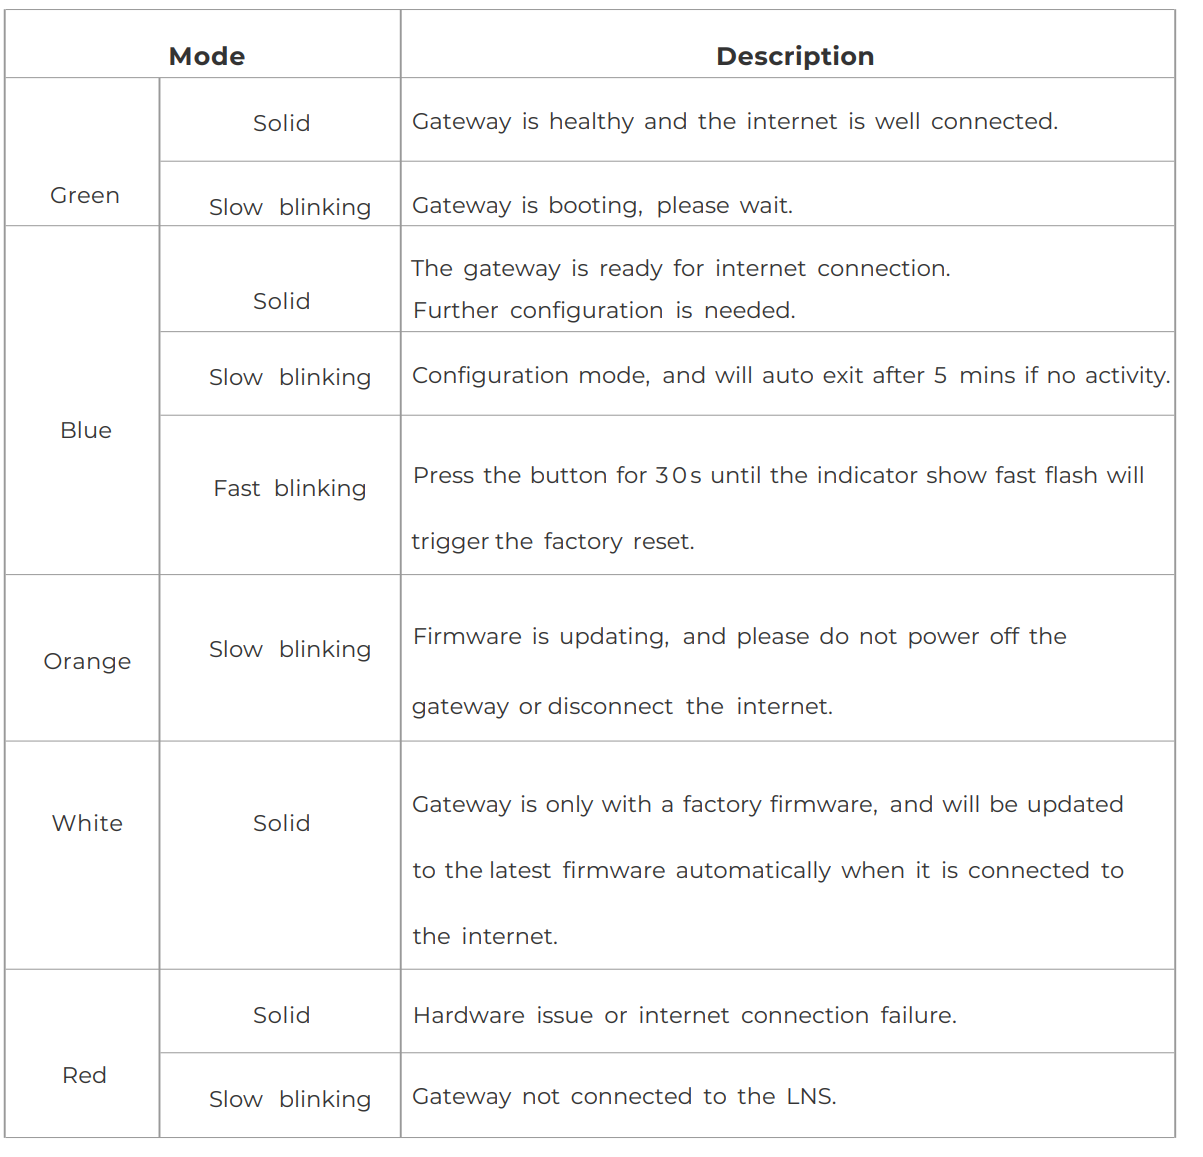
Connect the antenna and power adaptor to the gateway. The power LED will show in red, and in about 15s, the indicator on the top will flash green, indicating that the gateway is booting.
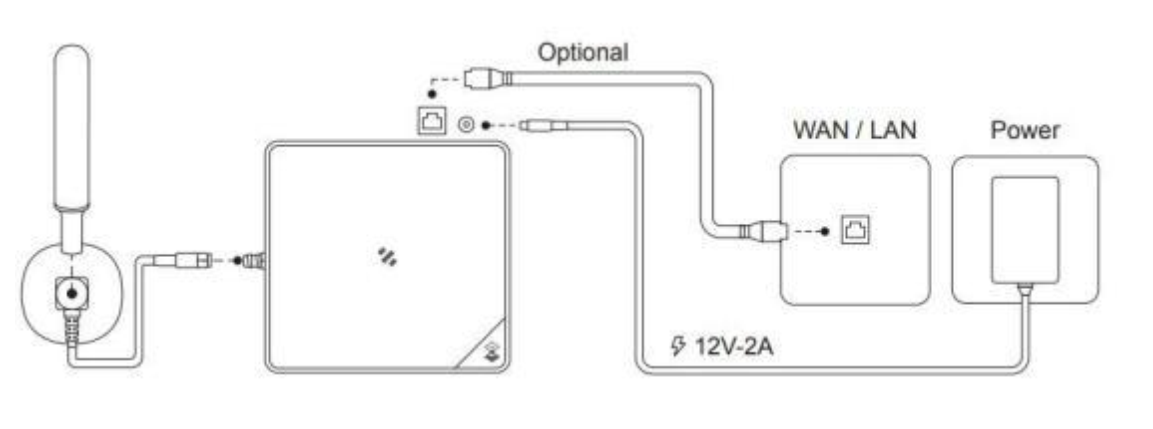
There are two ways to connect to the Internet. Choose the one that works for you.
1.1 Connect with Ethernet
Connect the Ethernet cable to the Ethernet port, and the indicator on the top will show solid green if the gateway is successfully connected to the internet.
1.2 Connect with WIFI via Luci
- Step 1: Turn on the device AP hotspot
Press the button for 5s until the blue indicator flashes slowly to enter the configuration mode.
- Step 2: Connect to the AP hotspot
AP hotspot name is SenseCAP_XXXXXX (6-figure MAC address),default password is 12345678; connect your computer to this AP hotspot.
- Step 3: Get your device Username and Password
You can find the Username and Password on your device label.
- Step 4: Log in to the Local Console
Input the IP Address (192.168.168.1) in your browser to enter the Local Console. Then input your device username and password, and click the Login button.
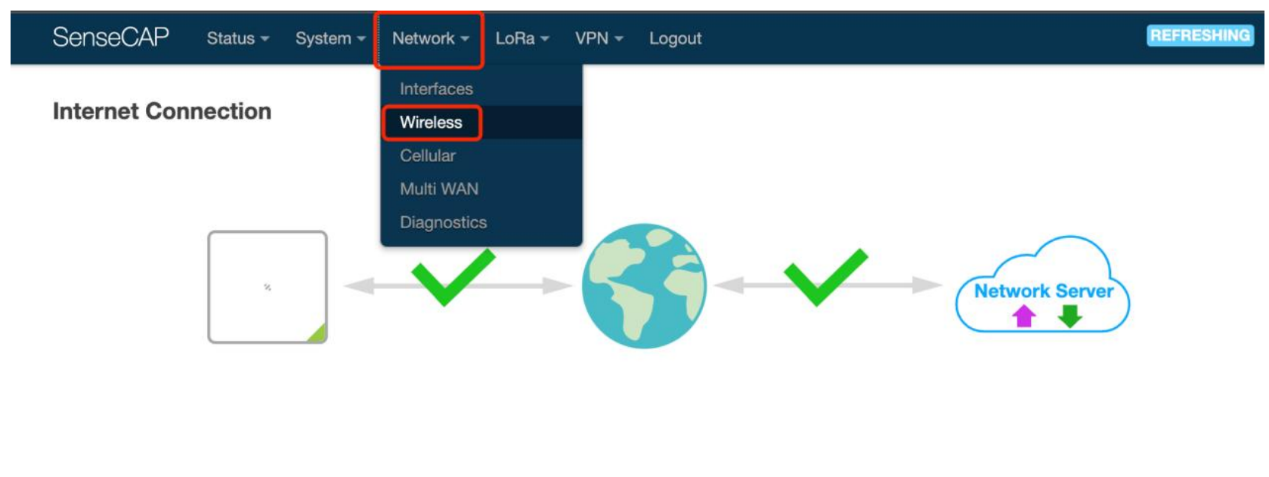
- Step 5: Click on Network - Wireless.
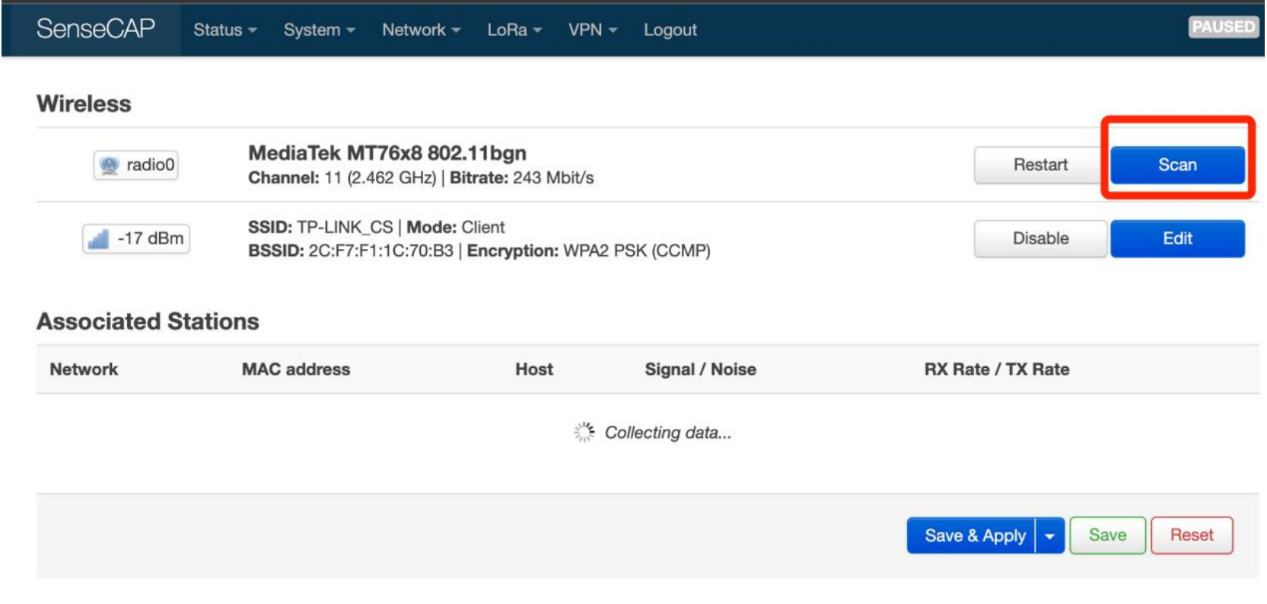
Click on the Scan button to scan the WIFI.
Select your WIFI to join the network.
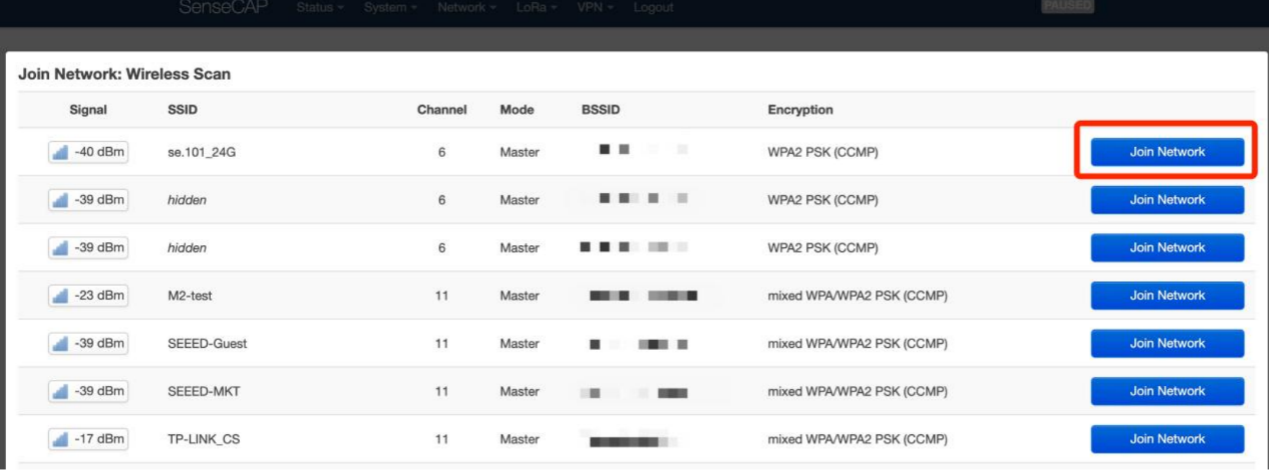
Submit the WIFI password, and then click Submit and Save.

Then click Save and Apply to apply your settings. The indicator on the top will show solid green if the gateway is successfully connected to the WIFI.
After powering on the gateway, check the gateway working status.
LED Indicator:
1.3 Connect Gateway to The Things Network(TTN)
TTN (The Things Network) forms a global, decentralized IoT network dedicated to providing extensive wireless communication coverage for IoT devices through community-supported LoRaWAN gateways. Next, we will guide you on how to successfully connect your gateway to the TTN network.
1.3.1 TTN Configuration
- Step 1: Log into The Things Stack.
If you don't have a TTN account, please register first.
- Step 2: Register the gateway.

Enter your Gateway EUI and click "confirm".
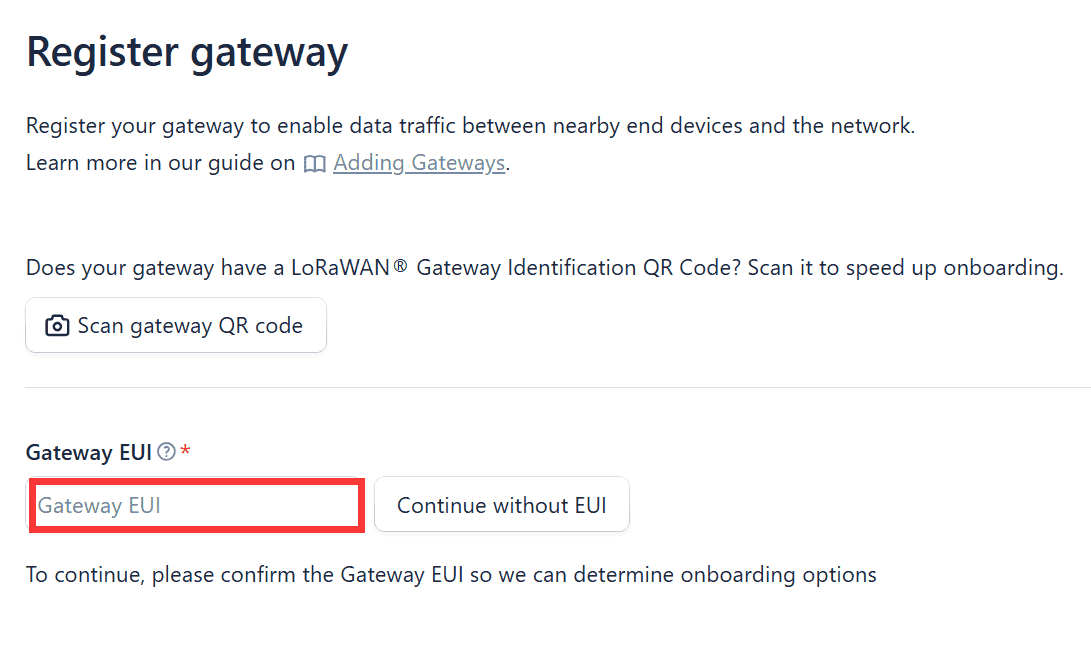
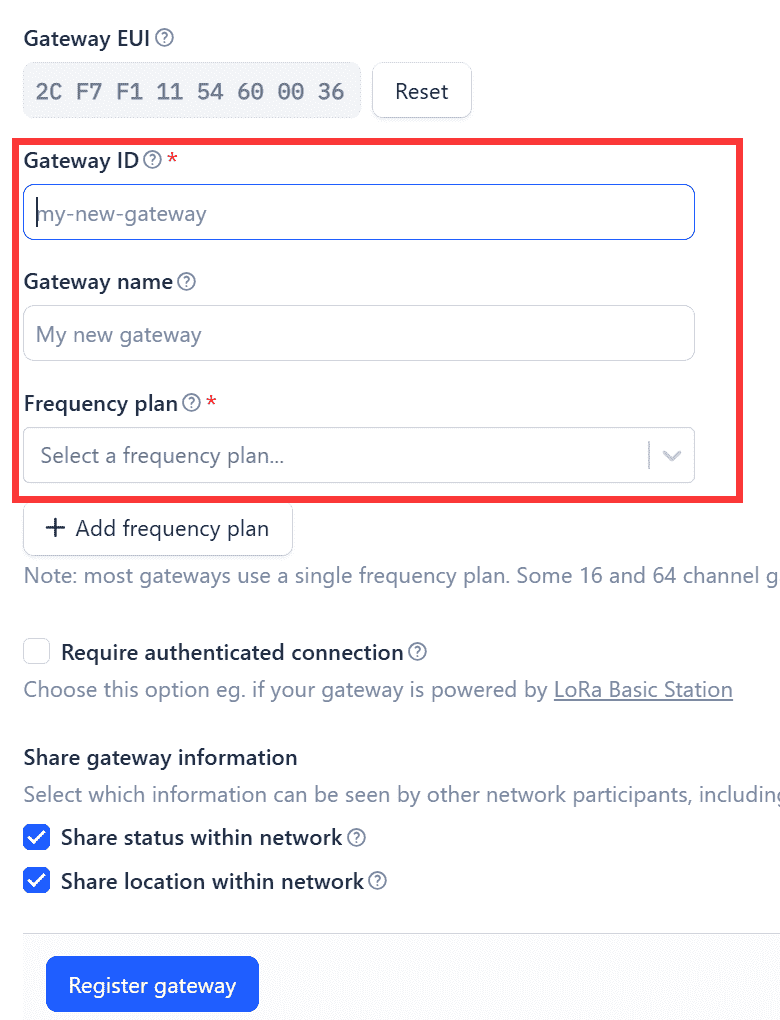
Enter your Gateway ID, Gateway ID, Frequency plan and click "Register gateway".
You can check the Gateway in the overview after successful registration.
1.3.2 Gateway Configuration
Configure the gateway via the Web UI, please to log into Luci page first.
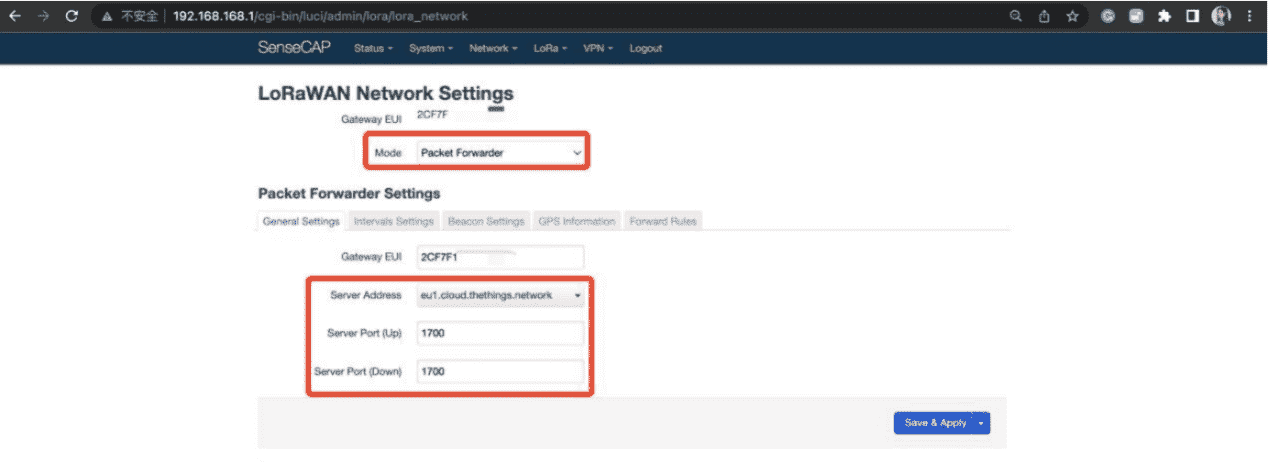
- Step 1: LoRa Network Settings
Navigate to LoRa --> LoRa Network.

- Step 2: Set Mode to Packet Forward.
Click "Save&Apply" to apply your settings.
- Step 3: Channel Plan Settings
Navigate to LoRa --> Channel Plan.

Select the Region and Frequency plan according to the actual choice.
After setting, click Save& Apply.

By Now, the Gateway setting been completed.
2. Connect AgroSense to TTN Via Gateway
Our gateway has successfully connected to The Things Network, and we are now initiating the process of uploading AgroSense data to the TTN servers via the gateway.
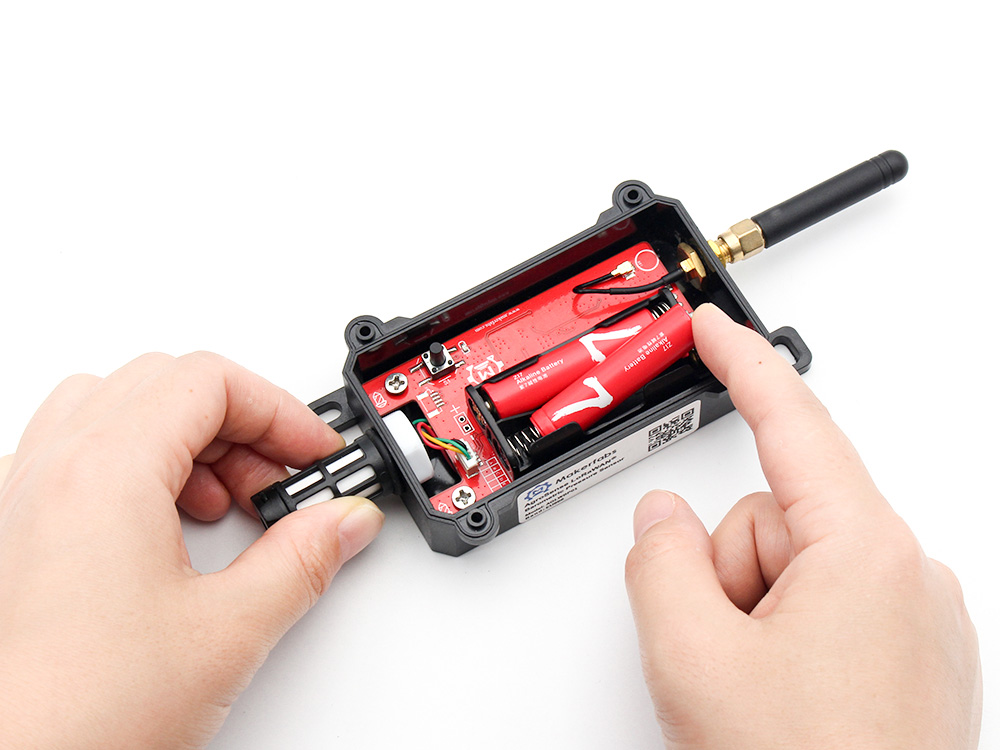
- Step1:Battery Installation
- Step2: TTN Configuration
Open TTN and login your account(that created in 1.3.1)
Select the correct region.
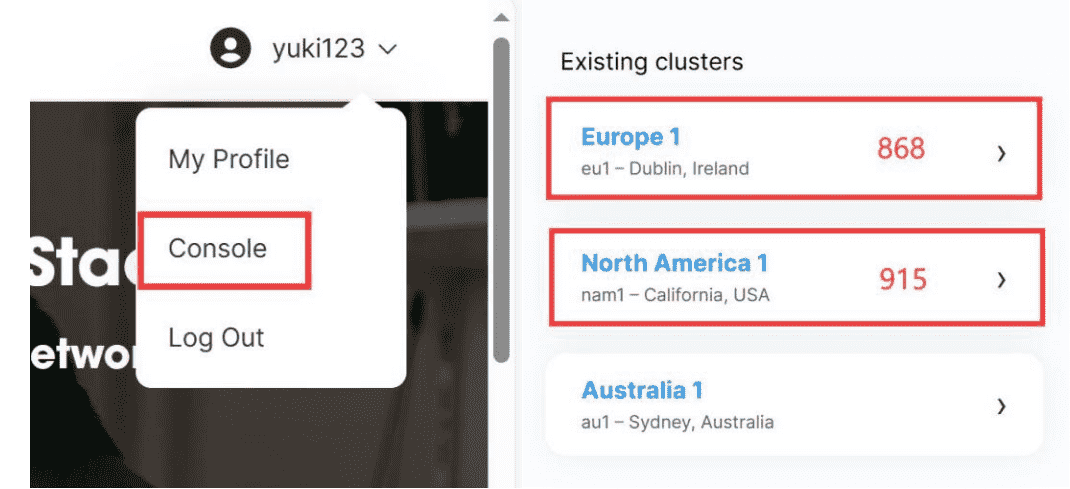
Create new application.

Enter your Application ID, and click "Create application".
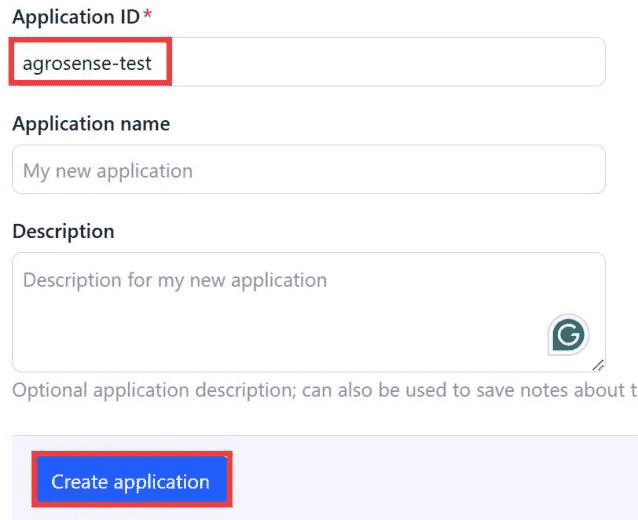
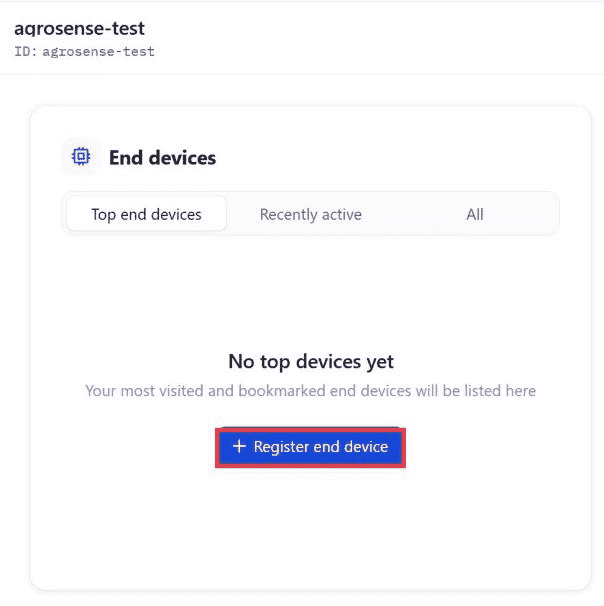
Click "+ Register end device".
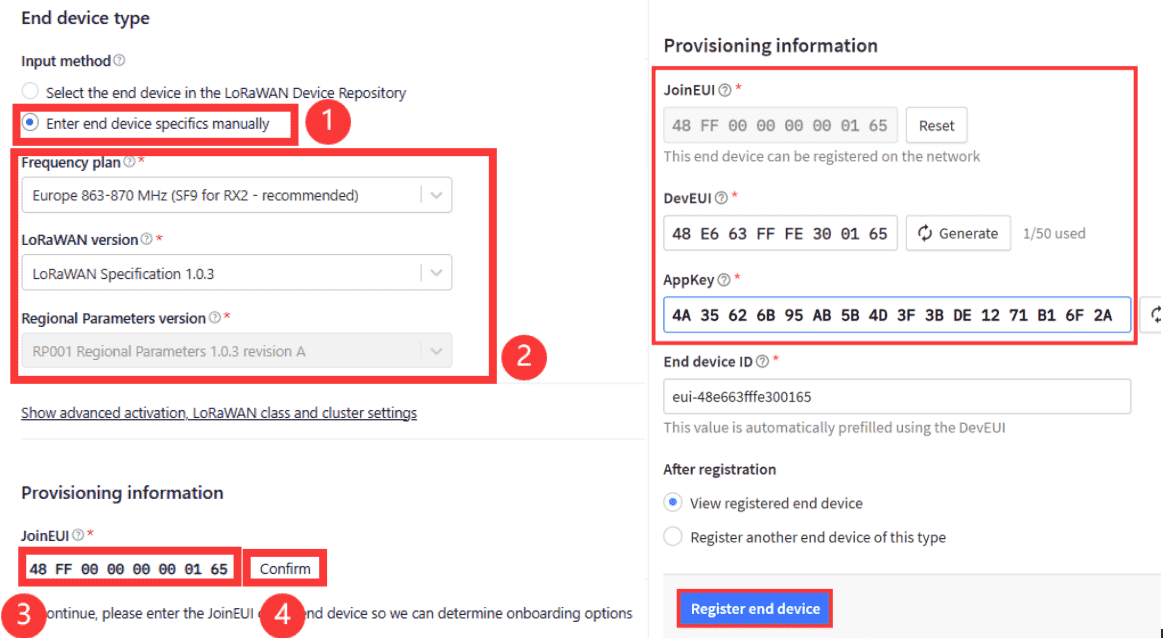
Choose "Enter end device specifics manually".
Select the three options as shown in the image below.(Take 868 for example)
Enter you joinEUI, DevEUI, Appkey.
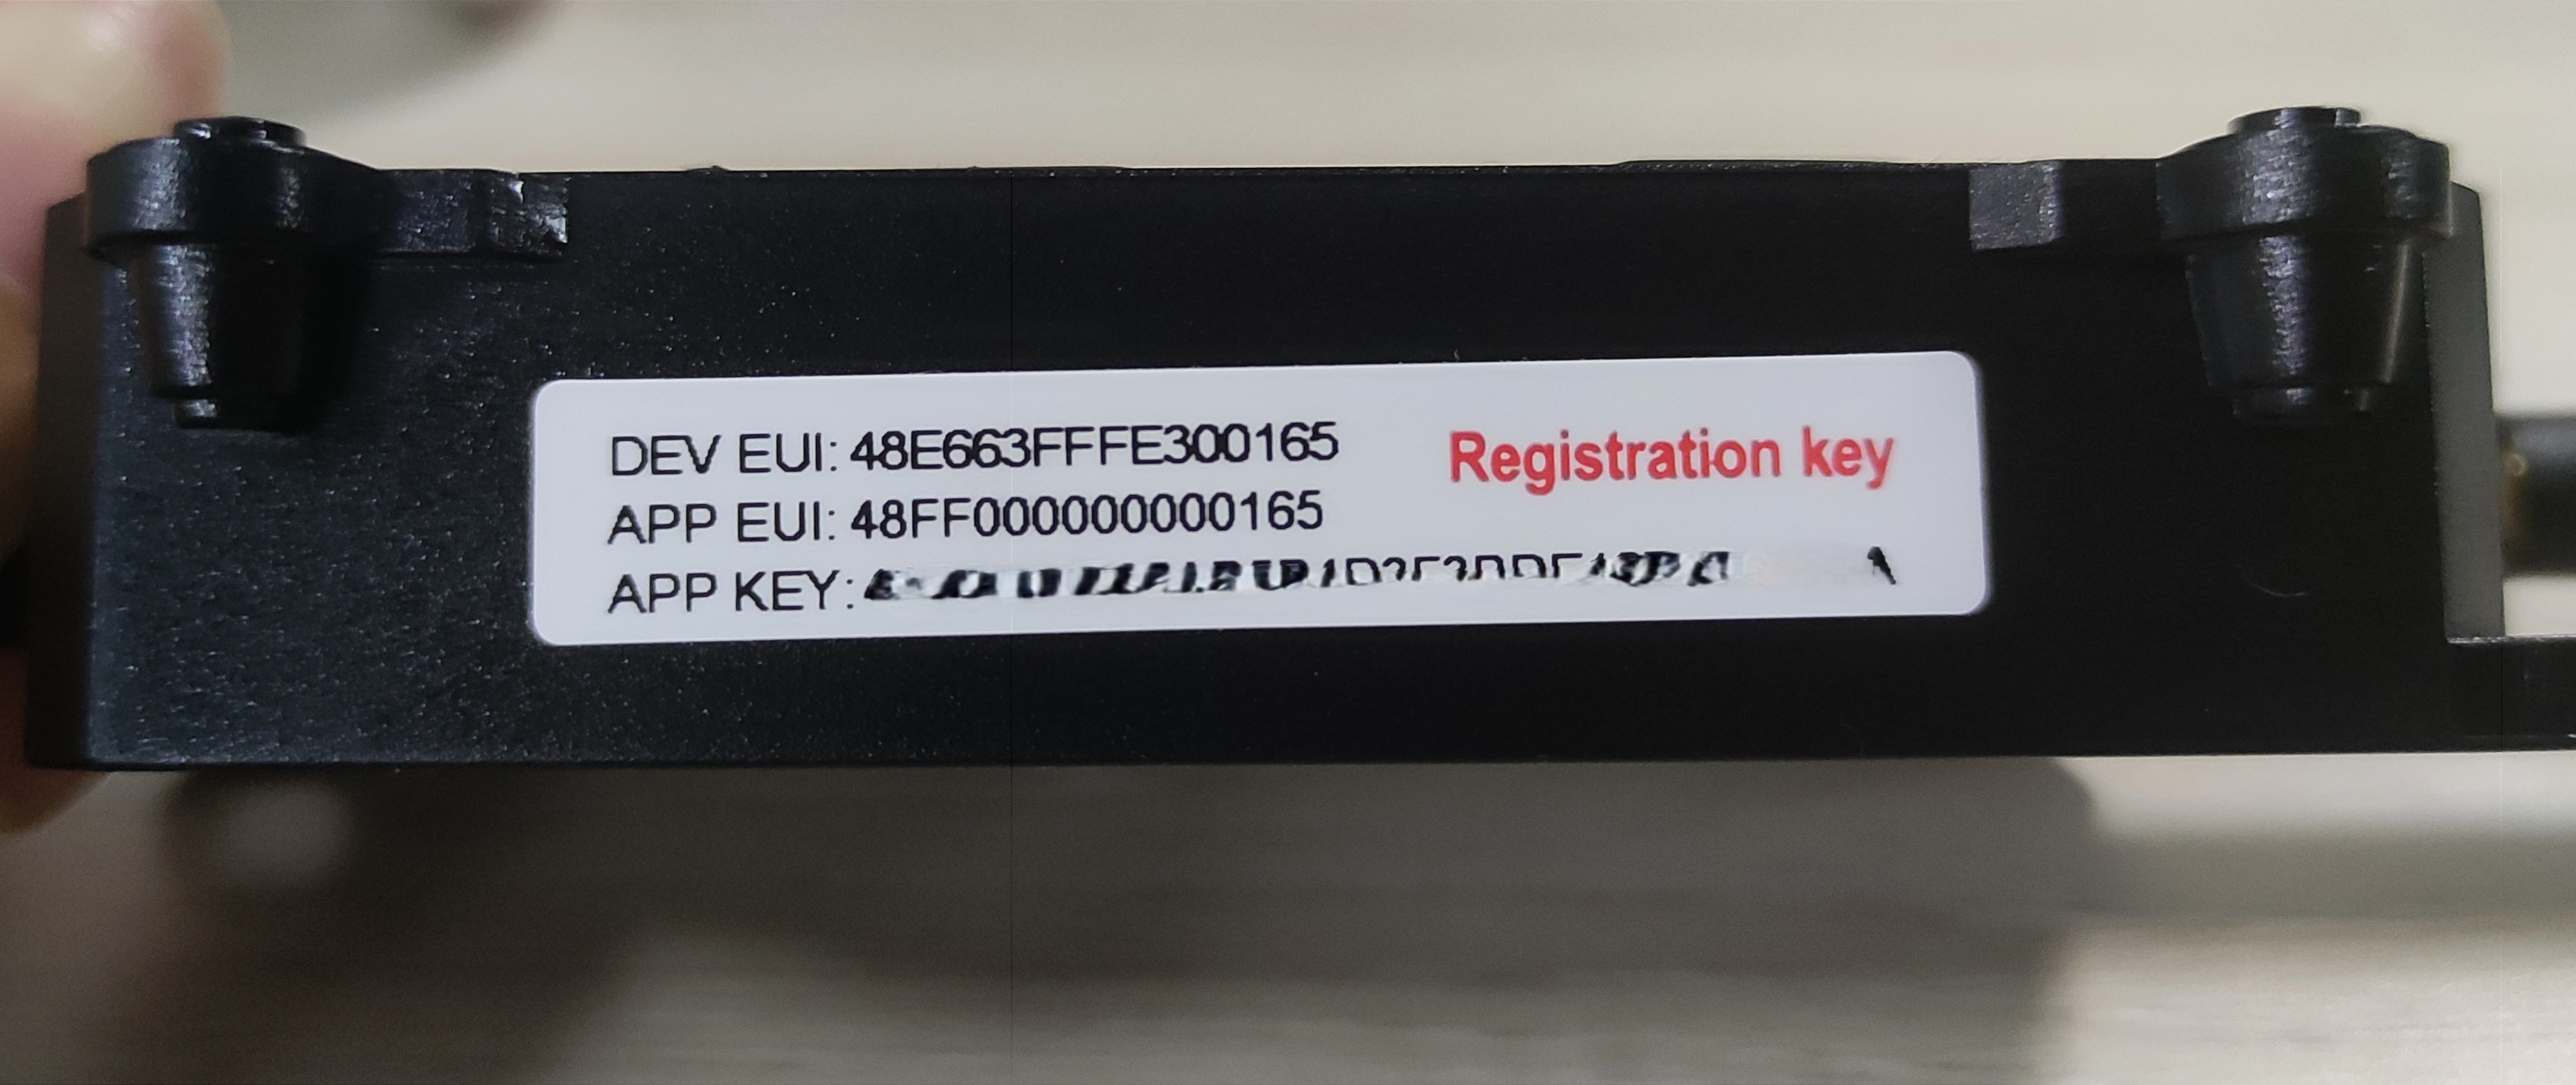
NOTE: On the AgroSense LoRaWAN® Sensor label, you can get DVE EUI, APP EUI, APP KEY data.
Enter them in "Provisioning information" correctly.
| AgroSense LoRaWAN® Sensor label | Provisioning information |
|---|---|
| APP EUI | JoinEUI |
| DEV EUI | DevEUI |
| APP KEY | AppKEY |
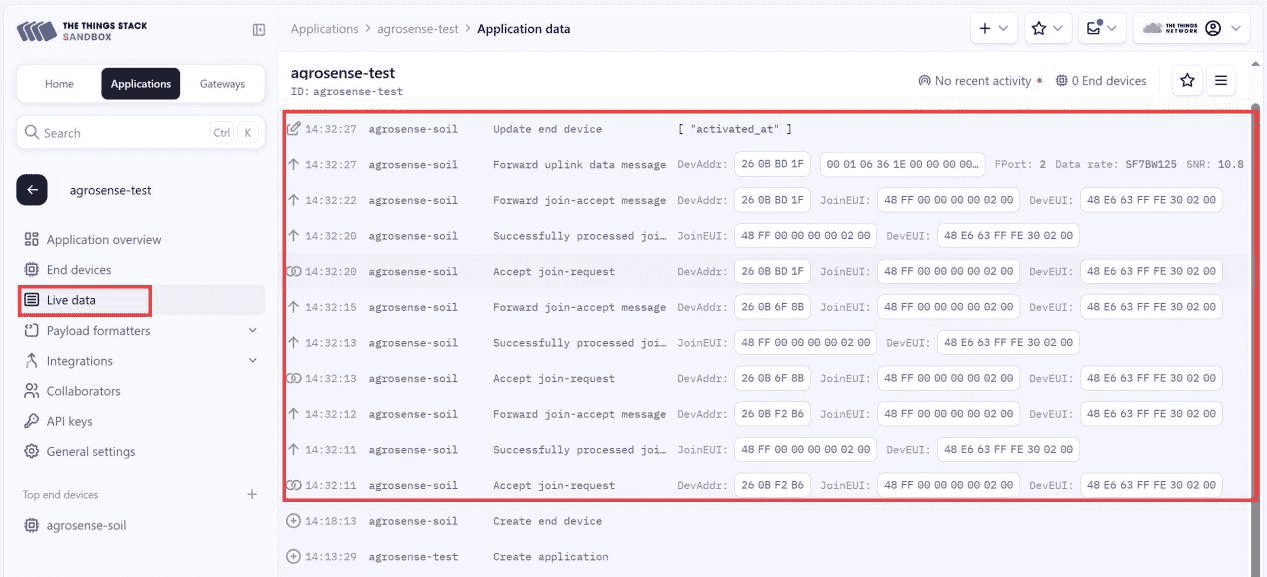
Press AgroSense LoRaWAN® Sensor's User button and wait a few seconds after LED flashes, if you find that LED flashes a second time, it proves that the network connects successfully.
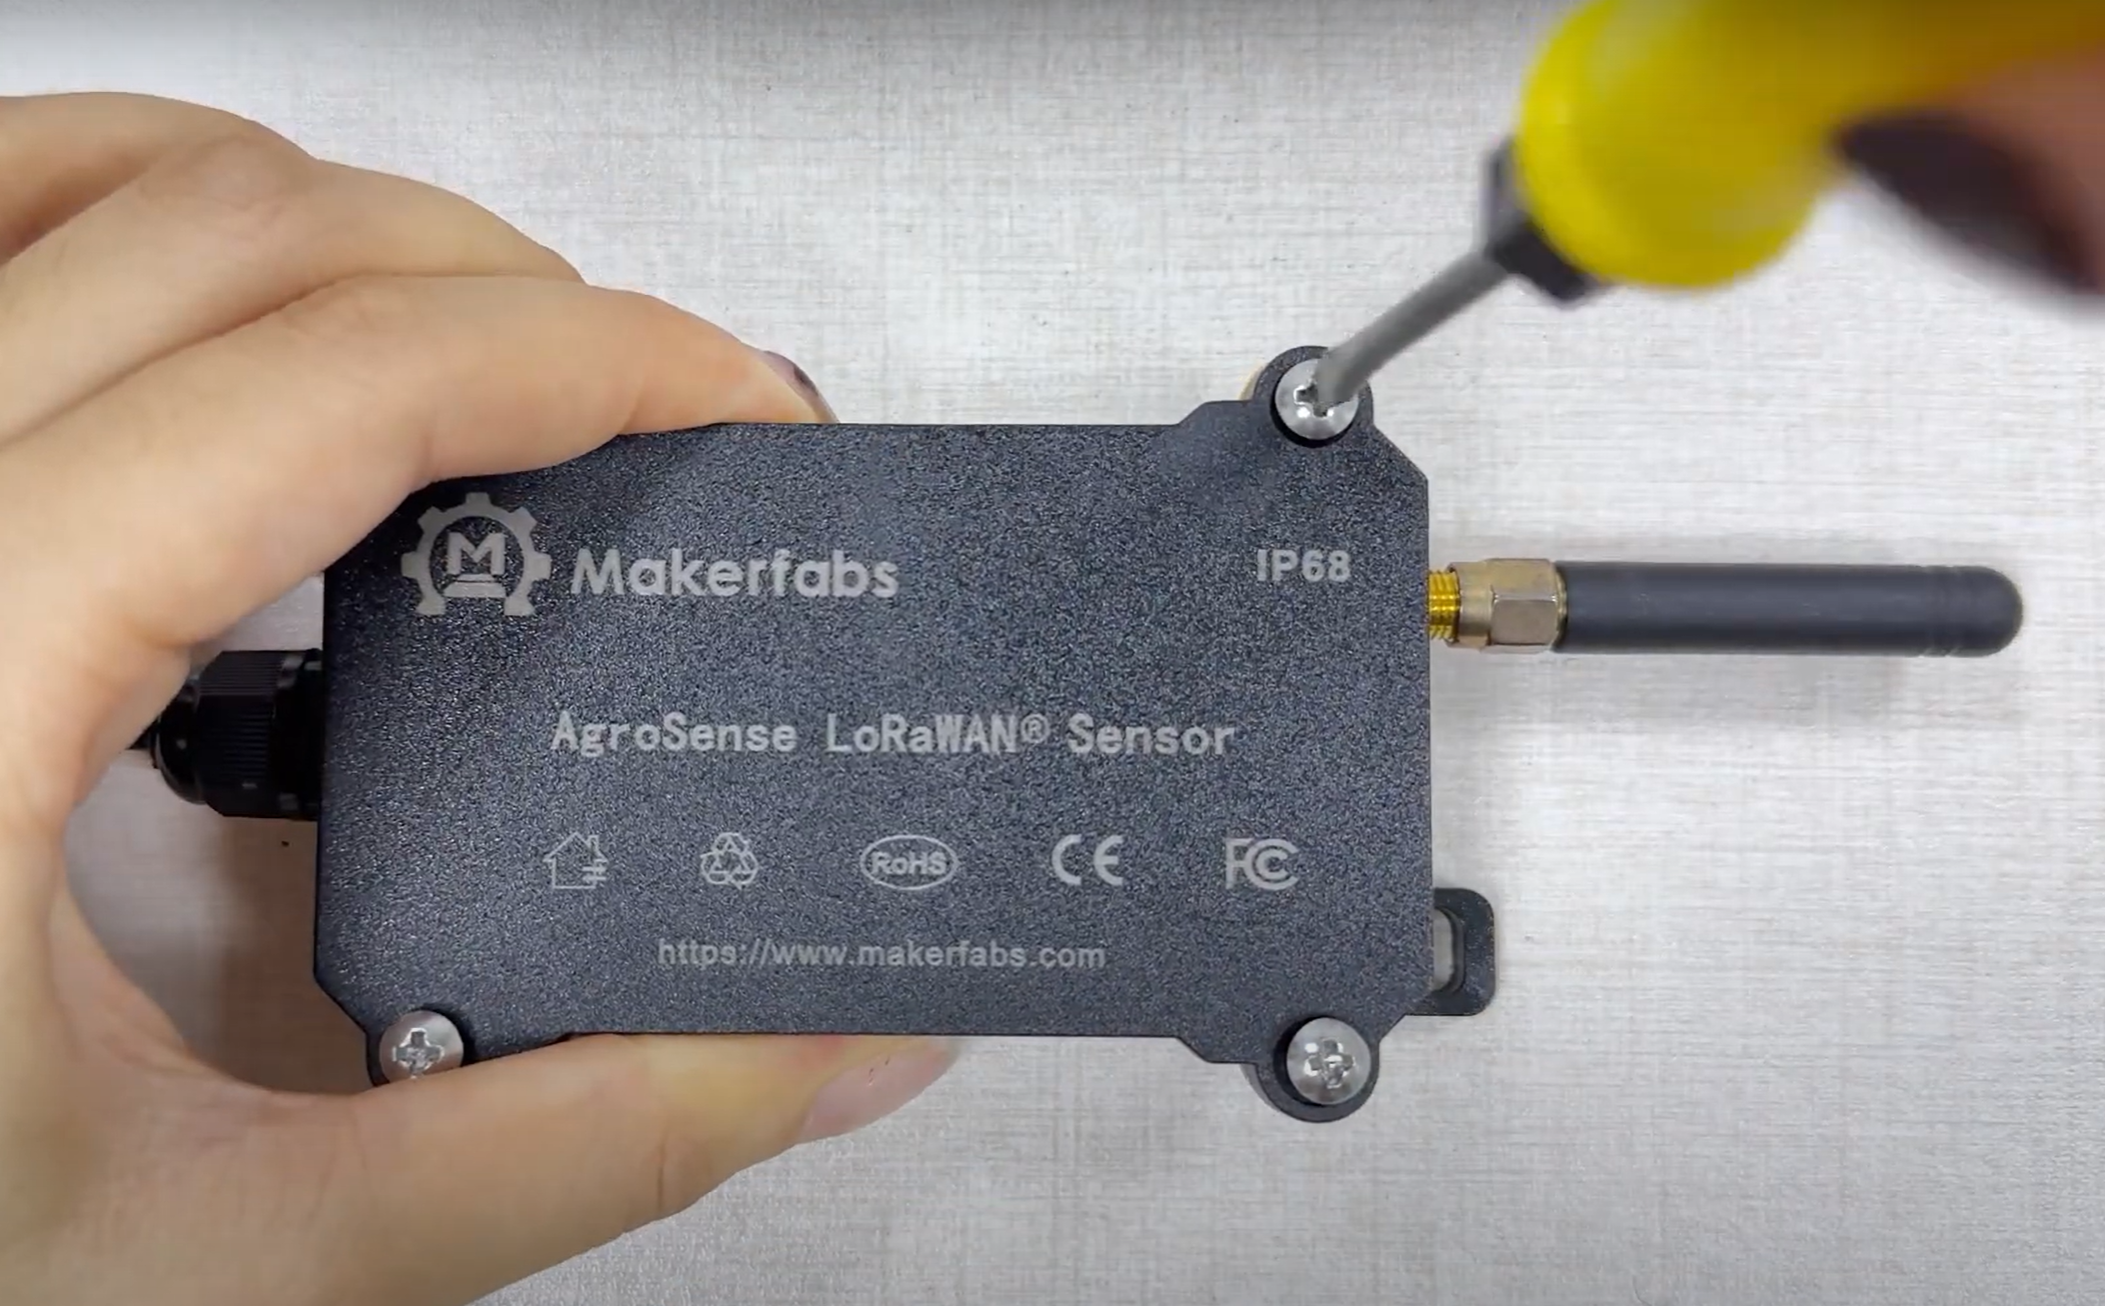
- Step3: wall-mounted installation
Tighten the screws on the four corners of the case after putting the cover on, Wall mounting the product for use.
3. Data Visualization with Thingspeak
The Things Network is the largest LoRaWAN data server, but it do not support data storage& visualization, to achieve this, we utilize ThingSpeak for data presentation and analysis.
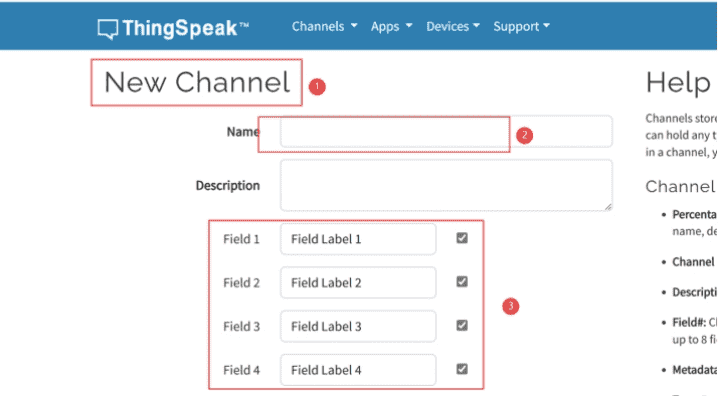
- Step1: Create a Channel:
Log in to ThingSpeak.
Click on “My Channels”.
Click on “+ New Channel”.
Fill in the Channel name and field names (e.g., Field1: Temperature, Field2: Humidity).
Click on “Save Channel”.
- Step2: Obtain the Write API Key:
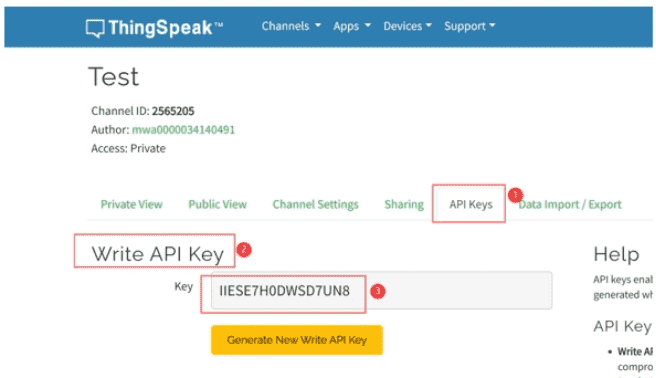
Open the newly created Channel.
Click on the “API Keys” tab.
Copy the “Write API Key”.
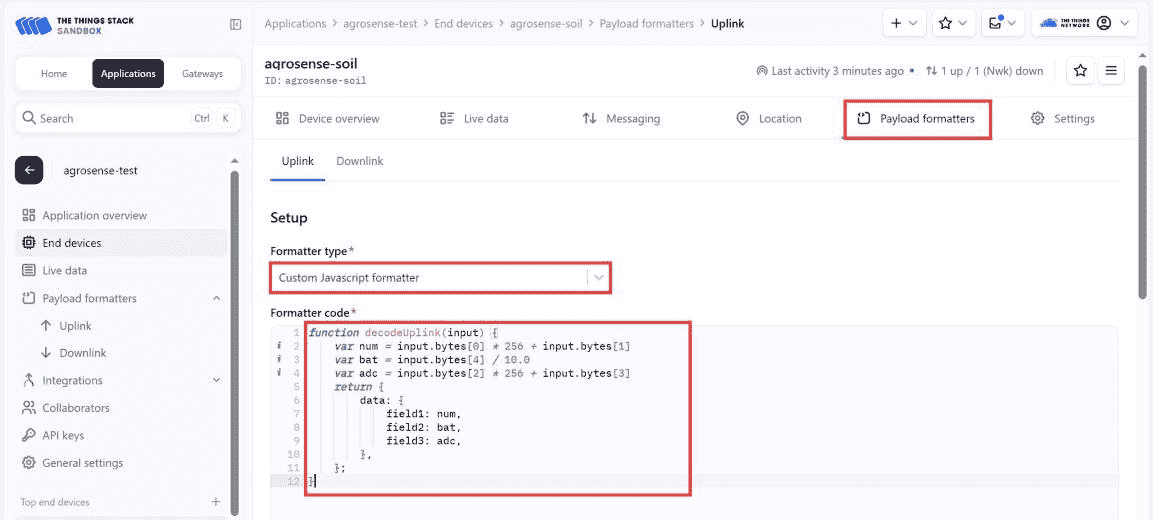
- Step3: Configure Payload Formatter:
In the device details page, click on the “Payload Formatters” tab.
Click on the “Uplink” tab.
Select “Custom JavaScript Formatters”.
Here JavaScript code to parse the binary data sent from the device. You can download & Copy all AgroSense JavaScript at github.
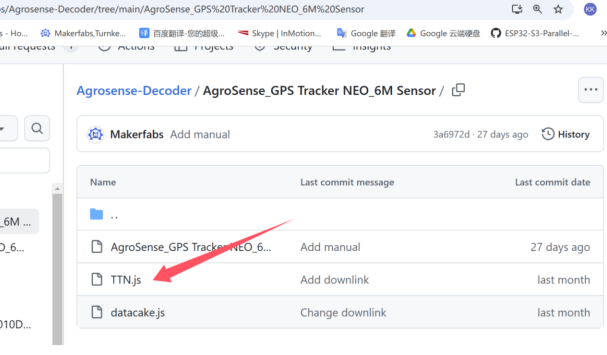
Finally click "Save changes".
- Step4: Configure Webhook at TTN
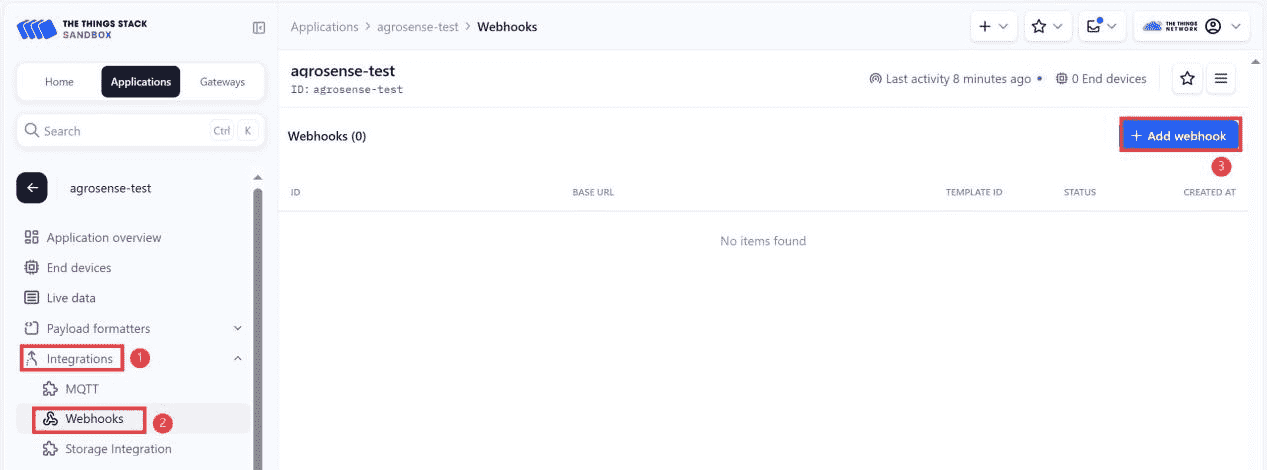
In the application page, click on the “Integrations” tab.
Select “Webhooks”.
Click on “+ Add webhook.
Choose the “ThingSpeak” template.
Fill in the following information and click on “Create ThingSpeak webhook”.
| Webhook ID | Webhook ID |
|---|---|
| Channel ID | Your ThingSpeak Channel ID |
| API Key | Your ThingSpeak Write API Key |
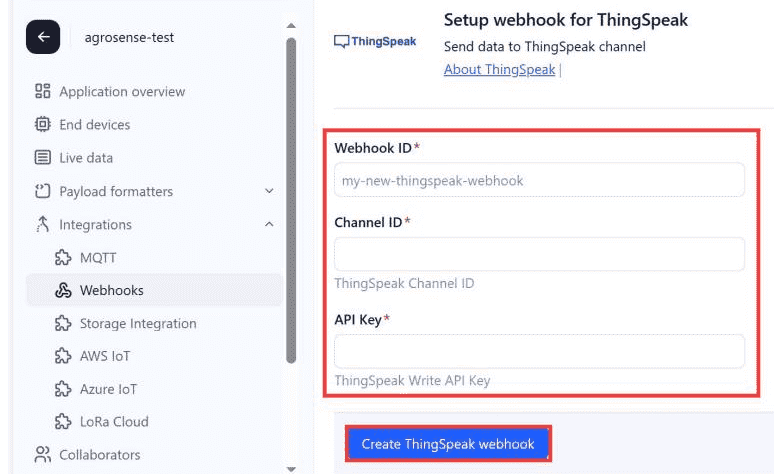
With the above setting, TTN forward the AgroSense data to thingspeak for visualization analysis.
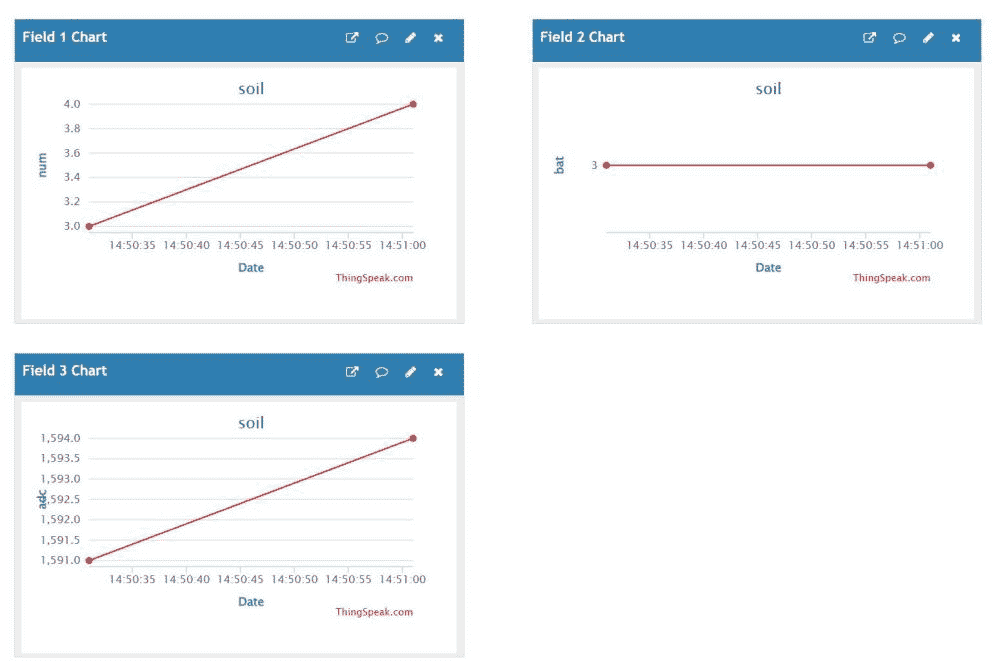
Now Press AgroSense LoRaWAN® Sensor's User Button, you will successfully see the data in Thingspeak.
NOTE: Agrosense sensor send data every1 hours by default, but you can press the user button in your implement of the project, to help you quickly check if the whole project works as intended.
Agrosense support Data Downlink to change the time interval of reporting, check Downlink for the details.
4. Using with DataCake
DataCake is a leading provider of IoT device management solutions, specializing in efficient data collection, in-depth analysis, and remote monitoring. The platform seamlessly integrates Agrosense's LoRaWAN data, enabling reliable data storage and precise visualization.
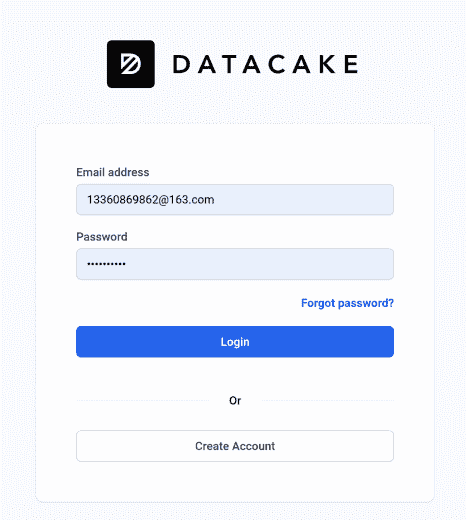
- Step1: Login DataCake or Create Account.
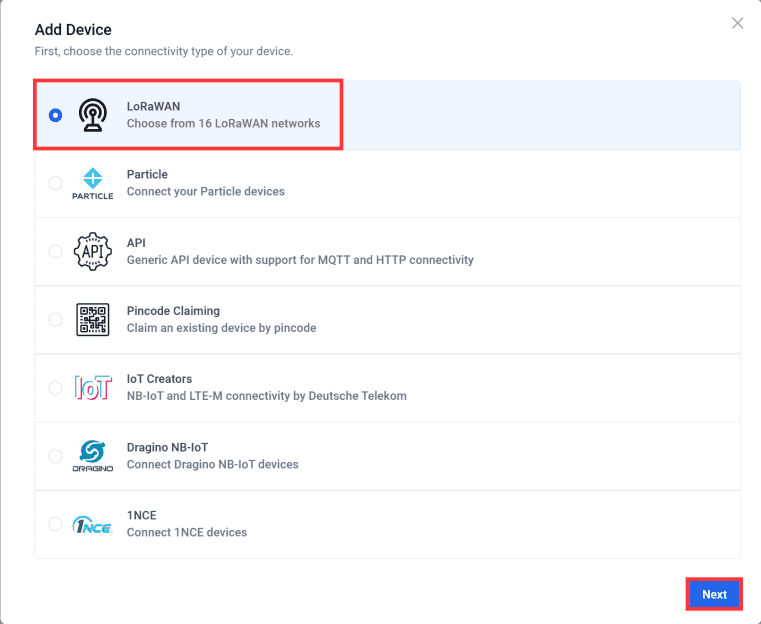
- Step2:Add Device.

Select LoRaWAN and click “Next”.
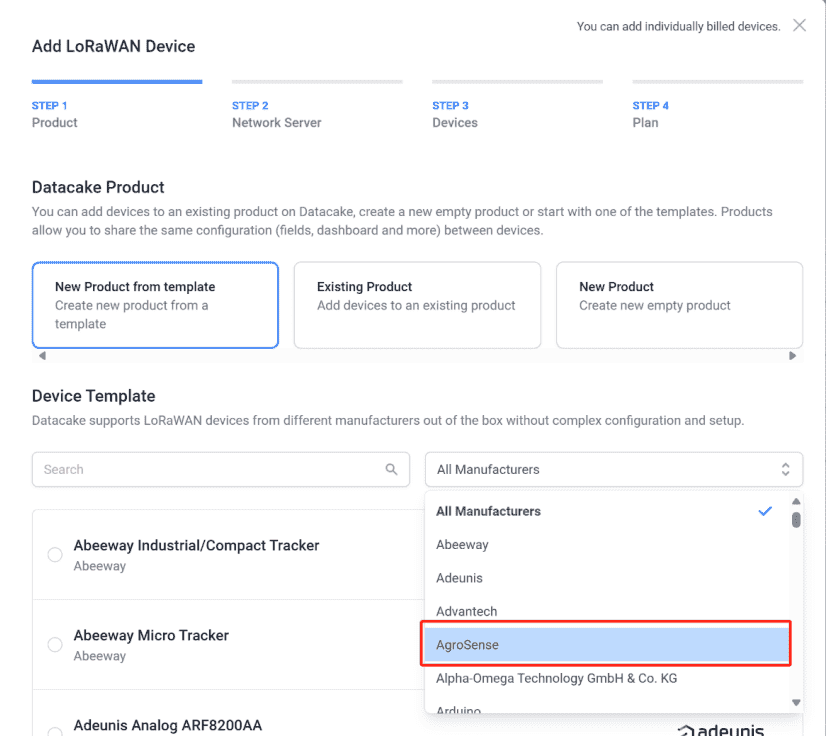
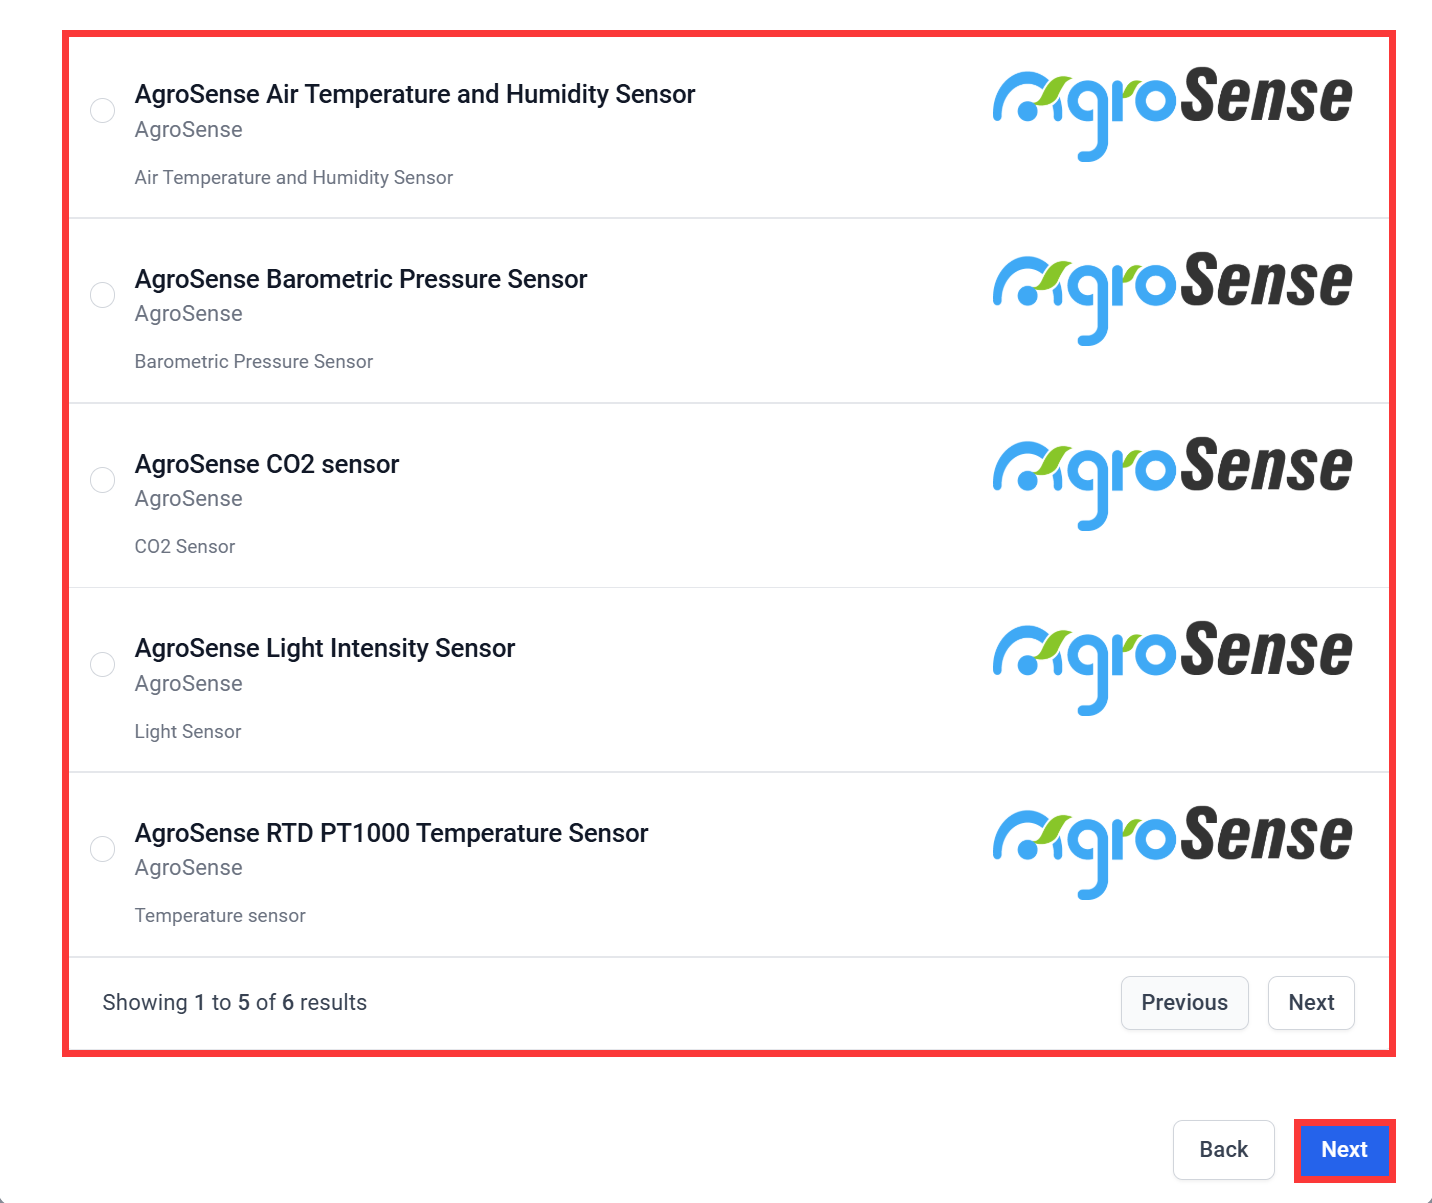
- Step3: Select a Product based on your needs, you can create a new template yourself or use one of our supplied templates.
Take "New Product from template" as an example.
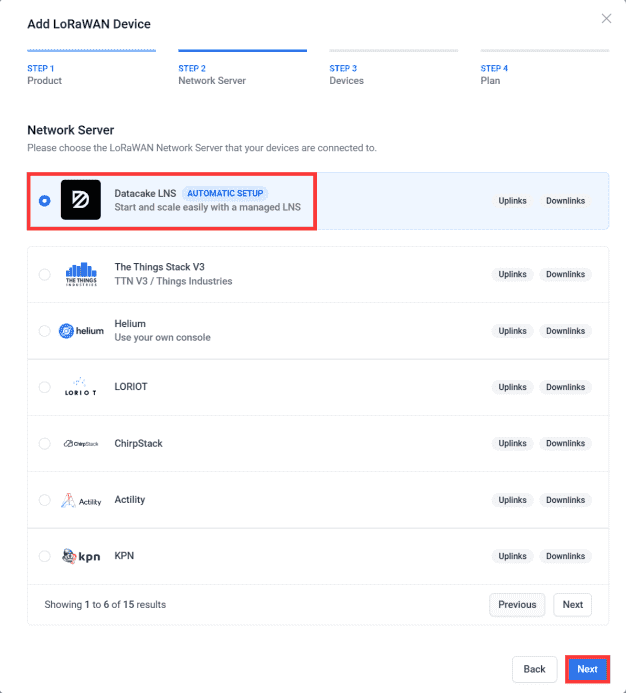
- Step4: Select “Datacake LNS”.
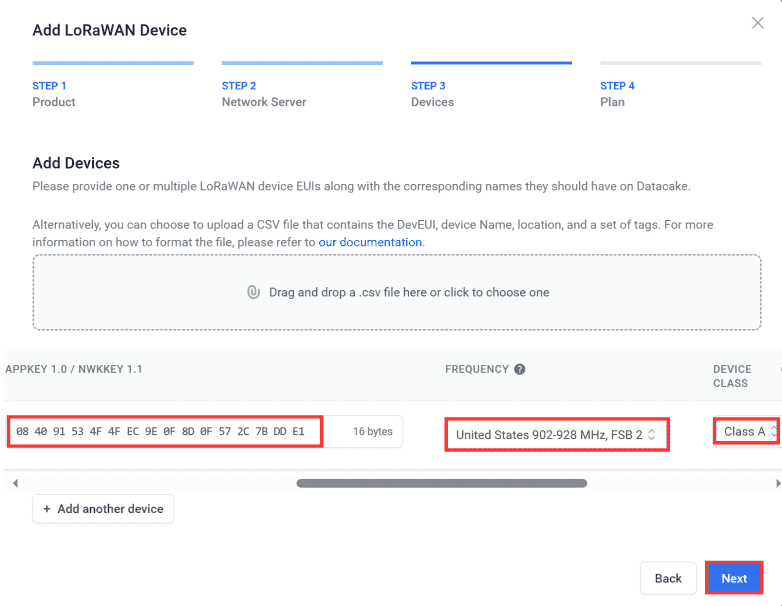
Enter DEVEUI、APPEUI、APPKEY、FREQUENCY and DEVICE CLASS.
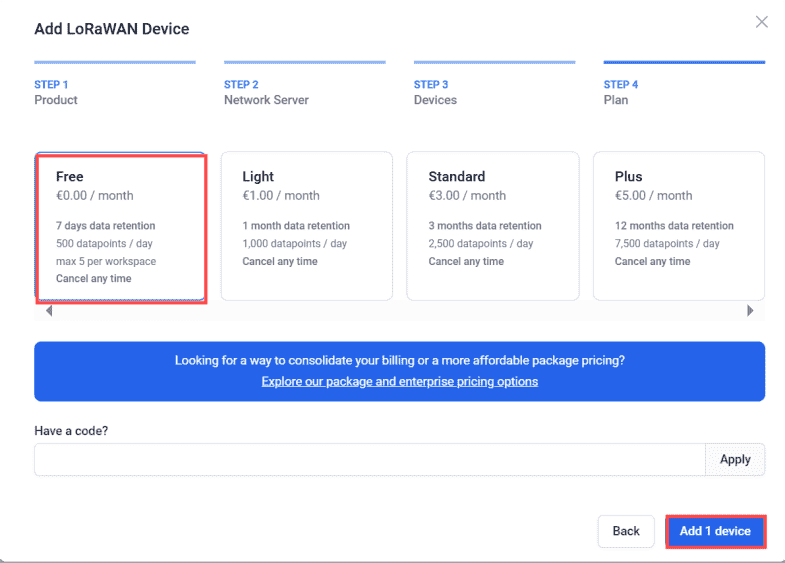
Choose the type according to your needs, and click “Add device”.
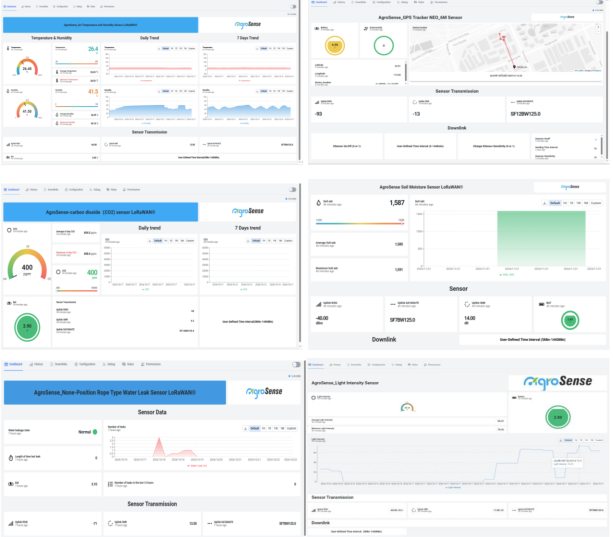
- Step5: Press AgroSense LoRaWAN® Sensor User button, you will successfully see the data in DataCake.
5. FAQ
Agrosense offers ODM/OEM service, for users'designated sensors.
For additional features, please contact sales@agrosense.cc
6. Resource
For more detailed usage of Gateway & Agrosense you can refer to Github.