Basic usage of Squareline with MaTouch 4.0"
Introduction
In our previous wiki, "Basic usage of Squareline with MaTouch 1.28," we offered a fundamental guide on utilizing the 1.28-inch display. Nonetheless, certain display chips are not compatible with the TFT_eSPI library. Hence, we opted to substitute the driver with the GFX_Library_of_Arduino library and incorporated the GT911 library for touch functionality. This enables the utilization of exported UI routines on Arduino.
Usage
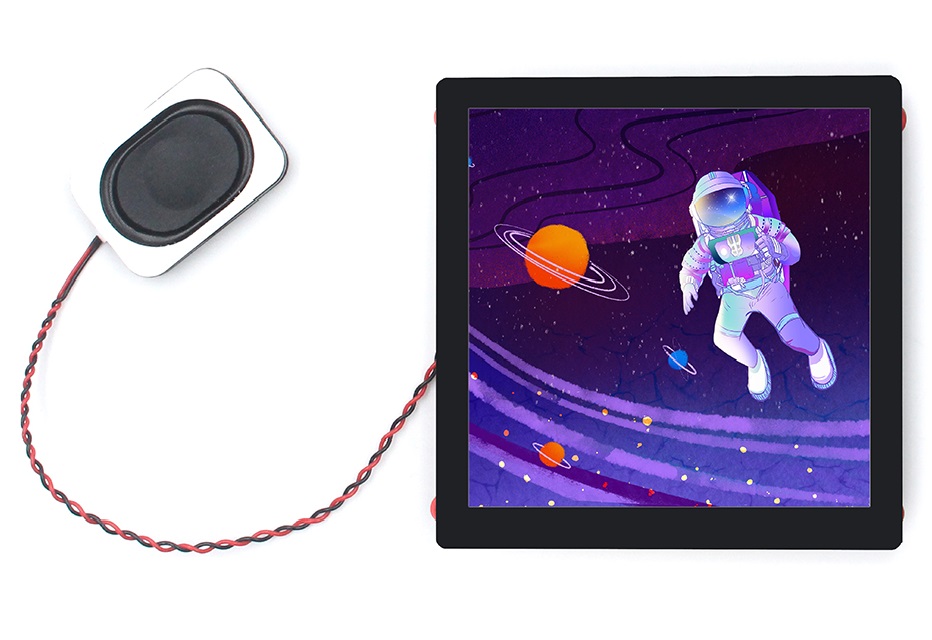
We choose a MaTouch_ESP32-S3 Parallel IPS with Touch 4.0" 480*480 ST7701 as a monitor.
Note: In this project, the Squareline version is 1.3.0, and the Arduino version is 1.8.19. ESP32-S3 development board library version is 2.0.9
Introduction to Software Basics
Squareline introduction:
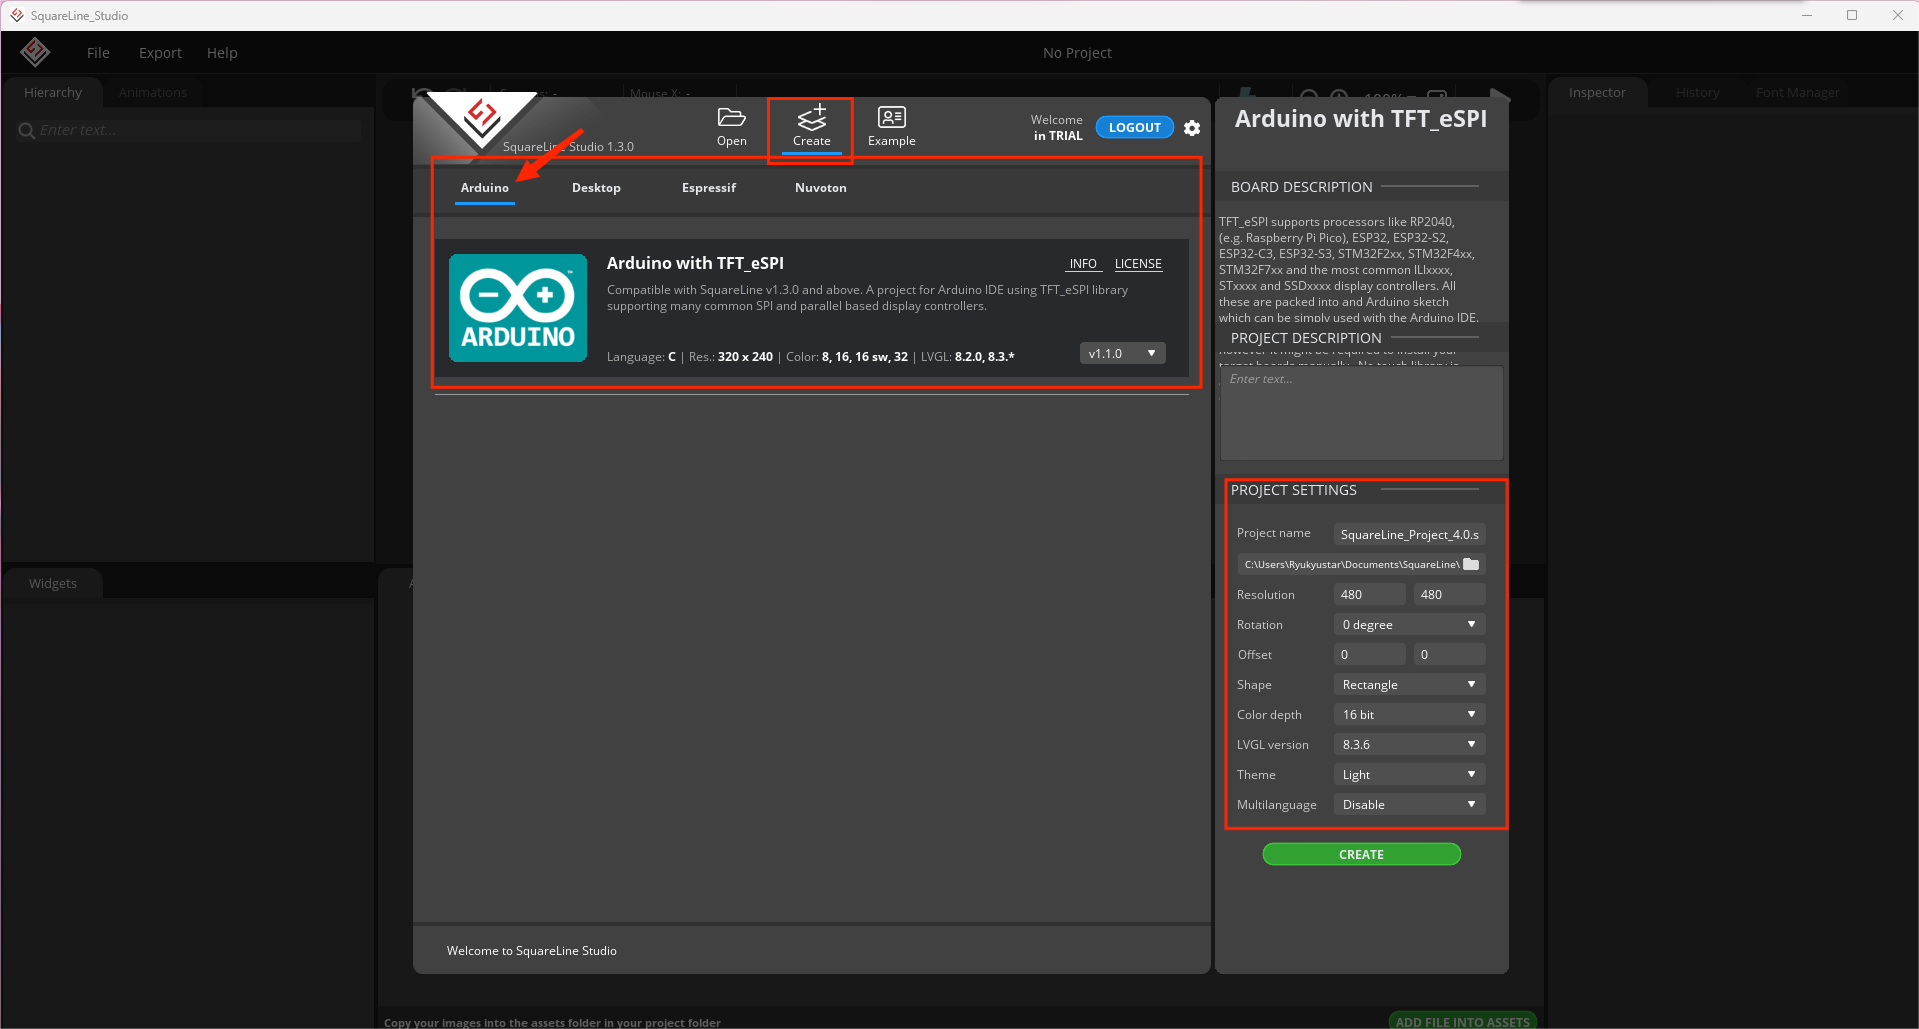
In the picture, we can see the Squareline interface. let's create a new project in it. Select the Arduino development environment We set the hardware parameters according to ESP32-S3 4.0" display with Touch. For example, Resolution is 480*480, the shape is a Rectangle and color depth is 16-bit, and the project name and path need to be set for yourself. when all configurations are complete, click the "CREATE".
When Squareline creates a new project successfully, we can see the Squareline workspace interface.
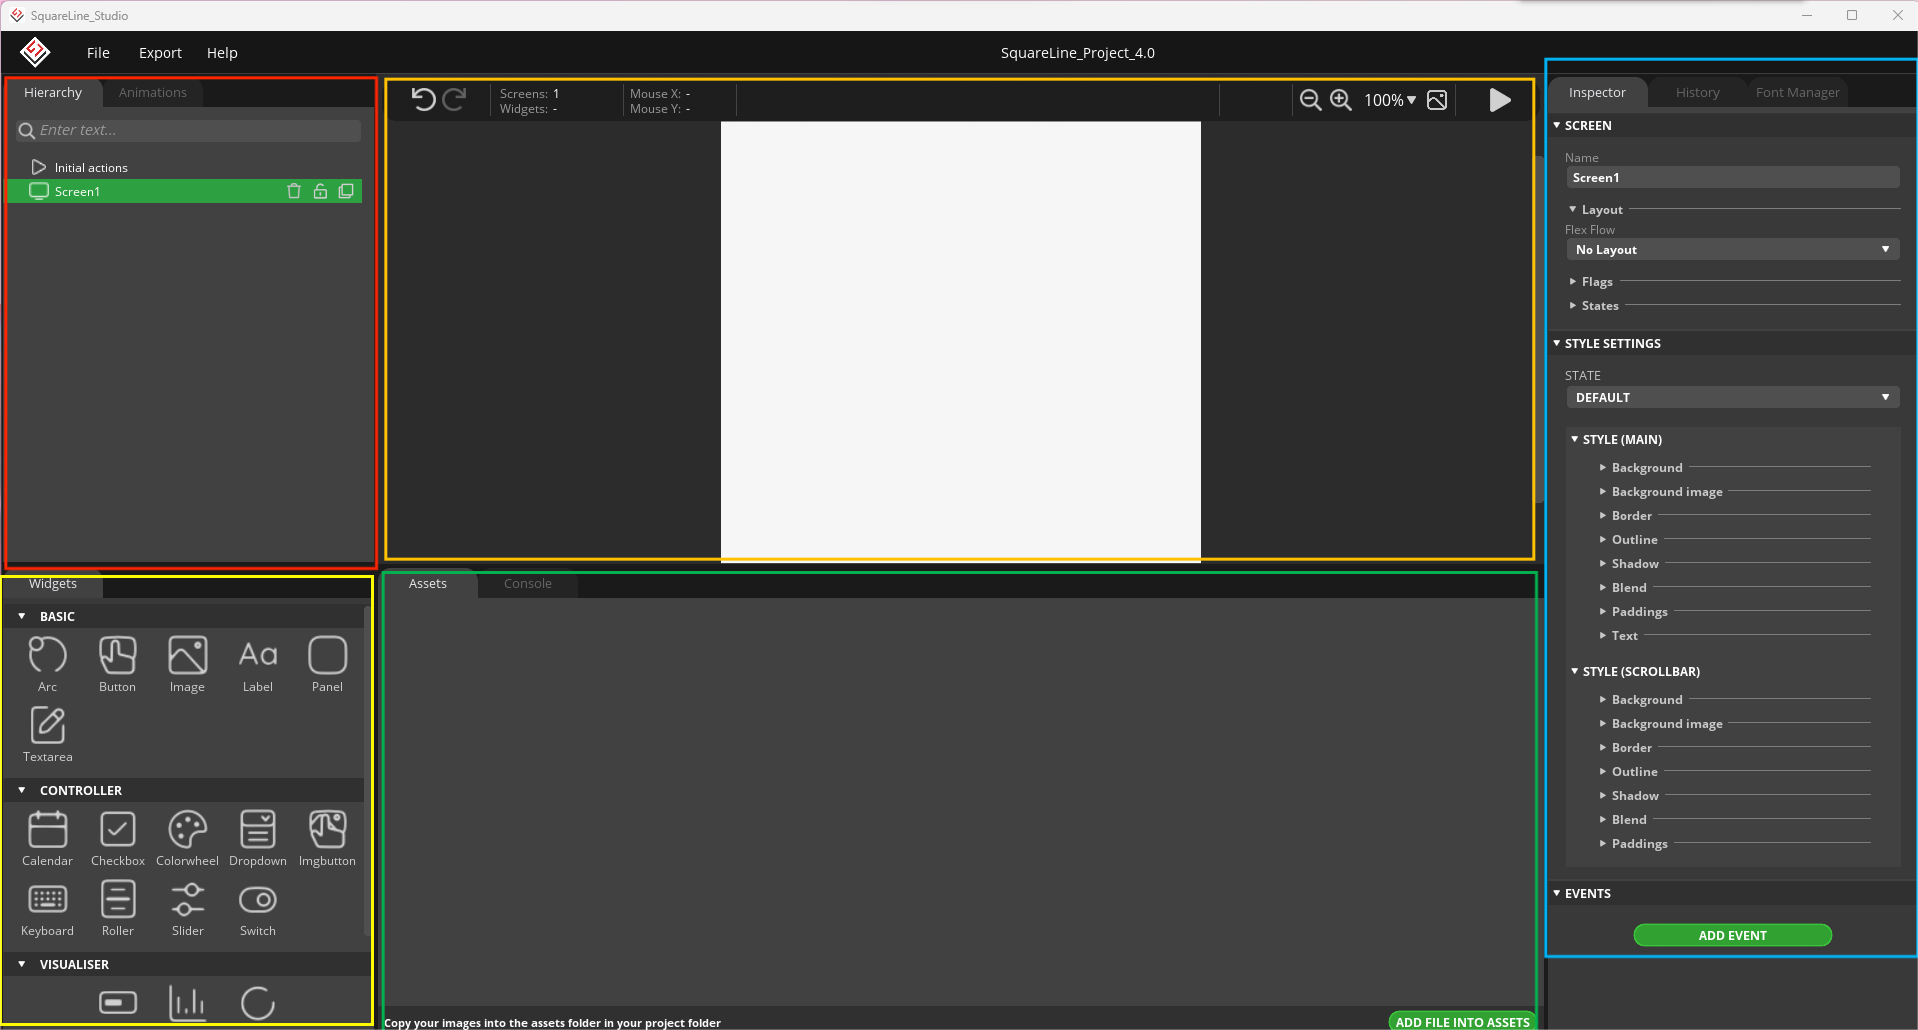
Hierarchy:
In the Hierarchy Panel, you can find the scenes and the list of the widgets appearing on the scenes in hierarchical order. You can modify the widget order, of course.
Animations:
In the Hierarchy Panel, you can find the scenes and the list of the widgets appearing on the scenes in hierarchical order. You can modify the widget order, of course.
Widgets:
You can find widgets, which are the basic elements of UI, on the Widget Panel. Every widget has its own preference. You can add custom styles to widget components and you are allowed to configure them in different states.
Assets:
Images and fonts, added to the project, appear in the Asset Panel. Having created a project, an Asset folder has also been created. If you copy the images needed to your project there\, the program will load them automatically listing them in the Asset Panel. Images are allowed in PNG format. If you double click on the image in the Asset Panel, it will be opened in the default image browser. If you would like to add fonts to your project, you should copy them into the Asset/Fonts folder. Then the program will autoload them.
Console:
You can find program logos and error messages in the Console Panel.
Inspector:
In the Inspector Panel, there are the parameters of the selected widgets. You can add styles and events to them. History:
There is a list of your actions in the History Panel. The program can record up to 200 actions into the list. Selecting any action on the list, the project sets back into that previous state. If you modify any element of your project after setting it back, actions after the selected one disappears.
Font Manager
Use your operation system fonts in your embedded GUI, as well. LVGL applies UTF-8 encoding to display Unicode characters in any language. Here, you can generate a new font for your GUI project. With the font converter tool, you can create Carray from any TTF or WOFF font. You can select ranges of Unicode characters and specify the bpp (bit-per-pixel).
Project presentations
- Simple UI design
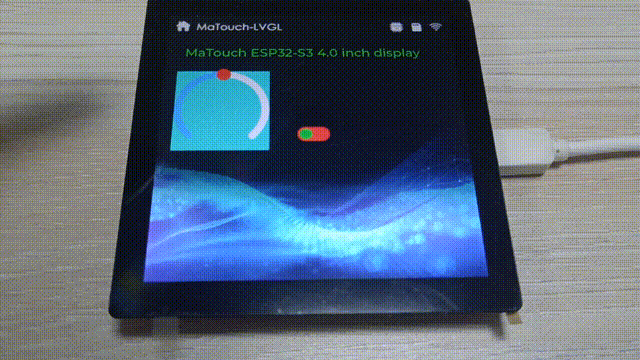
When we created a project, we choose the widgets depending on our own preferences. we use the simple demo to display how to design a UI interface for ESP32-S3 1.28" with touch by Squareline and Arduino.
Click the "ADD FILE INTO ASSETS" to add the picture as a background Within Assets, you can drag the image to Screen1.
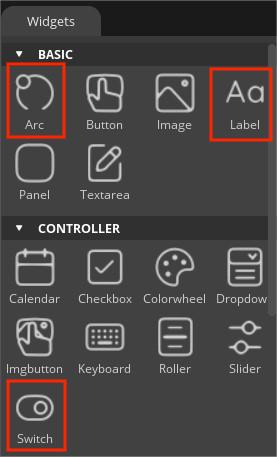
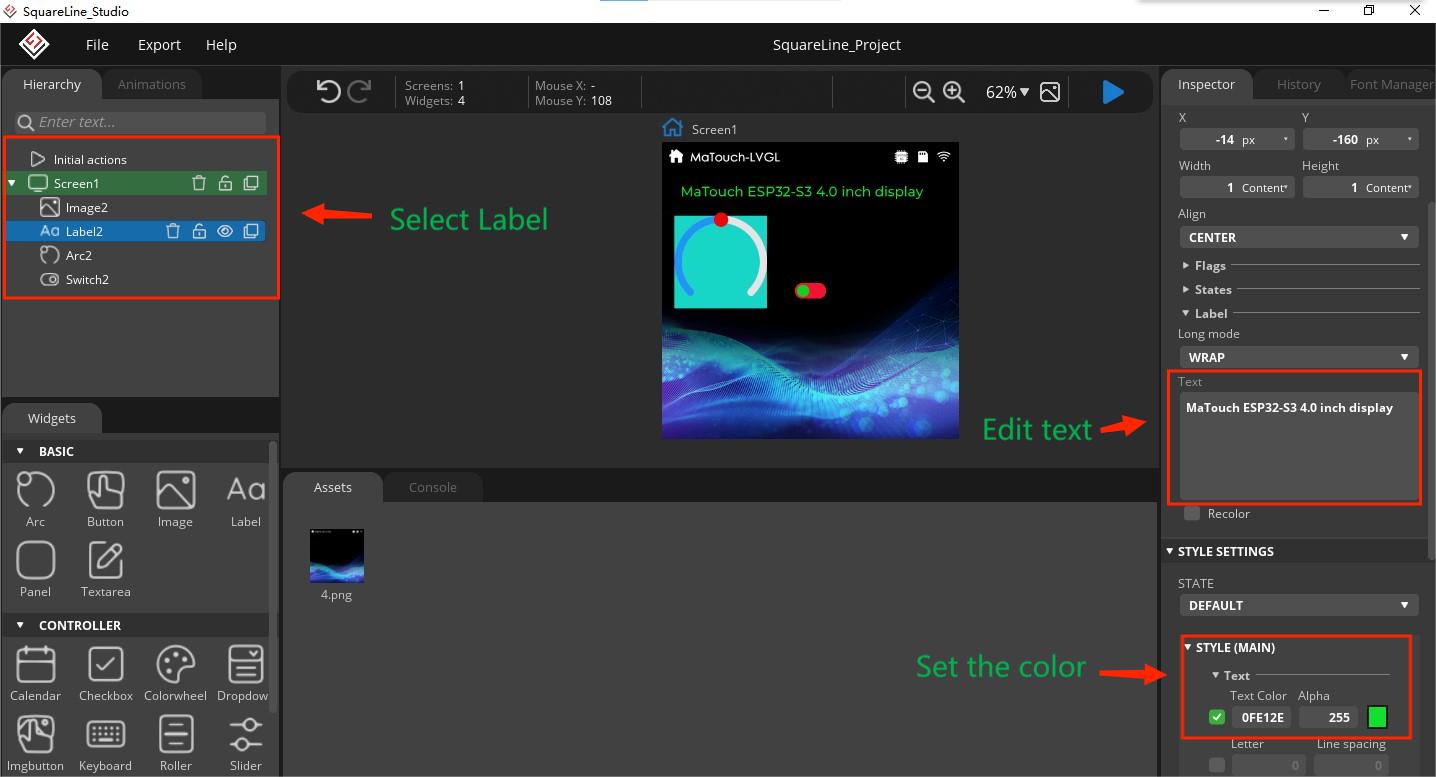
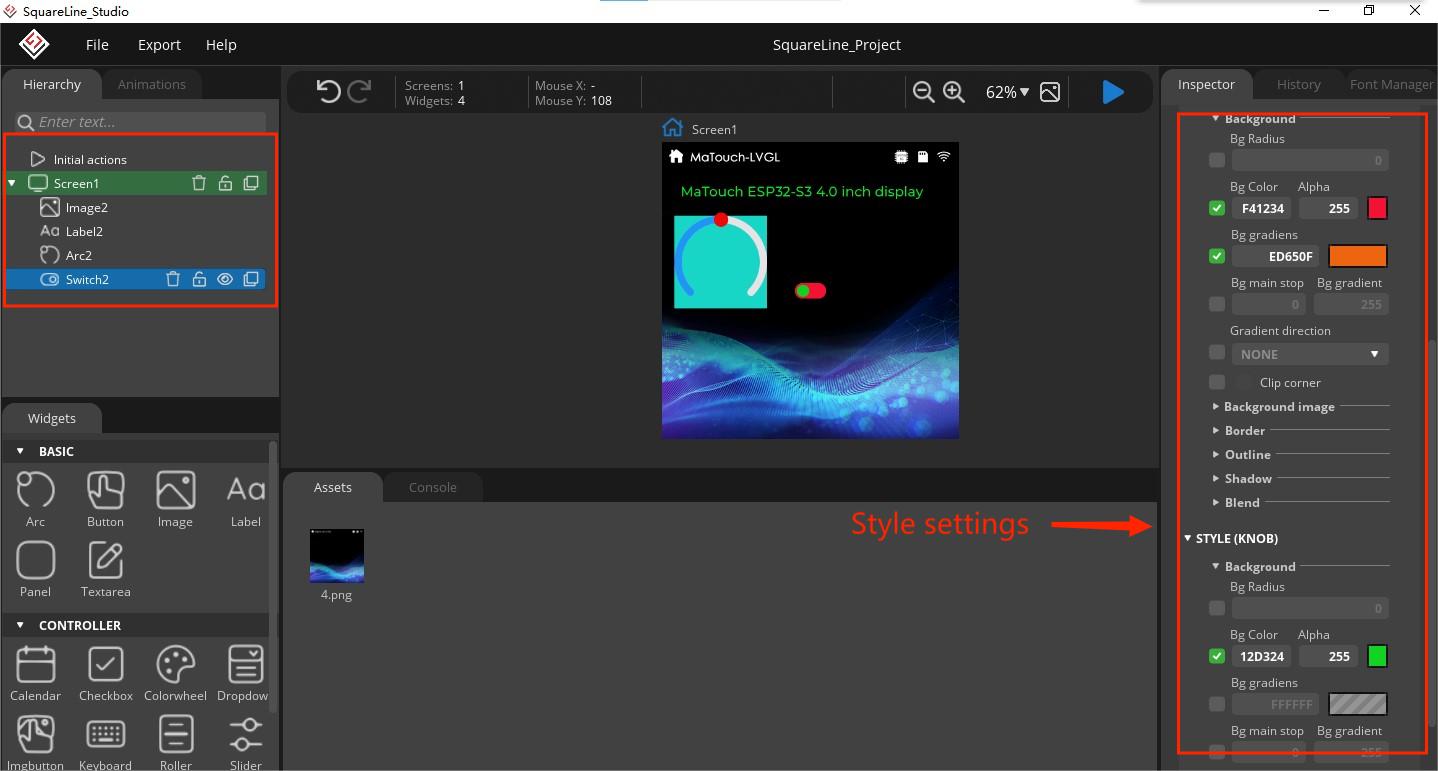
We can set a Label to introduce our project on the screen and choose a Switch and an Arc to show the project. set the Switch and Arc color in STYLE SETTINGS.
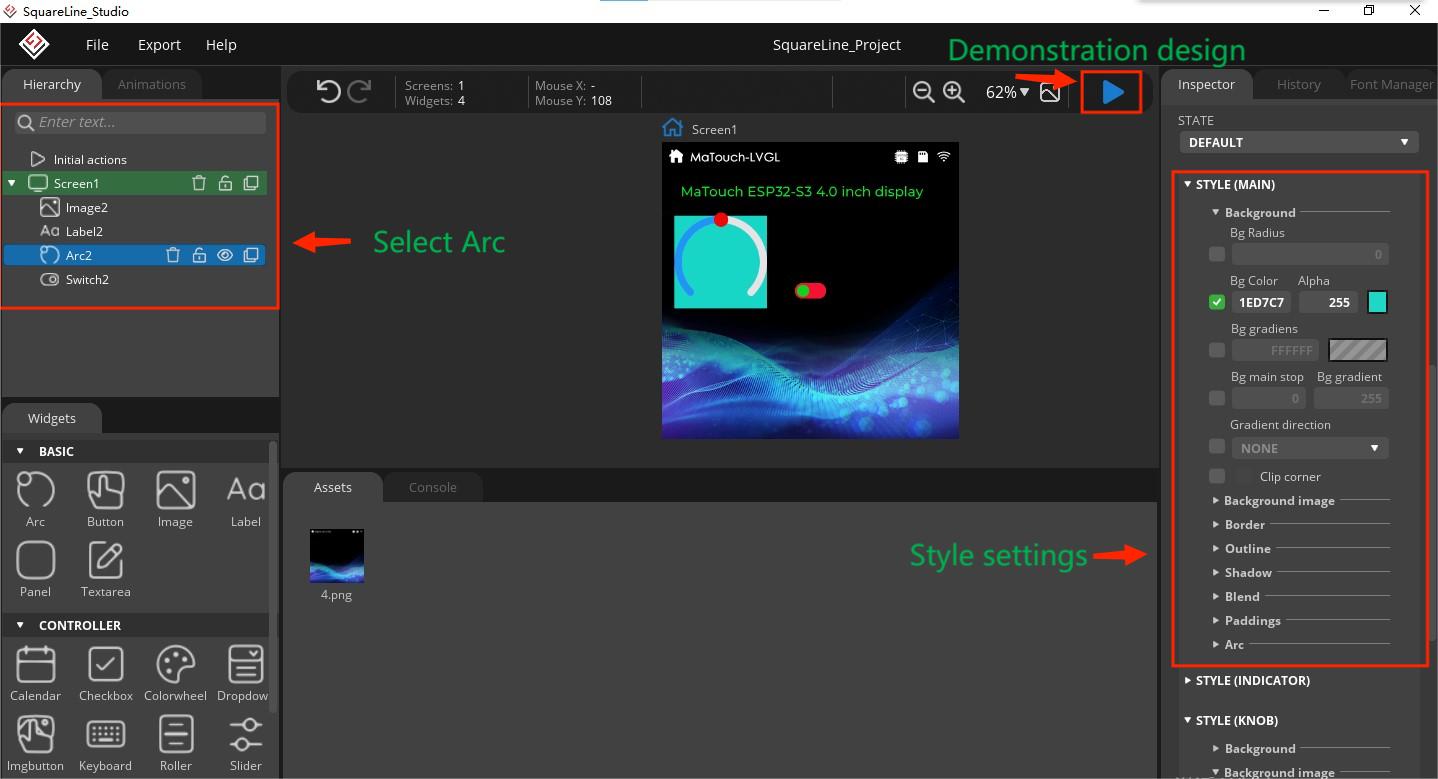
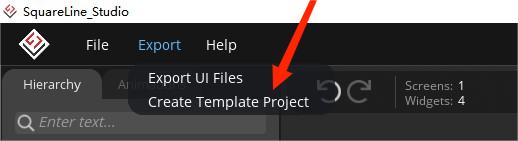
Now we finish a simple project, and before the "create template project", users can click the >>file>>Project Settings to check whether the configuration is correct. Then click the >>export>>create template project.
The Library Modifications
We find the program export path, and we can see two files named "ui" and "libraries". There is only one "ui.ino" in the UI folder to run our main program, and the libraries folder contains the library function resources called in the program.

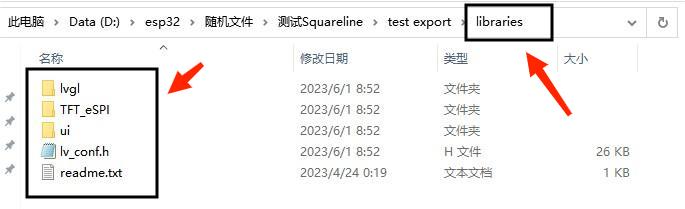
The library file and three libs,"ui, TFT_eSPI, and lvgl," and a lv_conf.h.
Usually, the ui library we don't need to modify. Copy the "lvgl" and "ui" folders in the libraries folder to the library file of Arduino, General Arduino library folder path for: (C)/Users/Document/Arduino/libraries.
①.The "GFX Library For Arduino" library
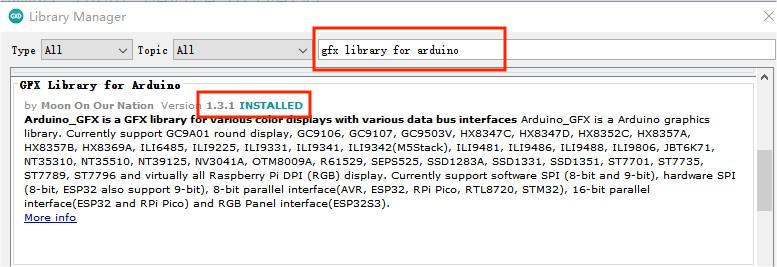
Because The “TFT_eSPI” library doesn’t support the ST7701 driver IC, we must use another library which is “GFX Library For Arduino” library to drive the MaTouch_ESP32-S3 Parallel IPS with Touch 4.0" 480*480 ST7701.
Open the Arduino IDE, choose the >>tools>> mange libraries>
Search the “gfx library for Arduino” lib in the search box and install the library version 1.3.1.
②. The "lvgl" library
With the lvgl library, The lv_conf.h file is included in the exported library, we need to copy it to the Arduino lvgl folder,>>lvgl>>src, and the lvgl file is successfully modified.
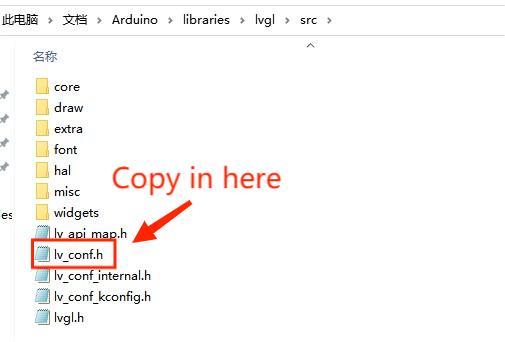
About lvgl_conf.h file, it is a configuration file used to configure the lvgl library. This file is generated when Squareline exports the project file. It contains various functions such as enabling configuration, setting color depth, and font compilation.
/* clang-format off */
#if 1 /*Set it to "1" to enable content*/

/*Color depth: 1 (1 byte per pixel), 8 (RGB332), 16 (RGB565), 32 (ARGB8888)*/
#define LV_COLOR_DEPTH 16

/*Use a custom tick source that tells the elapsed time in milliseconds.
 *It removes the need to manually update the tick with `lv_tick_inc()`)*/
#define LV_TICK_CUSTOM 1
#if LV_TICK_CUSTOM
    #define LV_TICK_CUSTOM_INCLUDE "Arduino.h"         /*Header for the system time function*/
    #define LV_TICK_CUSTOM_SYS_TIME_EXPR (millis())    /*Expression evaluating to current system time in ms*/
#endif   /*LV_TICK_CUSTOM*/

/*Montserrat fonts with ASCII range and some symbols using bpp = 4
 *https://fonts.google.com/specimen/Montserrat*/
#define LV_FONT_MONTSERRAT_8  1
#define LV_FONT_MONTSERRAT_10 1
#define LV_FONT_MONTSERRAT_12 1
#define LV_FONT_MONTSERRAT_14 1
#define LV_FONT_MONTSERRAT_16 1
#define LV_FONT_MONTSERRAT_18 1
#define LV_FONT_MONTSERRAT_20 1
#define LV_FONT_MONTSERRAT_22 1
#define LV_FONT_MONTSERRAT_24 1
#define LV_FONT_MONTSERRAT_26 1
#define LV_FONT_MONTSERRAT_28 1
#define LV_FONT_MONTSERRAT_30 1
#define LV_FONT_MONTSERRAT_32 1
#define LV_FONT_MONTSERRAT_34 1
#define LV_FONT_MONTSERRAT_36 1
#define LV_FONT_MONTSERRAT_38 1
#define LV_FONT_MONTSERRAT_40 1
#define LV_FONT_MONTSERRAT_42 1
#define LV_FONT_MONTSERRAT_44 1
#define LV_FONT_MONTSERRAT_46 1
#define LV_FONT_MONTSERRAT_48 1
The ui.ino modifications

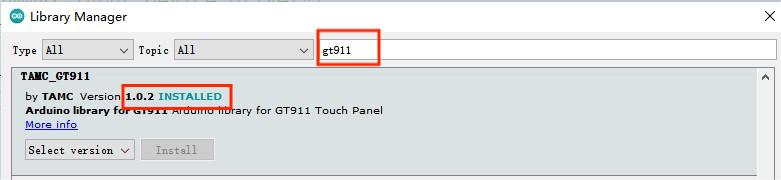
Because MaTouch ESP32-S3 4.0" Display with touch uses the GT911 touch IC, so we need to add the GT911 library to the Arduino library file by Arduino. Open the ui.ino, click the >>tools>>manage libraries, Look for GT911 in the search box, and install it.
We need to set the initialization of the GT911 driver in UI.INO, and at the same time fill in the member variables in the structure object of lv_disp_drv_t to enable the interface communication between the GFX library and lvgl library.
For the simplicity of the main program, we write the initialization function of GT911 separately as a header file, which only needs to be copied the “touch.h” file directly to the same level folder of UI.INO.
“touch.h” link: GitHub
Since we did not use the TFT_eSPI library, we need to delete all the codes related to the TFT_eSPI library.
#include <TFT_eSPI.h>

TFT_eSPI tft = TFT_eSPI(screenWidth, screenHeight); /* TFT instance */

    tft.startWrite();
    tft.setAddrWindow( area->x1, area->y1, w, h );
    tft.pushColors( ( uint16_t * )&color_p->full, w * h, true );
    tft.endWrite();

    tft.begin();          /* TFT init */
    tft.setRotation( 3 ); /* Landscape orientation, flipped */
Define the Header file of GFX_Library for Arduino.
#include <Arduino_GFX_Library.h>
Define the GFX Library For Arduino Interface pin.
Arduino_ESP32RGBPanel *bus = new Arduino_ESP32RGBPanel(
    1 /* CS */, 12 /* SCK */, 11 /* SDA */,
    45 /* DE */, 4 /* VSYNC */, 5 /* HSYNC */, 21 /* PCLK */,
    39 /* R0 */, 40 /* R1 */, 41 /* R2 */, 42 /* R3 */, 2 /* R4 */,
    0 /* G0/P22 */, 9 /* G1/P23 */, 14 /* G2/P24 */, 47 /* G3/P25 */, 48 /* G4/P26 */, 3 /* G5 */,
    6 /* B0 */, 7 /* B1 */, 15 /* B2 */, 16 /* B3 */, 8 /* B4 */
);

Arduino_ST7701_RGBPanel *gfx = new Arduino_ST7701_RGBPanel(
    bus, GFX_NOT_DEFINED /* RST */, 0 /* rotation */,
    true /* IPS */, 480 /* width */, 480 /* height */,
    st7701_type1_init_operations, sizeof(st7701_type1_init_operations),
    true /* BGR */);
Refer to the touch.h file, which is about the initialization and touch and output display functions when GT911 is driven.
#include "touch.h"
Note: Please don't put this declaration at the top of the program, it can only be compiled after the gfx pin definition.
In my_disp_flush function, Choose to call different functions according to whether the macro definition LV_COLOR_16_SWAP is 0
void my_disp_flush( lv_disp_drv_t *disp, const lv_area_t *area, lv_color_t *color_p )
{
    uint32_t w = ( area->x2 - area->x1 + 1 );
    uint32_t h = ( area->y2 - area->y1 + 1 );

#if (LV_COLOR_16_SWAP != 0)
    gfx->draw16bitBeRGBBitmap(area->x1, area->y1, (uint16_t *)&color_p->full, w, h);
#else
    gfx->draw16bitRGBBitmap(area->x1, area->y1, (uint16_t *)&color_p->full, w, h);
#endif

    lv_disp_flush_ready( disp );
}
Modify the touchpad function according to the pre-set functions in touch.h, and pass the state of the touchpad to the LVGL graphics library.
void my_touchpad_read(lv_indev_drv_t *indev_driver, lv_indev_data_t *data)
{
    if (touch_has_signal())
    {
        if (touch_touched())
        {
            data->state = LV_INDEV_STATE_PR;

            /*Set the coordinates*/
            data->point.x = touch_last_x;
            data->point.y = touch_last_y;
        }
        else if (touch_released())
        {
            data->state = LV_INDEV_STATE_REL;
        }
    }
    else
    {
        data->state = LV_INDEV_STATE_REL;
    }
}
In void setup function, Initialize touch function and gfx function.
    touch_init();
    gfx->begin();
    gfx->fillScreen(BLACK);
When the ui.ino is modified successfully, choose the "ESP32-S3 Dev module", flash size is 16MB, PSRAM is OPI PSRAM, and choose the com. verify and upload the code.
Please pay attention to the UI path when saving, it was easy to cover the previous design, and the different projects' UI library was incompatible.
Key point: Add the touch.h file to the same level file of UI.ino.
Initialization of touch function and gfx function.
Delete the unnecessary TFT_eSPI code.
Install the GT911 library as version 1.0.2 and the gfx library for Arduino as version 1.3.1.
Images can only be imported in "png" format.
Result
Upon successfully uploading the application, users will be able to witness the Squareline UI showcased on the screen. Interacting with the UI can be accomplished by tapping or dragging the screen, thereby achieving the touch functionality. This serves as the Squareline Basic Learning guide.
FAQ
You can list your question here or contact techsupport@makerfabs.com for technology support. Detailed descriptions of your question will be helped to solve your question.
Question 1: have I need to modify something in the ui library folder? Answer: users just need to copy the ui library to the Arduino library folder.